Introduction
Quick Responses allow you to send auto-personalised content to a lead or client within seconds. These can be sent via WhatsApp, SMS, email, or other chat apps, without any typing or copy + pasting needed.
When you combine Quick Responses with a library of introductions, follow-ups, and other content, you’ll be able to keep every lead warm and engaged to build strong, personal relationships with minimal effort.
All client notifications such as new lead alerts, follow up reminders, and view alerts open the client screen, so interacting with your clients is always only one tap away.
Sending Quick Responses
SENDING QUICK RESPONSES VIA MOBILE APP
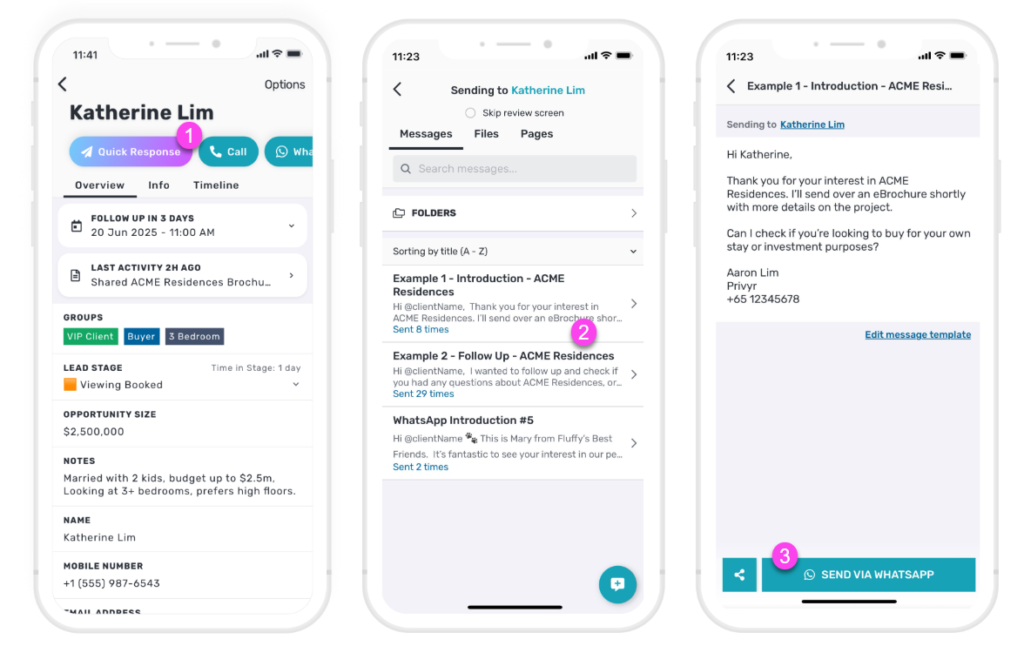
When viewing a client in the Privyr app, tap the QUICK RESPONSES button at the top of the screen and select the message, file, or page you wish to send.
The content will be auto-personalised for the client, and you’ll have a chance to review and make changes before sending. Once you’re ready, click on SEND VIA WHATSAPP (or SMS or EMAIL, depending on your settings).
If the person you wish to send to isn’t on your client list yet, you can add their contact and send them a personalised message in one step via Quick Add & Send Message.
SENDING QUICK RESPONSES VIA DESKTOP
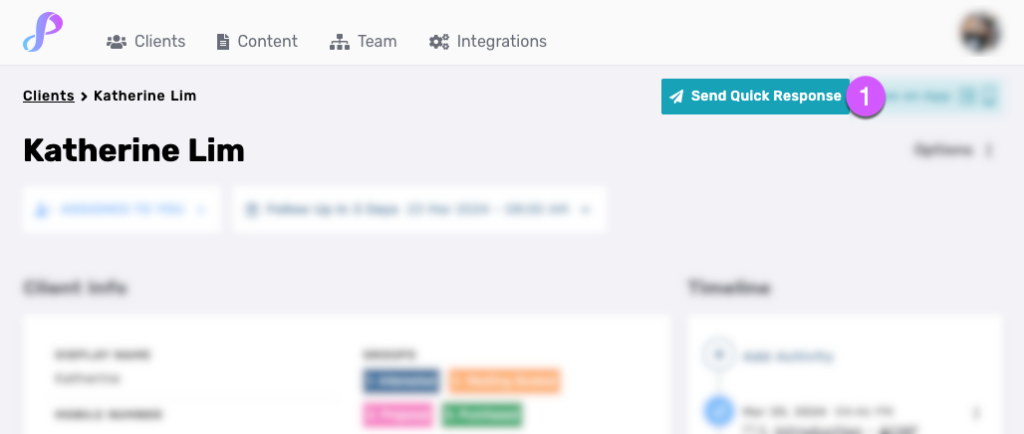

When viewing a client on the desktop web version of Privyr, tap the QUICK RESPONSE button at the top right of the screen.
In the Quick Response modal, select the message, file, or page you wish to send, and whether you want to send it via WhatsApp, SMS, or Email.
If the Skip review screen checkbox is disabled, you will be brought to a review screen where you can edit the message and change the messaging platform before sending your Quick Response.
Otherwise, if the Skip review screen checkbox is enabled, your selected messaging platform will be opened immediately upon selecting your message, file, or page.
Note that Privyr will use the default WhatsApp / SMS / Email application of your device, so you may need to configure your device settings if your preferred application or account isn’t opening correctly.
Tips & Tricks
SELECTING & CREATING CONTENT

When choosing content to send to a client, you can tap to view the Messages, Files, or Pages tab. You can also tap the (+) button to create a message template, which can be reused to send to other clients in the future.
View more information on Managing your Content, Messages, Files, and Pages.
BEFORE SENDING CONTENT
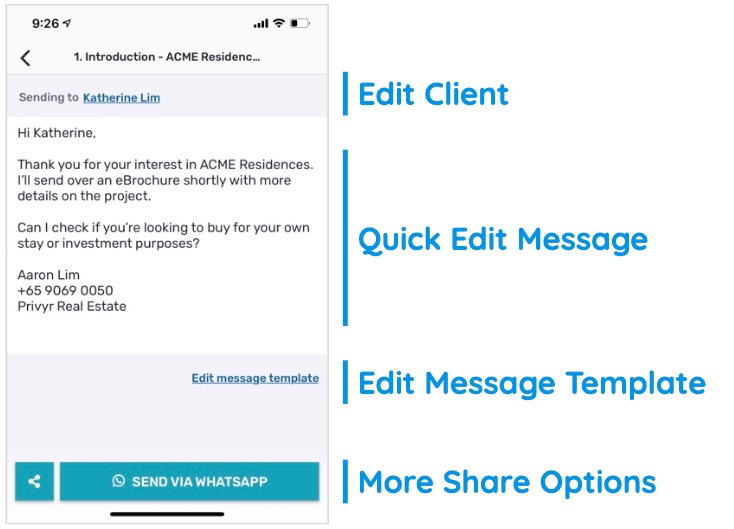
Before sending, you can review the content with several options to edit the client, content, and channel to send through:
- Edit Client – update the client’s details such as display name, phone number, email, etc. View more information on editing clients.
- Quick Edit Message – edit the message for this client, but don’t save the changes for future use.
- Edit Message Template – update the message template and save the changes for future use. View more information on message templates.
- More Share Options – tap the share icon on the left to view more sending options such as WhatsApp, SMS, email, and other applications. You can also edit your default send channel in your account preferences.
AFTER SENDING CONTENT
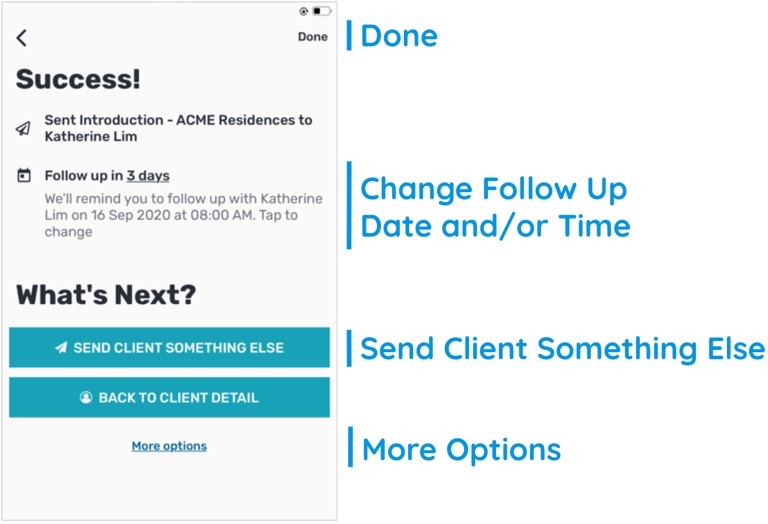
After sending the content, you’ll see a summary of what you sent, the client’s follow up, and suggested actions.
- Click on DONE to proceed back to the client’s detail page. Alternately, click on the back icon to go back and re-send the content (e.g. via another channel).
- The client’s Follow Up reminder will be displayed. Tap it to update the date and/or time.
- If you want to send another item to the client, tap the SEND CLIENT SOMETHING ELSE button and select the next message, file, or page to send.
- Tap on More Options to view the message, file, or page details, or go back to the home screen.
Client Timeline
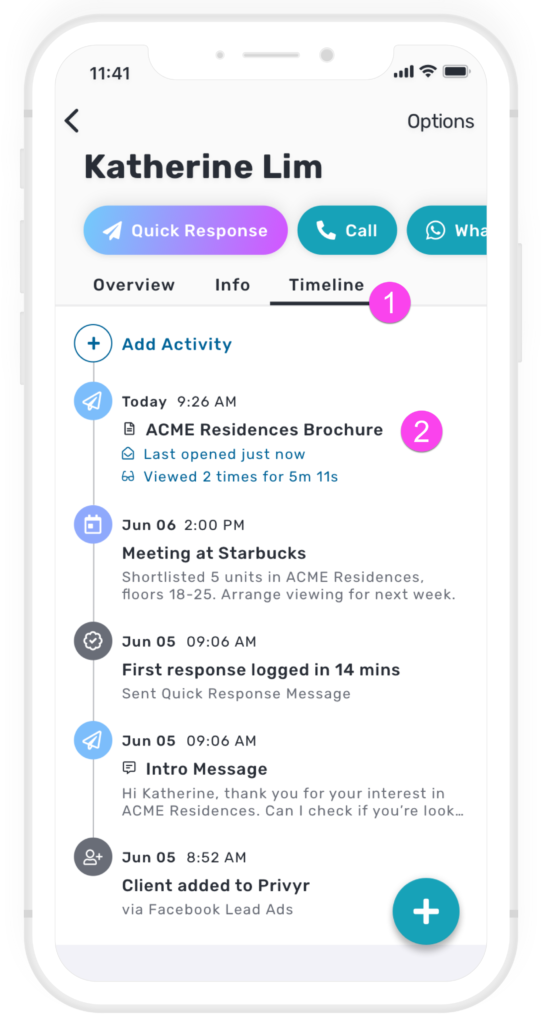
All messages, files, and pages that you send through Privyr will automatically appear on the client’s timeline, giving you a full history of your interactions. Tap on each timeline item to view more options.
These interactions are also saved under the sharing history when viewing the details of a Message, File, or Page.
WhatsApp Auto-Responder
Want to automate the first message to a new lead? You can set up a WhatsApp Auto-Responder to instantly message new leads on WhatsApp. Any new lead you receive via your integrations will be immediately and automatically messaged from your own WhatsApp number, even when you’re busy or offline.
All messages are sent from your existing WhatsApp Business number, so you can view and continue all conversations directly in the WhatsApp Business app on your phone or laptop.
Privyr’s Auto-Responder works through WhatsApp’s official APIs (Privyr is a verified Meta Business Partner), keeping your WhatsApp account and data safe while complying with WhatsApp’s Terms and Conditions.
For more information on setting this up, view our full guide on WhatsApp Auto-Responder.