Introduction
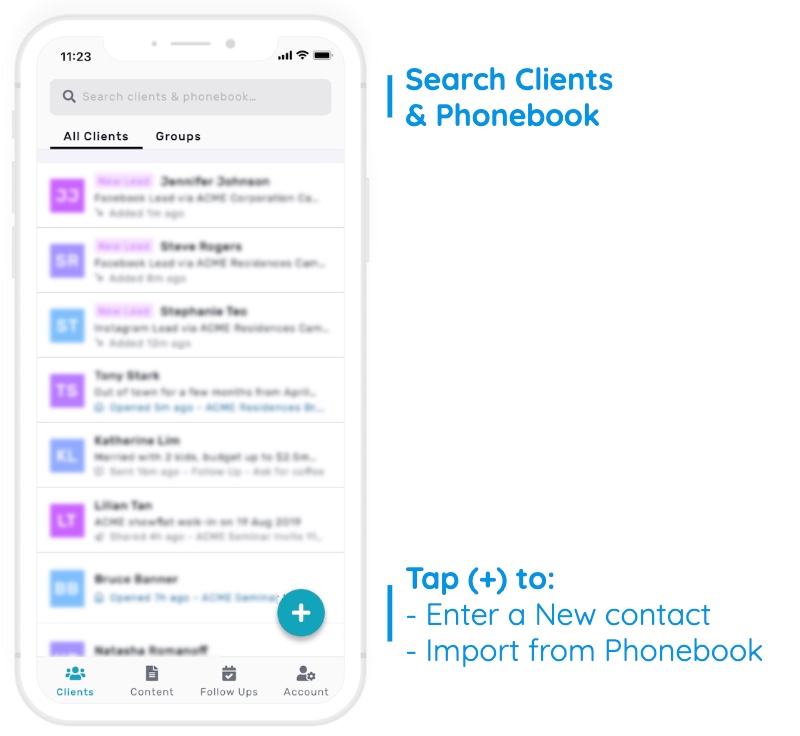
Privyr makes it quick and easy to enter new contacts, import from your phonebook, or connect to your website, Facebook, TikTok, and other lead sources so that your leads and clients are always at your fingertips.
If you’re always meeting new people, you can use our Quick Add & Send Message feature to send a personalised message to someone you just met, without having to add them to your phonebook.
Adding Contacts & Importing from Phonebook
You can add and import contacts from your contact list via two methods:
- Search Bar: use the search bar at the top to find contacts across your client list and phonebook. Tap on a phonebook contact to immediately start importing them.
- The (+) Button: tap the (+) button to manually enter a new contact or import up to 50 contacts from your phonebook at once.
Note viewing and importing of contacts from your phonebook requires permissions to your phone’s contacts. If you don’t see your phonebook contacts when searching or importing, check your phone settings and grant Privyr access to phone contacts.
Quick Add Contact & Send Message
If you’ve just met someone in person (or virtually) and want to send them a personalised message to connect immediately, you can do so in one step via the Quick Add & Send Message feature.
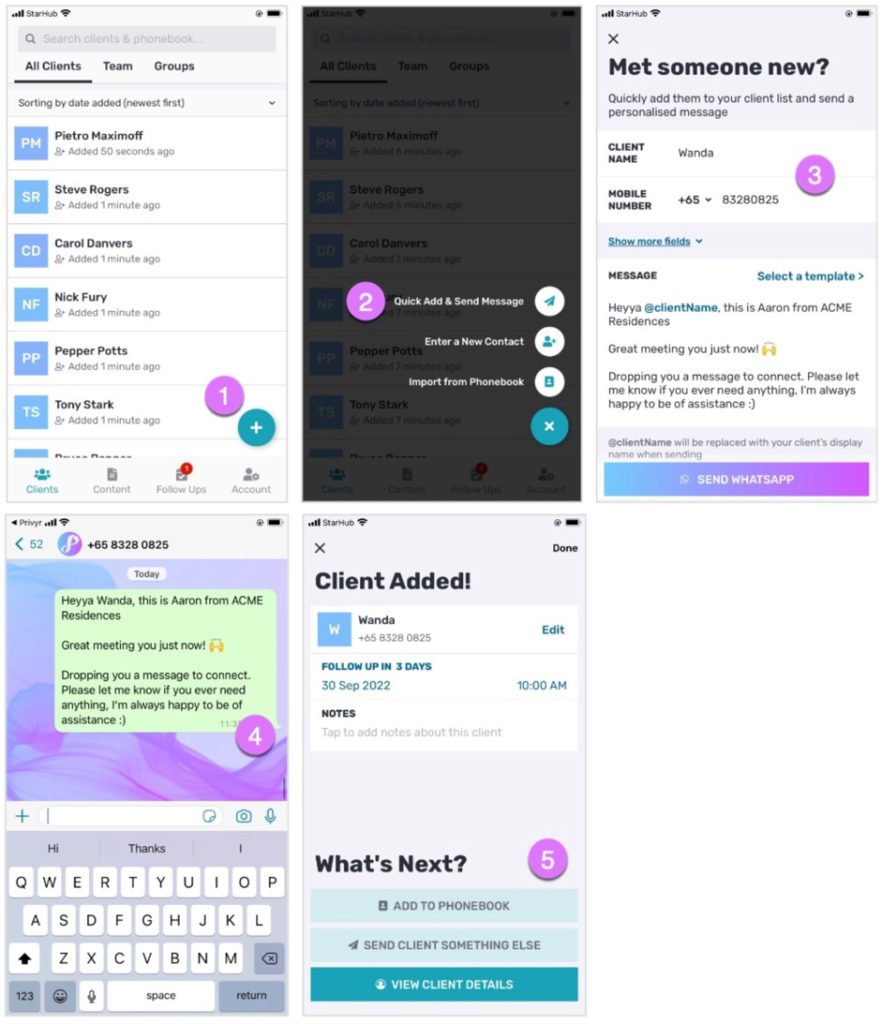
- On your Client List, tap the (+) button
- Select Quick Add & Send Message
- Enter the contact’s name and number, then tap SEND WHATSAPP (or SMS / Email, depending on your settings)
- You can tap-and-hold on SEND WHATSAPP to change to SMS or email
- This will immediately send the personalised WhatsApp message
- The contact will be added to your client list, and you’ll be able to set a follow up, add notes, add to your phonebook, or send something else.
The auto-personalised message can be fully customised or selected from one of your existing message templates. The last sent message will be saved and pre-populated the next time you Quick Add & Send.
Entering a new Contact
When entering a new client, you’ll be shown a simplified form with the following fields:
- Client Name is only visible to you within the Privyr app for easy reference and searching, and is never shown to your client. It is usually the same as the contact name in your phonebook. This field is required.
- Display Name is used for auto-personalisation and is shown to your clients on content that you send them, such as in your messages, files, and pages. Make sure this is appropriate to be seen by your client. It is usually just the client’s first name (e.g. ‘Katherine’) but can also be a more formal salutation (e.g. ‘Ms. Lim’) depending on your relationship. This field is optional.
- Mobile Number is the phone number of your contact, and used to enable quick-sending of content via apps like WhatsApp or SMS. This field is optional.
- Notes are for you to remember details about the contact, such as their preferences and requirements. These are private to you, and never shown to your clients. This field is optional.
If you wish to add more details, tap on the MORE FIELDS button to show the following fields:
- WhatsApp Number is for you to enter a number that the client uses for WhatsApp, if it is different from their mobile number. If left blank, it will be assumed to be the same as their mobile number. This field is optional.
- Email Address is the email of the contact, and is used to enable quick sending of content via email. This field is optional.
Once you’re done, tap the SAVE button to create the contact in your Privyr account. You can always edit or delete the contact at any time.
Note that the app will warn you if the contact already exists in your Privyr account, so you won’t have to worry about duplicates.
Saving to Phonebook

You can quickly save a contact from Privyr to your phonebook without having to copy and paste their details. When viewing the client in Privyr, tap on the Options menu in the top right of the screen, followed by Add to Phonebook.
This is useful when you created a contact in Privyr before adding them to your phonebook, or received a new lead to your account via your website or Facebook Lead Ads integration.
Note that the app will warn you if the contact already exists in your phonebook, so you won’t have to worry about duplicates.
Editing Clients
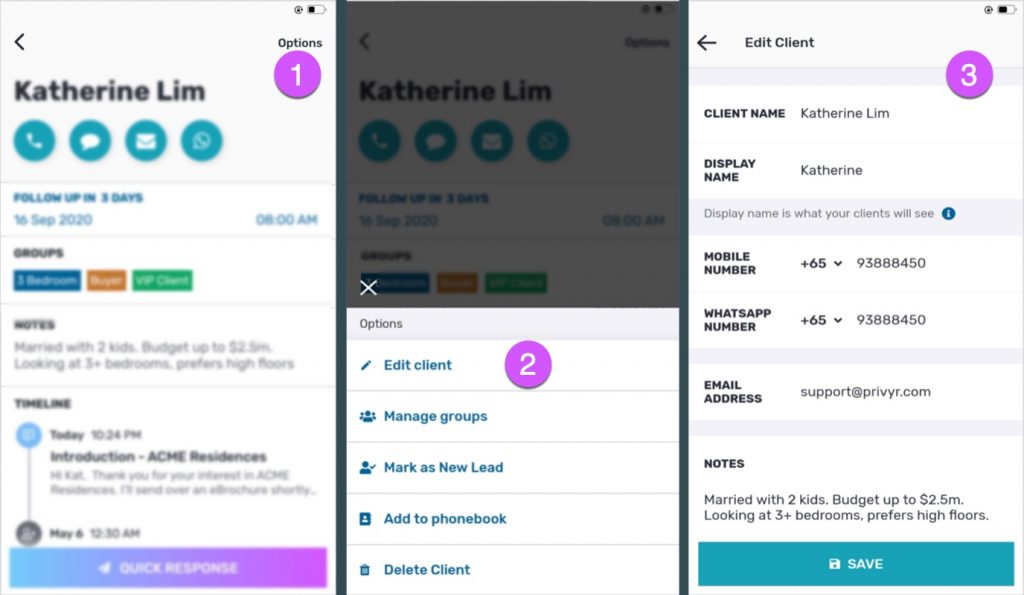
When viewing a client in Privyr, you can edit their contact details by tapping the Options menu in the top right of the screen, followed by Edit Client.
Note that changing the Display Name will also update the name shown on any files or pages that you previously shared with the contact.
Deleting Clients
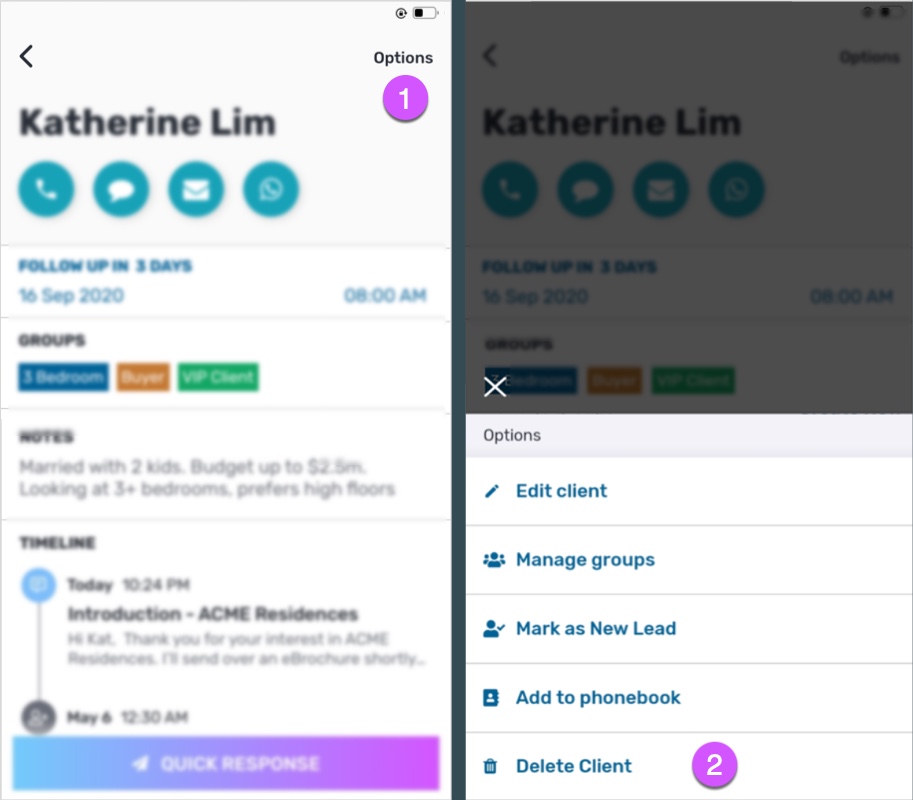
When viewing a client in Privyr, you can delete their record by tapping the Options menu in the top right of the screen, followed by Delete Client.
You can also delete multiple clients at a time via the bulk actions feature on your client list.
Note that deleting a client will permanently remove them from your Privyr client list, along with any associated data in Privyr. All file or page links previously shared with the client will also be made invalid. However, this does not delete or affect any data in your phonebook.
Other Ways to Add Clients to Privyr
Lead Source Integrations
You can connect your Privyr account to lead sources such as your website, Facebook Lead Ads, TikTok Lead Generation, LinkedIn Lead Gen Forms, Google Forms, WordPress, Wix, Typeform, Zapier, and much more via Privyr’s lead source integrations.
Import Clients from Spreadsheet
If you have many existing contacts that you want to add to Privyr, you can import them in bulk from a spreadsheet.