Introduction
Pages are simple websites that contain text, images, videos, maps, and other types of content. These pages are auto-personalised for the lead or client, feature your branding and contact details, and even let you track when they are viewed.
You can add unlimited pages to your account to help you organise and share information on your products, services, events, and anything else you may need. This can all be done directly within the Privyr app, without any additional platforms or hosting required.
Your Page List
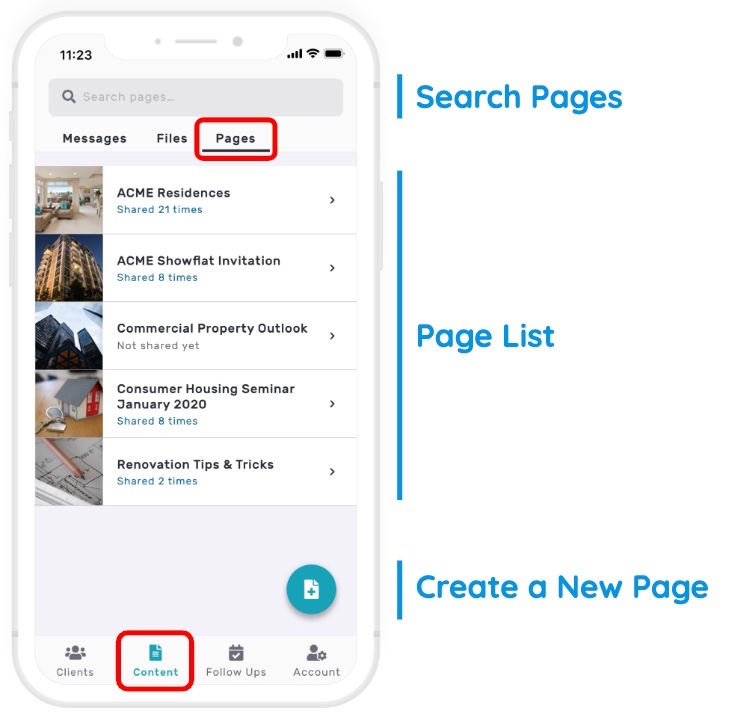
To view your pages, tap the Content icon in the footer and select the Pages tab at the top.
Your Page List shows all pages you’ve created or have access to, sorted by title. It also displays how many clients you’ve shared each page with. Tap on a page to view more details and send, edit, or delete it.
Use the search box at the top of the screen to find specific pages, or tap the (+) button at the bottom to create a new page.
Quick Tip: you can set your Page List to open as the default Content tab under your Account Personalisation settings.
Page Details
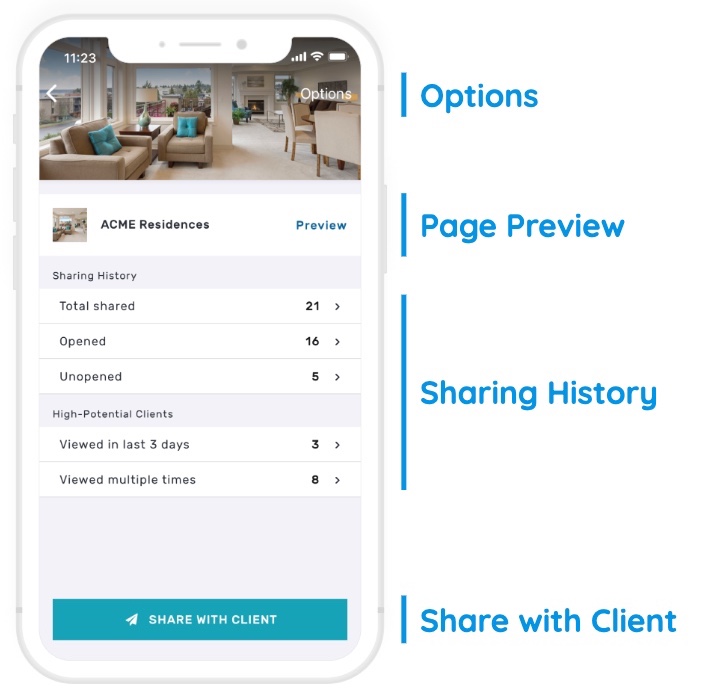
Open a page from your page list to view all details and actions related to it.
Tap the Preview button to see what the page looks like to your clients. Note that the @clientName token will be automatically replaced with the client’s display name when they view it.
The Sharing History shows information on the clients you’ve shared the page with, and how they’ve interacted with it. Tap on any item to view a list of the clients with more details and options available.
- Total Shared is all clients you’ve shared the page with
- Opened are clients that have opened the page at least once
- Unopened are clients that you’ve shared the page with, but haven’t opened it yet
- Viewed in last 3 days are clients that last viewed the page in the past 3 days
- Viewed multiple times are clients that viewed the page two or more times
The SHARE WITH CLIENT button at the bottom allows you to quickly send an auto-personalised version of the page to one or more clients. Just tap this button and select the client you wish to share with, or Bulk Send to up to 50 clients at once.
Tap on the Options button in the top right to edit the page, edit the default message, or delete it.
Page Branding
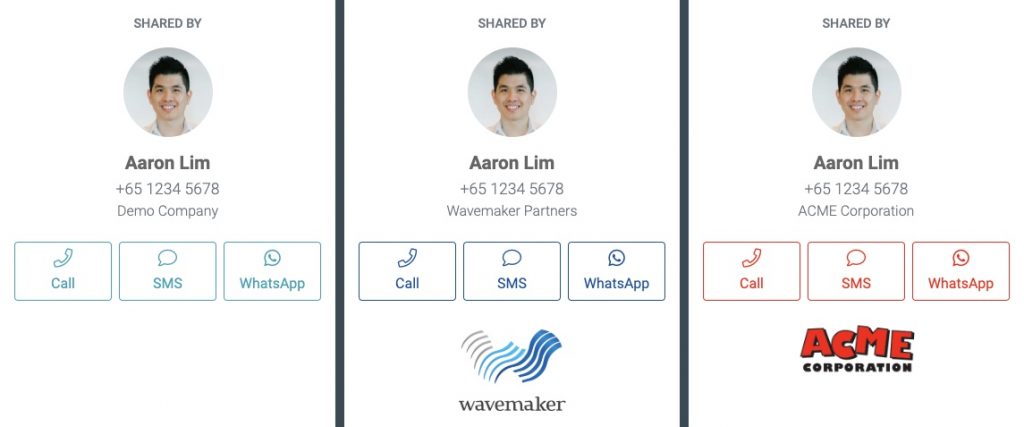
All pages sent through Privyr will automatically feature your contact details and branding at the bottom of the screen, alongside clickable buttons to call, SMS, or WhatsApp you.
This helps to build a stronger brand presence and relationship with your clients, and makes it easy for new leads quickly get in touch with you if your pages are being forwarded to others.
You can also apply custom branding to your account, featuring your own logo and colours on all files and pages you send (see examples in the image above). The link URL can also be customised with your own branding. These customisations can be configured under your Account Settings > File & Page Branding.
Tracking Page Views

All pages sent through Privyr are trackable, and will give you real-time alerts whenever your leads or clients view them. Tap the alert to view the client’s timeline with more details such as how many times they’ve opened the page and the total time they’ve spent viewing it.
Note that you can adjust your Notification Settings to customise what type of alerts you get when leads view your pages.
You can also see the full sharing history of a page on the page details screen, which shows all clients that the page has been shared with, who has and hasn’t opened it, who viewed in the last 3 days, and who has viewed it multiple times.
If you want to see all clients who viewed any of your pages in the last 7 days, you can open the Recently Active group under the Groups tab of your Client List.
Detailed Page View Stats
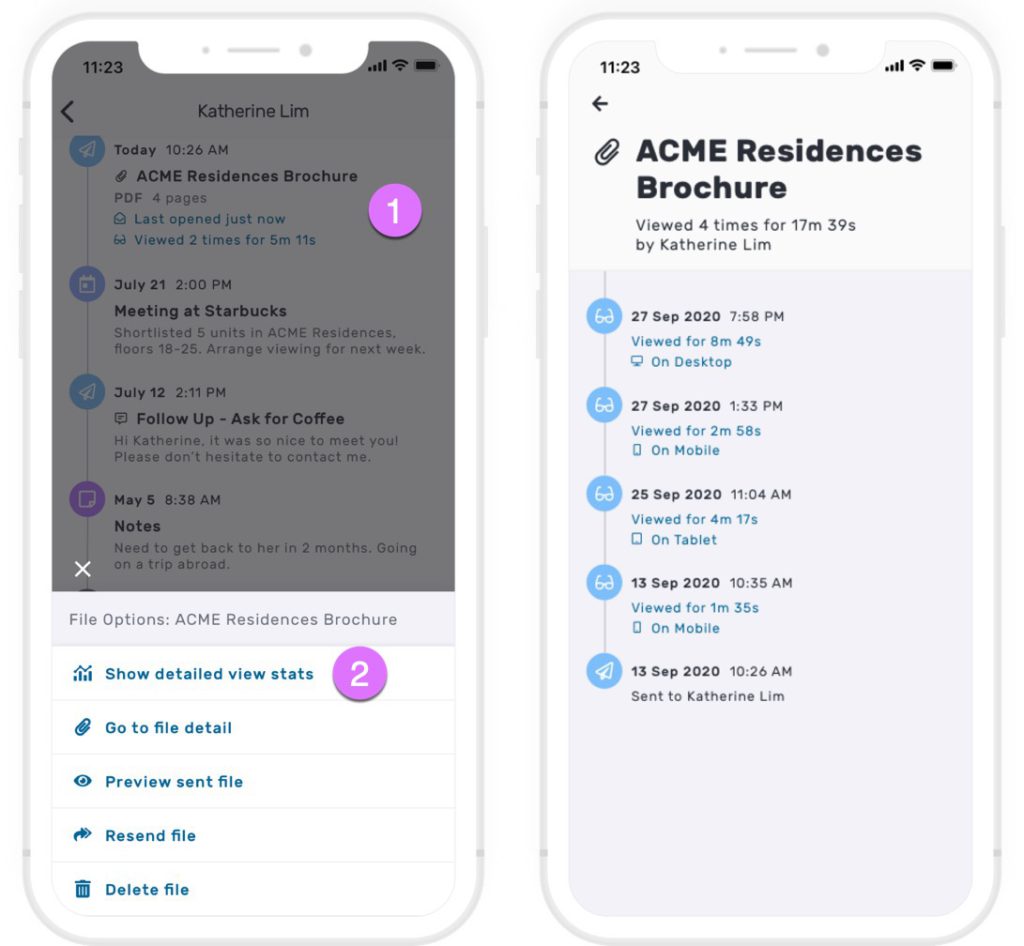
You can see detailed view stats showing a breakdown of all views by a specific client on a page, including the date and time of each view, the time spent viewing, and even what type of device it was viewed on.
Simply tap the page on the client’s timeline (or tap the client from your page’s sharing history), then select ‘Show detailed view stats’.
Creating Pages
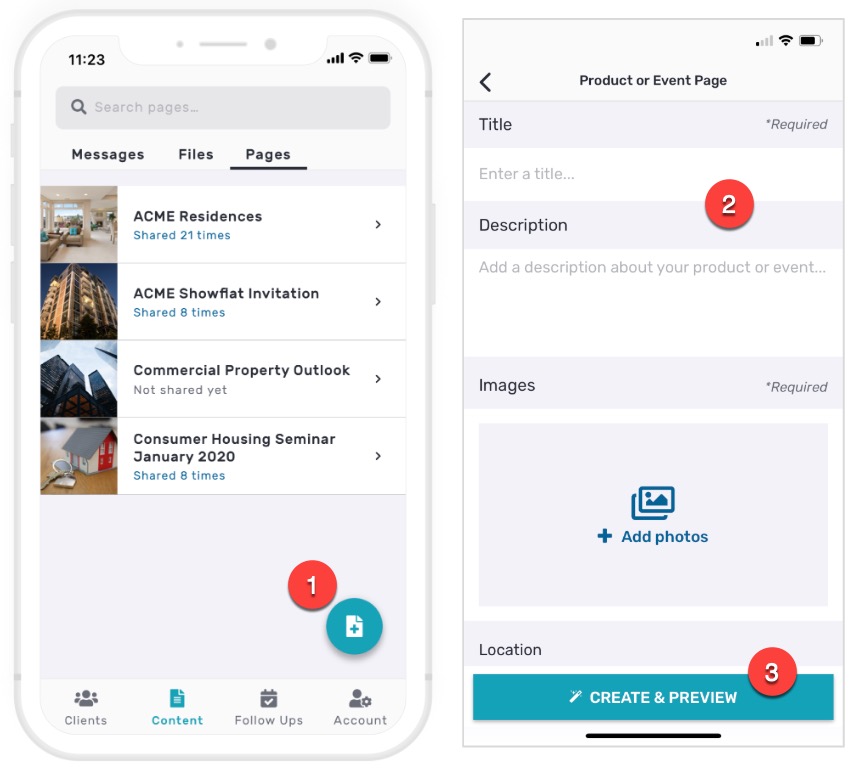
Tap the (+) button on your page list and select a design template to start creating a new page.
Every page will have a title, description, and images, and may optionally include other details such as website link, file attachment, YouTube video or Google Map location.
Once you’re done, tap the CREATE & PREVIEW button to save the page and see how it looks. Once completed, the page will appear in your page list and can be viewed, sent, edited, or deleted at any time.
Editing and Deleting Pages
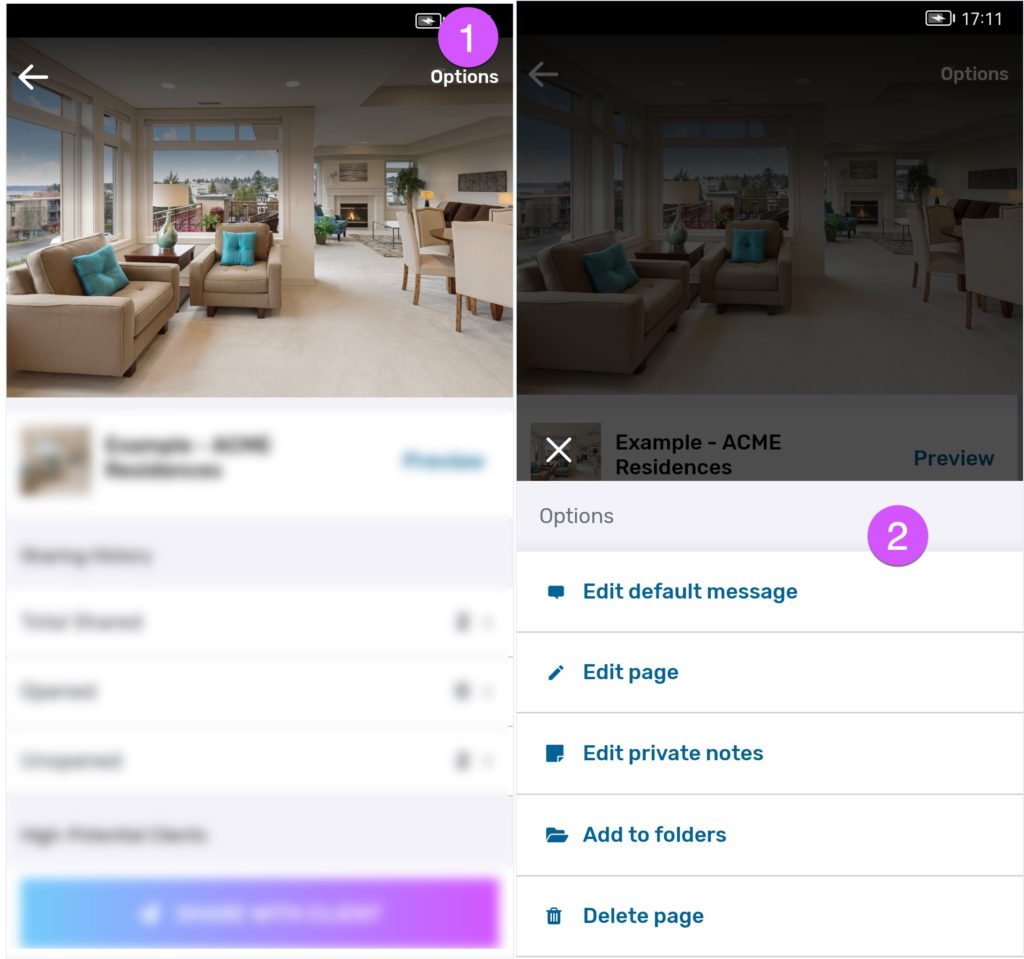
When viewing a page, you can tap on the Options menu in the top right of the screen to perform a few actions:
- Edit default message to update the default text message that is included every time you send the page to a client. This can be used to provide more information or context before the client opens the page.
- You can use @variables to automatically insert client details and sender details in your default message
- Client @variables: @clientName, @clientEmail, @clientPhone, and more.
These tokens automatically personalise your message with your client’s display name and other information, making the message more warm and personal. - Sender @variables: @senderName, @senderCompany, @senderPhone, @senderEmail, and more.
These tokens automatically insert the current sender’s information, keeping messages up-to-date and accurate across team members and organisations.
- Client @variables: @clientName, @clientEmail, @clientPhone, and more.
- You can use @variables to automatically insert client details and sender details in your default message
- Edit page to change the page content such as title, description, images, and other details. Note that changing the page will automatically update all previously sent links to show the new content, ensuring everyone sees the latest version.
- Add private notes if you wish to include any private details about your page.
- Add to folders to organise and manage your pages, such as by creator, product or service, or any other categorisation you like.
- Delete page to permanently remove it from your page list, along with any associated data in Privyr. All previously shared page links will also be made invalid, so be careful about deleting pages that your clients may try to view again in the future.
Page Folders
Create and use custom folders to help manage and organise your page templates, such as by creator (if you are using Privyr with a Team), product or service, or any other categorisation you like. You can add unlimited pages per folder and multiple folders per page.
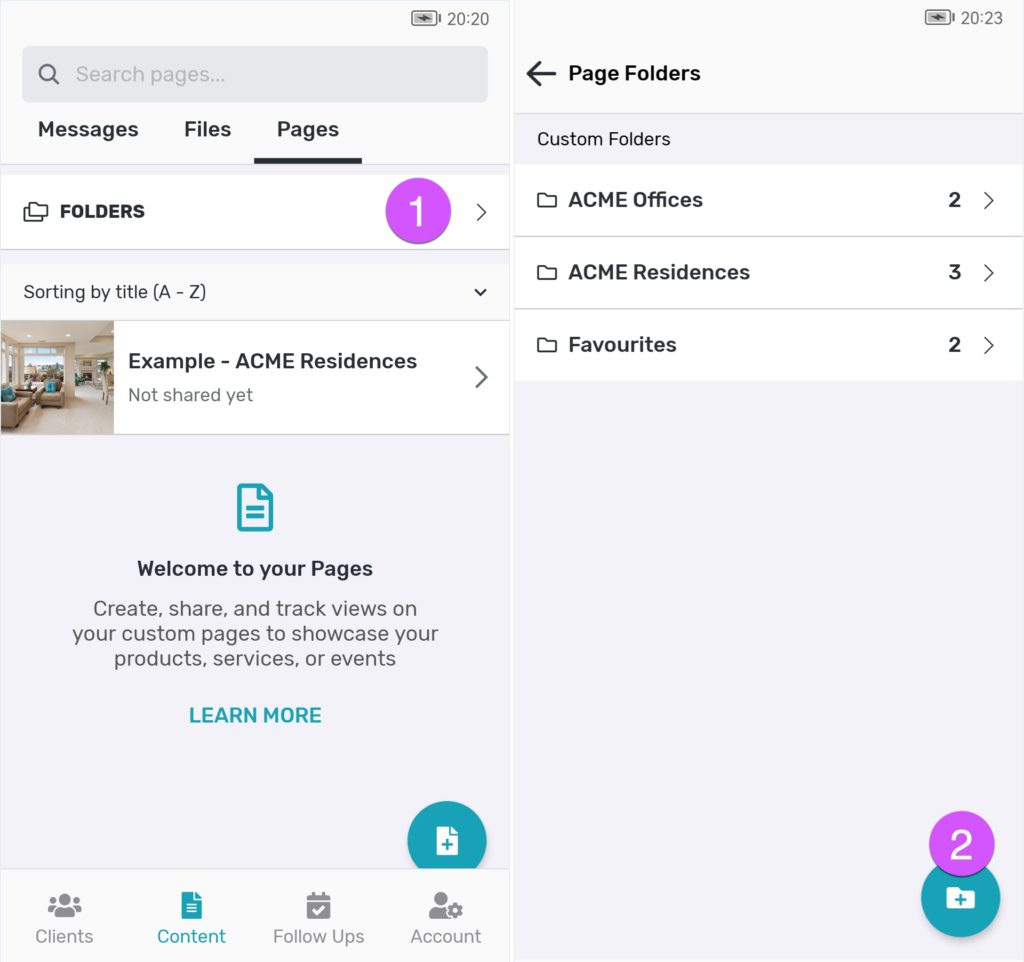
To create a new folder, tap Folders followed by the (+) button on your Pages tab.
To add a page to a folder, tap Options when viewing a page and then tap Add to Folders. You can add the page to an existing folder, or create a new one by tapping Create New.
Bulk Page Actions
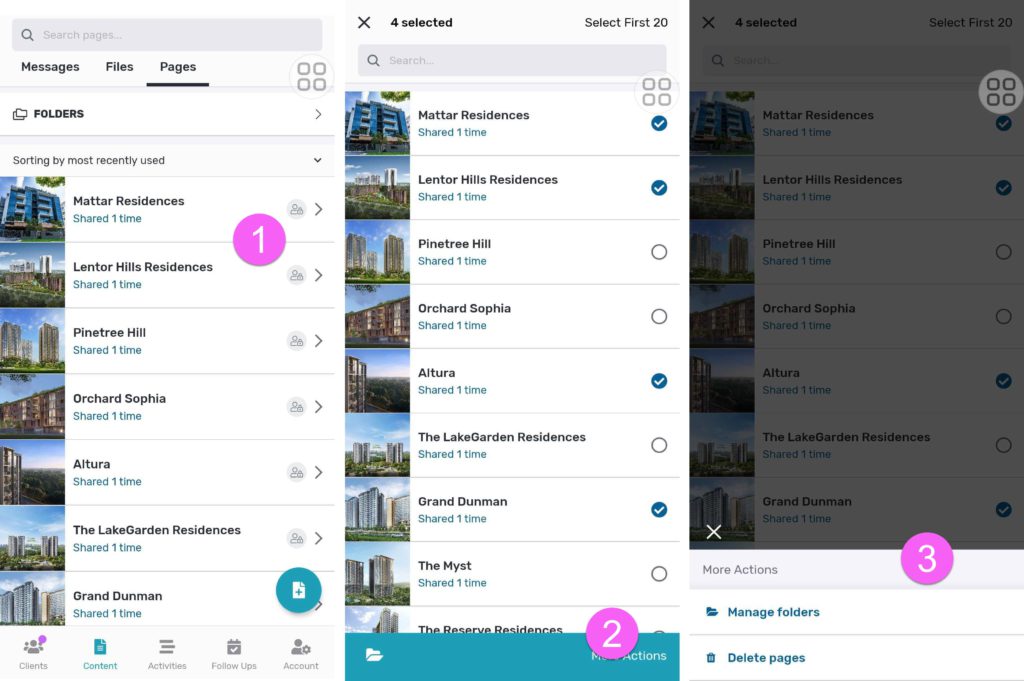
From your Page template list or Page template search results screen, tap and hold on any Page template to trigger multi-select mode and perform bulk actions. You can select up to 20 Page templates at a time (you can also bulk-select up to 20 at a time via the Select First 20 button in the top right), with options to perform the following actions:
- Manage folders for all selected Page templates
- Delete all selected Page templates
Share Access to your Page Templates
You can allow other Privyr users to add copies of your Page templates to their accounts and share them with their clients under their own name and branding.
To find out more about how to share access to your Page templates with other Privyr users, see Share Access to Content Templates