Introduction
Create and use Custom Groups to help manage and organise your clients, such as by product, interest level, stage, or any other categorization you like. You can create up to 100 custom groups, with unlimited clients per group and multiple groups per client.
Tap on a group to view all clients within it, with the ability to perform bulk actions such as sending content, managing groups, or setting follow ups for up to 50 clients at a time.
Your Groups Tab
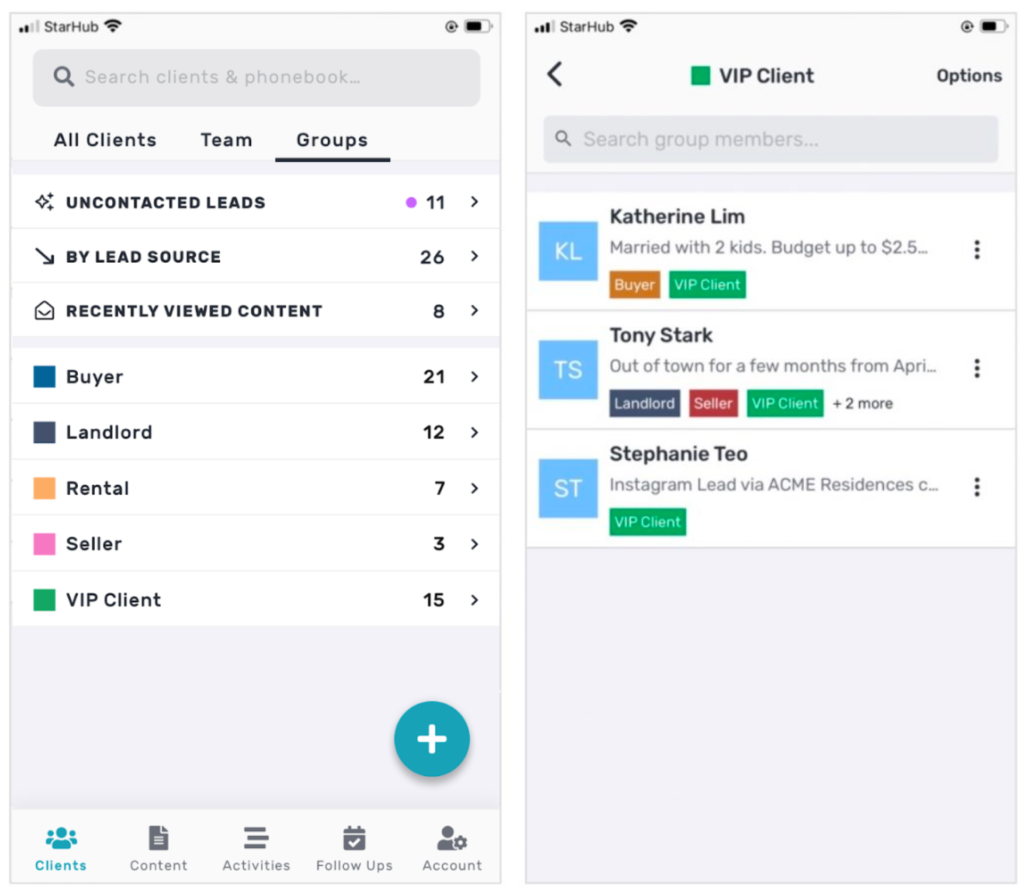
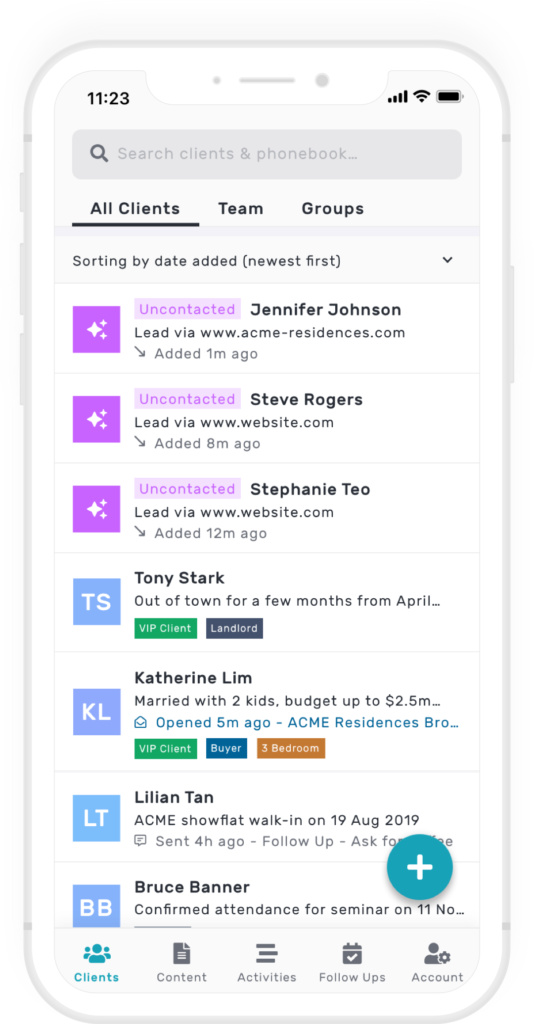
The Groups tab on your Client List displays the default groups as well as any custom groups you’ve created. The following default groups will always be displayed at the top of the screen:
- Uncontacted Leads that you haven’t acted on yet. This list shows the most recently received leads first, with a purple dot highlighting new leads since you last checked the list.
- Clients who Recently Viewed Content, which are those who opened one of your file or page links in the last 7 days. This list will be sorted by the most recently viewed, with a purple dot highlighting new views since you last checked the list.
You can create, manage, and edit up to 100 custom groups, which will be displayed in alphabetical order below the default groups.
Tap on any group to view the members of the group. You can tap on any client to view their client details, or tap and hold to select multiple clients and initiate bulk actions.
Creating Groups
You can create new Groups through the Privyr app or the Privyr web, with the following fields:
- Group Name is the title of the group. Each group must have a unique name.
- Group Color lets you choose the color of the group label, to visually identify it.
You can create up to a maximum of 100 groups in your account, and can edit or delete them at any time.
Via the Mobile Privyr App
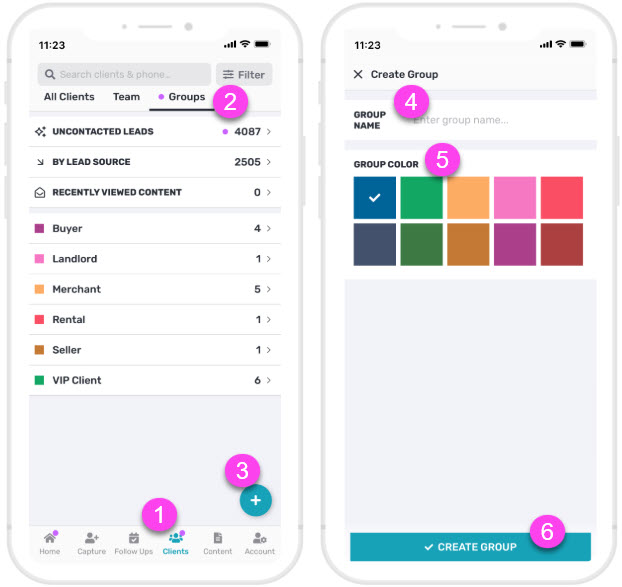
- Go to the Clients tab > Groups
- Tap the (+) button
- Enter the Group Name and select the Group Color
- Tap the CREATE GROUP button to save it to your Groups list.
Via the Privyr Web
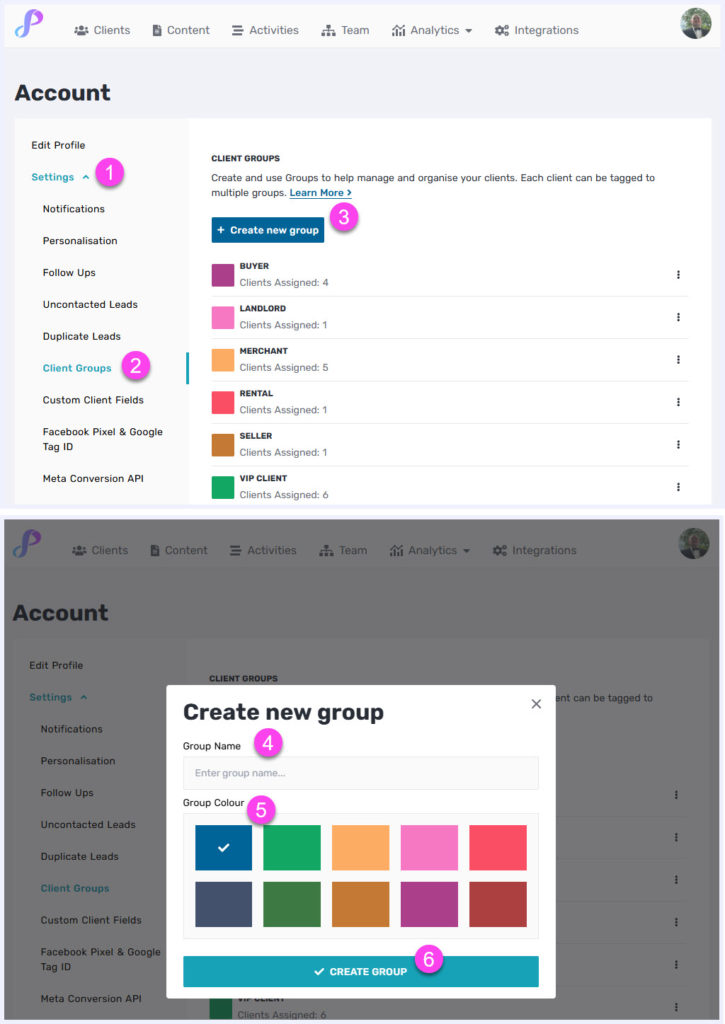
- Click the profile photo in the upper right-hand corner
- Go to Settings
- Select Client Groups
- Click + Create new group
- Enter the Group Name and select the Group Color.
- Click the CREATE GROUP button to save it to your Groups list
Adding Clients to Groups
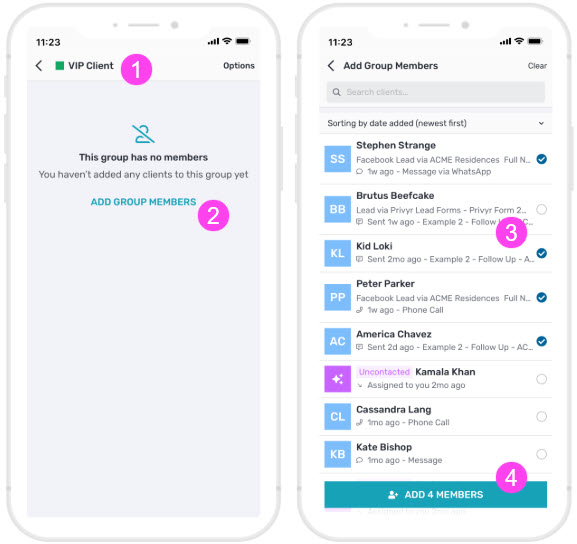
Once you create a Group, you’ll be taken to the Group Details screen where you can add members to the group. Tap on ADD GROUP MEMBERS and select any clients you wish to add to the group.
A group can have unlimited members, and each client can be added to multiple groups at a time.
Via the Mobile Privyr App
Once you create a Group, you’ll be taken to the Group Details screen, where you can add members to the group via these steps:
- Click Add Group Members
- Select the Clients you want to add to the Group
- Click the ADD X MEMBERS at the bottom
A group can have unlimited members, and each client can be added to multiple groups at a time.
You can also add clients to a group via bulk actions on your client list or client search results, or by tapping the Groups section on the client details screen.
Via the Privyr Web
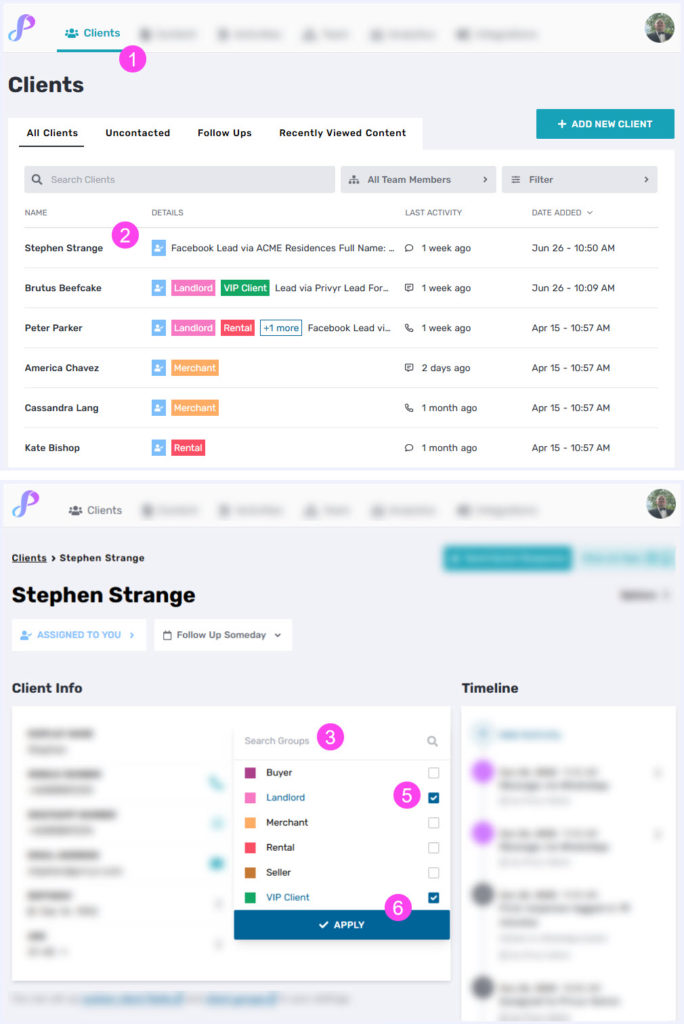
- Go to the Clients tab
- Select the Client
- Click the Groups field
- Select the Groups you want to assign the client to
- A group can have unlimited members, and each client can be added to multiple groups at a time.
- Click APPLY
Groups on the Client List
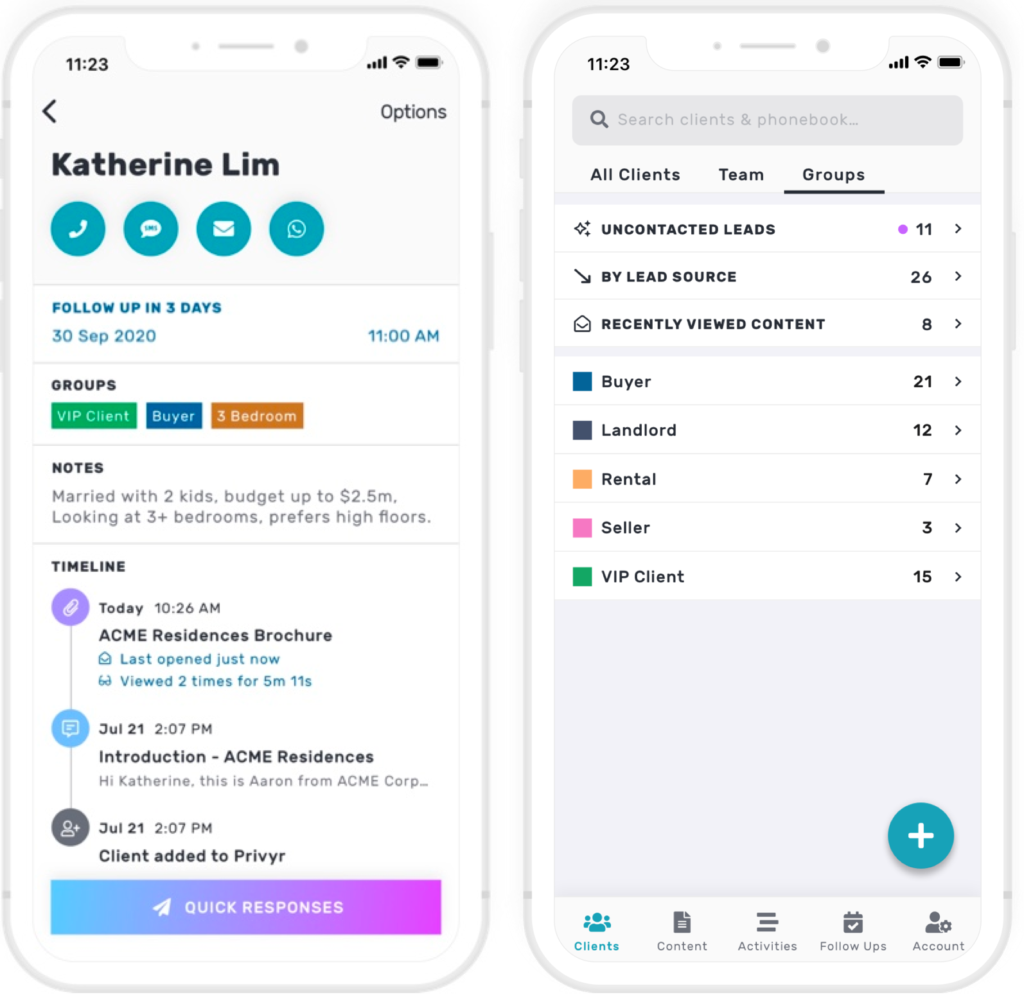
When viewing your client list, the Groups that each client is a member of will be displayed below their name. If a client is in multiple groups, the first 3 groups will be shown in alphabetical order, with a plus sign and count to indicate how many more groups the client is a part of.
You can tap and hold on any client to trigger multi-select mode and perform bulk actions on up to 50 clients at a time, which includes adding or removing multiple clients to/from multiple groups.
Groups on Client Details
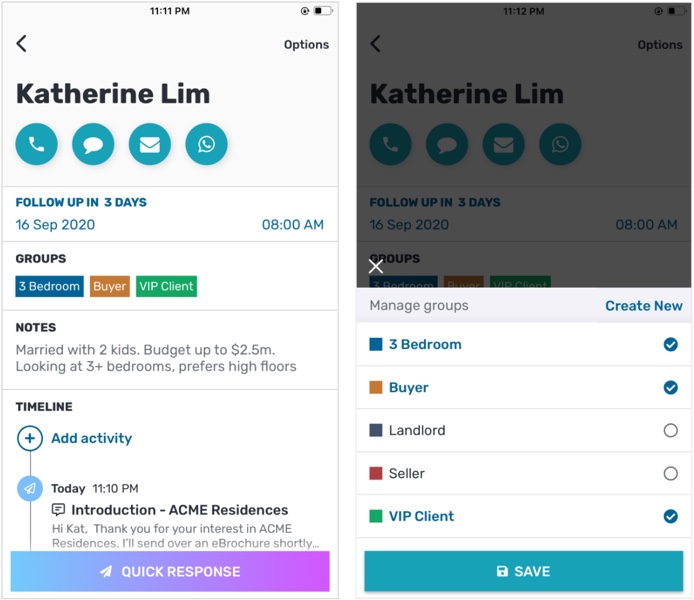
When viewing the client details screen, you’ll see a GROUPS section that indicates which groups a client is currently a member of. Tap on the GROUPS section to add or remove the client from each group, with the option to quickly Create New if needed.
The GROUPS section will be hidden if you haven’t created any groups yet. If the section is hidden, you can still create and add the client to a group via the Options menu > Add to Groups.
Editing and Deleting Groups
Via the Mobile Privyr App

When viewing a custom Group from your Groups tab, you can tap on the Options menu in the top right of the screen to perform a few actions:
- Bulk Actions to trigger multi-select mode and perform bulk actions on up to 50 clients at a time. You can also tap and hold on any client from the list to trigger multi-select mode. Note that the Bulk Actions option will not be shown if the group does not have any members yet.
- Edit Group Details to change the group name or group color.
- Delete Group to permanently remove it from your groups list and any associated clients. This will not delete any clients.
Note that you are not able to edit or delete the default New Leads or Recently Active groups.
Via the Privyr Web

To access the Client Groups on the Privyr web, you can easily click your profile photo on the top right corner, then go to Settings and select Client Groups.
Then, click the three-dotted button (…) next to the Group Name to perform a few actions:
- Edit Group to change the group name or group color.
- Delete Group to permanently remove it from your groups list and any associated clients. This will not delete any clients.
Bulk Sending Content to a Group
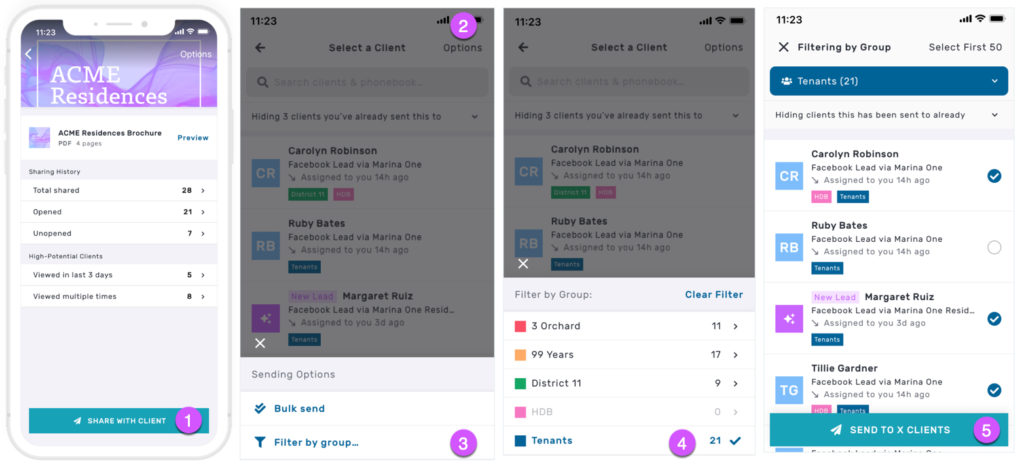
If you need to contact or engage with clients by group, you can bulk send auto-personalised content to selected or all clients within a specific group.
When viewing a Message, File, or Page, tap on the SHARE WITH CLIENT button at the bottom to show the Select Clients screen. Tap on Options at the top right of the screen and select Filter by group to view and select from your groups list.
Simply tap on Select First 50 at the top right, or select as many clients as you wish from the list, up to 50 at a time, then tap the SEND TO X CLIENTS button at the bottom to proceed with bulk sending. View more about bulk sending to clients in a group.