Introduction
You can create team accounts in Privyr to coordinate on leads and manage clients across multiple people on your team.
Once you invite your colleagues to your team, you can set up lead automation rules to automatically assign new leads in a round robin distribution, or leave leads unassigned so that everyone gets an alert and whoever is free can claim and respond to the lead.
You’ll also be able to set permissions for each team member to control the types of clients they have access to view. For example, some team members may be able to view all clients across the team, while others may only have access to view the clients that are assigned to themselves.
Admin accounts have full control over their team and data, and can invite, change permissions, or deactivate team accounts at any time.
Inviting Team Members
You can invite people to your team on Privyr via the following steps:
- On Privyr Web, go to your Team > Team Members tab
- On the Mobile App, go to your Account tab > Manage Team
- Click + INVITE MEMBERS

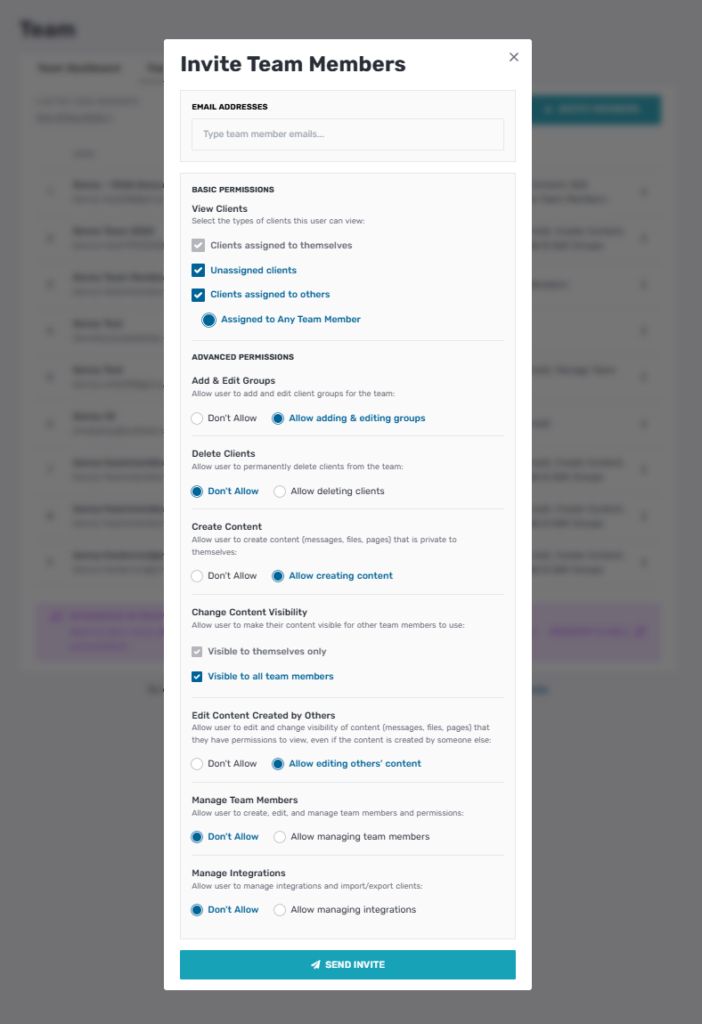
- Enter the Email Addresses of the people to invite, and select the permissions to grant them:
- View Clients
- Clients assigned to themselves: Users will always be able to view and act on clients that are assigned to themselves.
- Clients assigned to others: Allow user to view clients that are assigned to other team members. This also allows the user to assign and/or reassign clients to themselves or their teammates.
- Unassigned Clients: Allow user to view and claim clients that are unassigned (e.g. clients not assigned to anyone yet).
- Add & Edit Groups
- Allow user to add and edit client groups for the team.
- Delete Client
- Allow user to permanently delete clients from the team. This can only be done for clients that are currently assigned to themselves.
- Create Content
- Allow user to create content (messages, files, pages, sequences) that is private to themselves.
- Change Content Visibility
- Allow user to make their content visible for other team members to use.
- Visible to themselves only
- Visible to subteams they have access to
- Visible to all team members
- Allow user to make their content visible for other team members to use.
- Edit Content Created by Others
- Allow user to edit and change the visibility of content (messages, files, pages, sequences) that they have permission to view, even if the content is created by someone else.
- Manage Team Members
- Allow user to create, edit, and manage team members and their permissions. Note that they won’t be able to edit the Admin Account’s permissions or access.
- Manage Integrations
- Allow user to manage integrations and import/export clients.
- Click on SEND INVITE to send the invitations via email
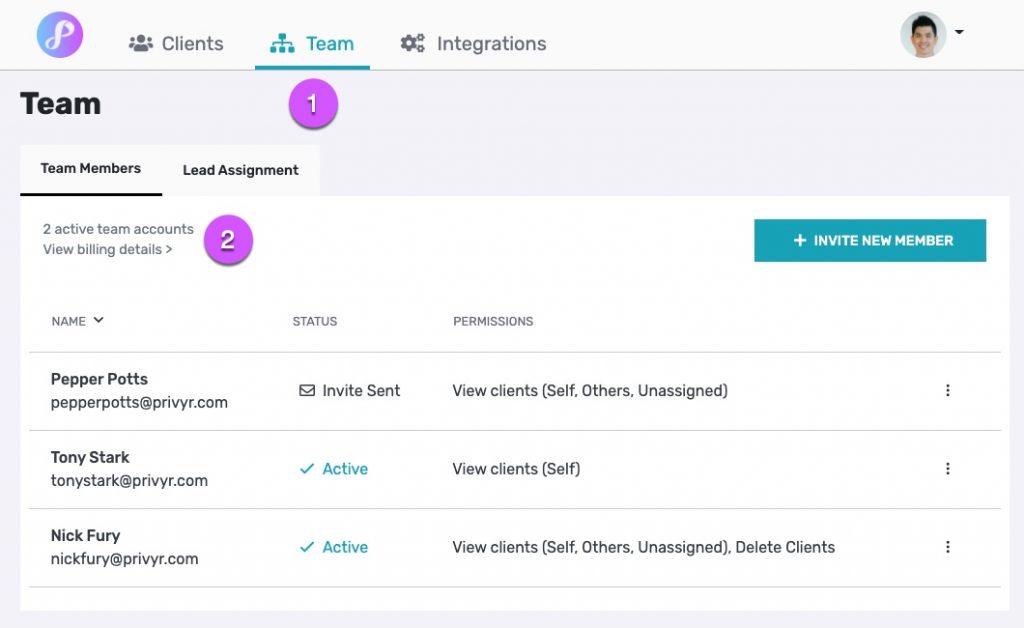
Once you’ve invited your team member(s), they’ll receive an email prompting them to download and log into the Privyr app to activate their account. You can view the status of your invitations on your Team Members dashboard.
- If a user’s status is ‘Invite Sent‘, it means they have been sent the invitation email but have not logged in to activate their account yet. You can click the ‘…’ on the right side of the table and choose to Resend Invite or Cancel Invite.
- Once a user has logged in and activated their account, their status will appear as ‘Active‘
Note that billing for team accounts starts once they have been invited and reactivated. However, if you’re still on free trial and/or are not subscribed, you won’t be charged for any accounts until your free trial ends and you subscribe to Privyr. View more details under Billing for Team Accounts.
Managing Team Members
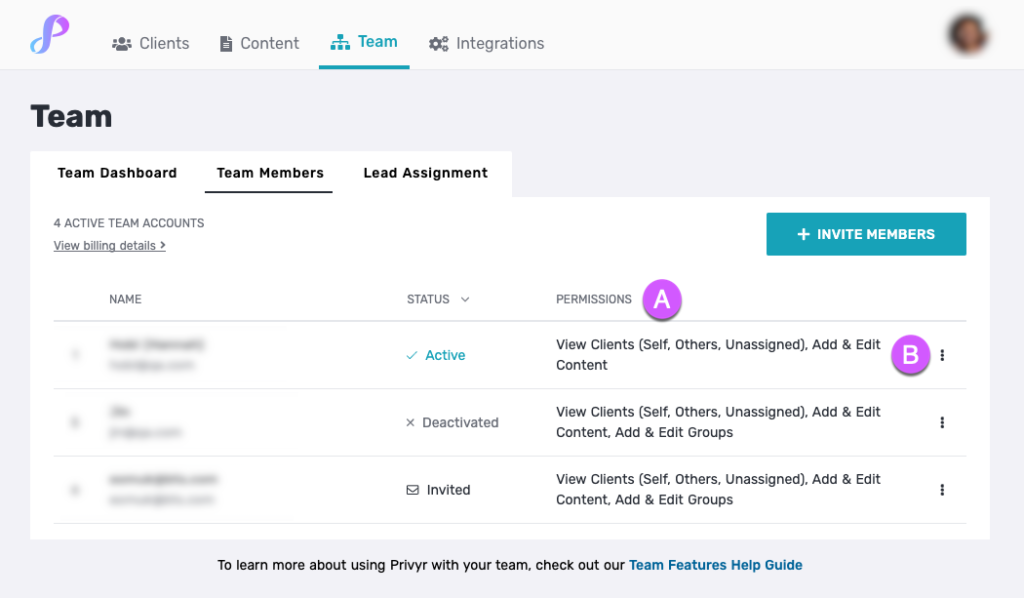
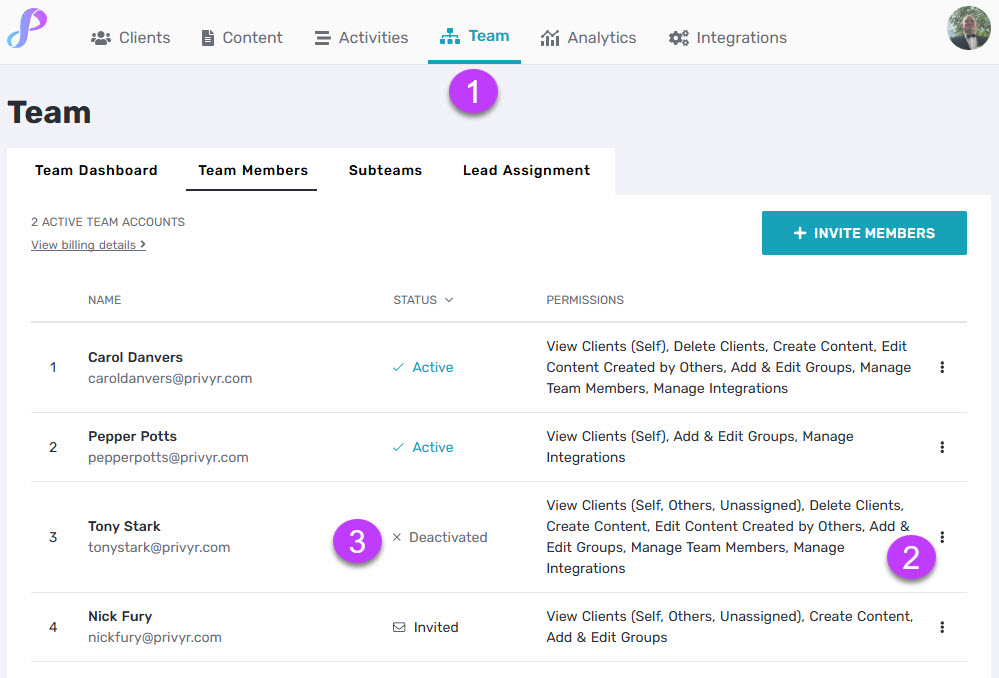
Your Team Members tab shows all users on your team, including those that are invited, active, and deactivated. Admin accounts have full control over their team and data, and can invite, change permissions, or deactivate team accounts at any time.
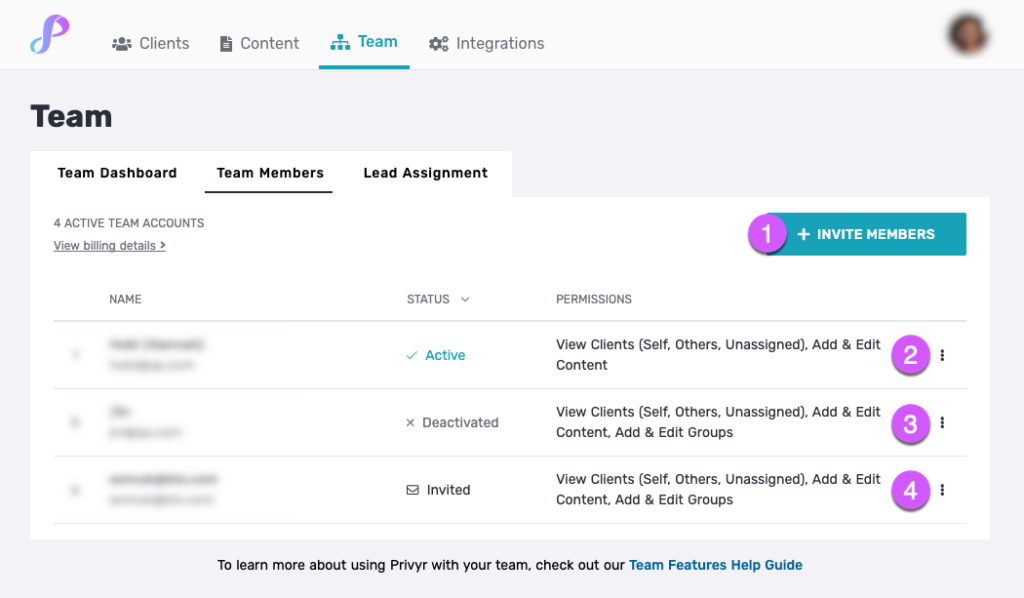
- To invite a new team member, tap on the + INVITE NEW MEMBER button
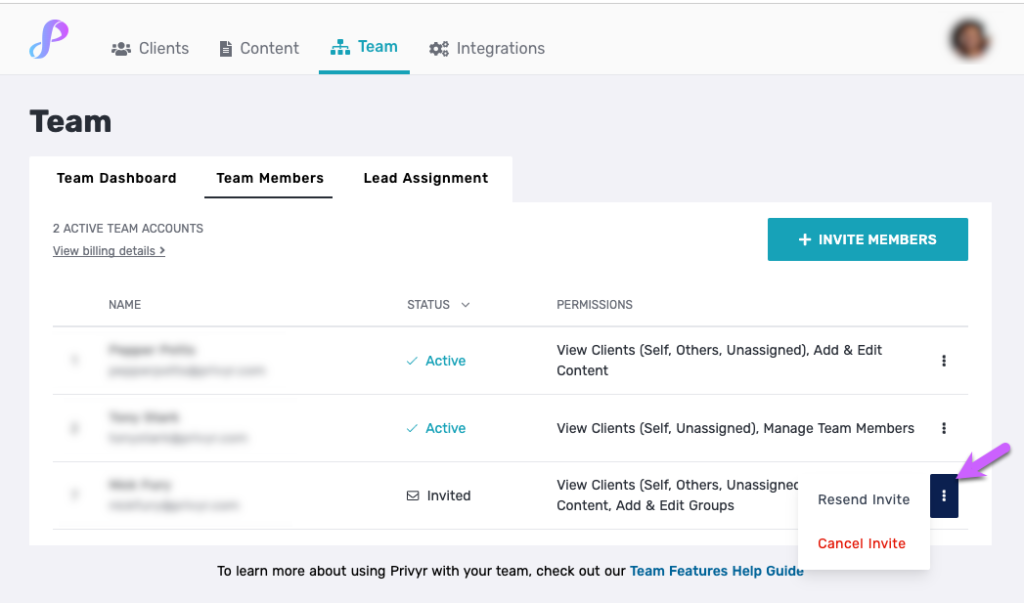
- If a user’s status is ‘Invite Sent‘, it means they’ve been invited via email but have not logged in to activate their account yet. You can click the ‘…‘ and choose to Resend Invite or Cancel Invite.
- If a user’s status is ‘Active‘, you can click the ‘…‘ and choose to Edit Permissions or Deactivate Account.
- If a user’s status is ‘Deactivated‘, you can click the ‘…‘ and choose to Edit Permissions or Reactivate Account.
Team Member Permissions
You can view the permissions granted to a team member on your Team Members dashboard, under the PERMISSIONS column (A). To edit the permissions of a user, click on ‘…‘ then ‘Edit Permissions‘ (B).
When inviting or editing a team member, you’ll be able to grant or revoke permissions to view and delete certain types of clients, as well as to add and edit Content and Groups.
- View Client
- Clients assigned to themselves: Users will always be able to view and act on clients that are assigned to themselves.
- Clients assigned to others: Allow user to view clients that are assigned to other team members. This also allows the user to assign and/or reassign clients to themselves or their teammates.
- Unassigned Clients: Allow user to view and claim clients that are unassigned (e.g. clients not assigned to anyone yet).
- Add & Edit Groups
- Allow user to add and edit client groups for the team.
- Delete Client
- Allow user to permanently delete clients from the team. This can only be done for clients that are currently assigned to themselves.
- Create Content
- Allow user to create content (messages, files, pages) that is private to themselves.
- Change Content Visibility
- Allow user to make their content (messages, files, pages) visible for other team members to use:
- Visible to themselves only
- Visible to subteams they have access to
- Visible to all team members
- Allow user to make their content (messages, files, pages) visible for other team members to use:
- Edit Content Created by Others
- Allow user to edit and change the visibility of content (messages, files, pages) that they have permission to view, even if the content is created by someone else.
- Manage Team Members
- Allow user to create, edit, and manage team members and their permissions. Note that they won’t be able to edit the Admin Account’s permissions or access.
- Manage Integrations
- Allow user to manage integrations and import/export clients.
VIEW CLIENTS
Team members will always be able to view clients that are assigned to themselves. Depending on their permissions, they may also be able to view clients assigned to other team members, and/or unassigned clients (e.g. clients that aren’t assigned to anyone yet).
If a user has permission to view clients assigned to others and/or unassigned clients, they can access the Team tab to view clients by assignment status and adjust their Team View Setting to only show certain types of clients in their Privyr app.
CONTACT AND UPDATE CLIENTS
Team members can contact and update clients assigned to themselves, as well as clients assigned to other team members, as long as they have permission to view leads assigned to others. This helps your team stay coordinated, allowing team members to contact clients or edit their details where necessary.
Team members with permission to view ‘unassigned clients‘ will need to assign the client to themselves first before they can contact or edit a client.
ASSIGN CLIENTS
Team members with permission to view ‘clients assigned to others’ also have the ability to assign and/or reassign clients to themselves or other team members.
Team members with permission to view ‘unassigned clients‘ have the ability to claim the client by assigning it to themselves.
If a user only has permission to view clients that are assigned to themselves, they won’t be able to assign, reassign, or claim any clients.
CREATE CONTENT
If a user has permission to ‘create content‘, they’ll be able to create new and edit existing content (messages, files and pages) that is private to themselves. Note that only the admin will be able to delete content.
CHANGE CONTENT VISIBILITY
By default, when team members create content (messages, files and pages), the content will be visible only to themselves. If a user has permission to ‘change content visibility‘, they’ll be able to set the visibility of their content, such as to Subteams they have access to, and/or to all team members.
EDIT CONTENT CREATED BY OTHERS
If a user has permission to ‘edit content created by others‘, they’ll be able to edit and change the visibility of content (messages, files, pages) that they have permission to view, even if the content is created by someone else.
ADD & EDIT GROUPS
If a user has permission to ‘add & edit groups‘, they’ll be able to create new and edit existing client groups that can be viewed and used by all members across the team. Note that only the admin will be able to delete groups.
DELETE CLIENTS
If a user has permission to ‘delete clients‘, they’ll be able to permanently delete clients from the team. However, they can only delete clients that are currently assigned to themselves.
If you need to delete a client that is assigned to someone else or unassigned, you’ll need to assign the client to yourself first before deleting.
MANAGE TEAM MEMBERS
If a user has permission to ‘manage team members’, they’ll be able to add or invite team members, cancel outstanding invitations, activate or deactivate team members, edit permissions for any team members, and manage the team’s lead automation rules.
However, team members cannot edit the admin account’s permission nor deactivate the admin account.
MANAGE INTEGRATIONS
If a user has permission to ‘manage integrations’, they’ll be able to configure lead source integrations, manage lead distribution rules, and import or export clients from CSV.
COMMON PERMISSIONS FOR TEAM ACCOUNTS
Certain actions are always allowed or disallowed for team member accounts, regardless of their permissions.
All team members are able to add new contacts, access and send content (e.g. files, messages, and pages), and use client groups. However, only the admin account will be able to delete content and client groups, and manage account billing.
Team Dashboard
The Team Dashboard lets you view key statistics about your team’s performance, such as the number of clients assigned to each teammate, contact rate, average response time, and activities taken. You can access the dashboard by going to Team > Team Dashboard.
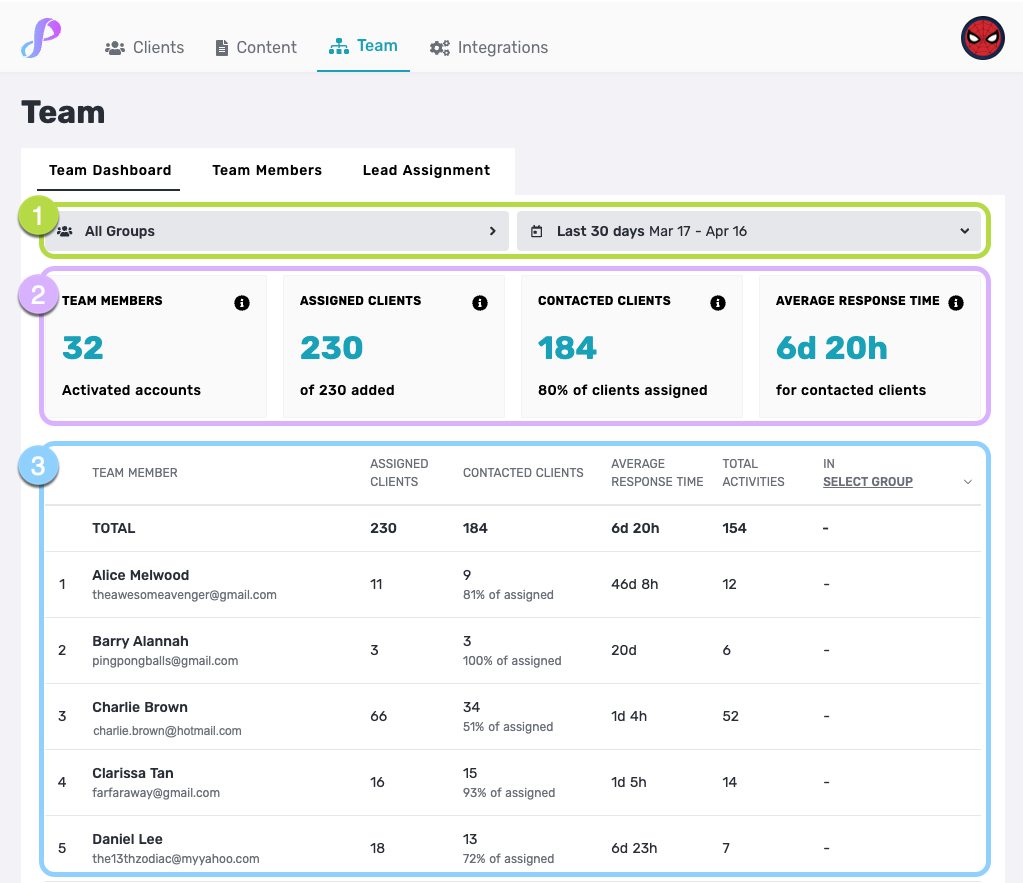
The Team Dashboard contains the following sections:
- Filters
- Groups:
- For Assigned Clients and Contacted Clients: Filters clients within the selected client group
- For Average Response Time and Total Activities: Filters activities performed on clients within the selected client group
- Date Range:
- For Assigned Clients and Contacted Clients: Filters clients added to Privyr within the selected date range
- For Average Response Time and Total Activities: Filters First Responses and activities that were logged within the selected date range
- Groups:
- Team Overview
- Team Members: Total team count
- Assigned Clients: Total clients assigned to the team
- Contacted Clients: Total assigned clients that have been contacted (clients without an Uncontacted label)
- Average Response Time: Average time taken for all team members to log a First Response
- Member Statistics Table
- Team Member: Name and email address
- Assigned Clients: Number of clients assigned to the member
- Contacted Clients: Number of assigned clients that have been contacted (clients without an Uncontacted label)
- Average Response Time: Average time taken for the member to log a First Response
- Total Activities: Number of timeline activities logged by the member
- In Select Group: Select a group to see the number of Assigned Clients that are in the selected client group
Team View Setting
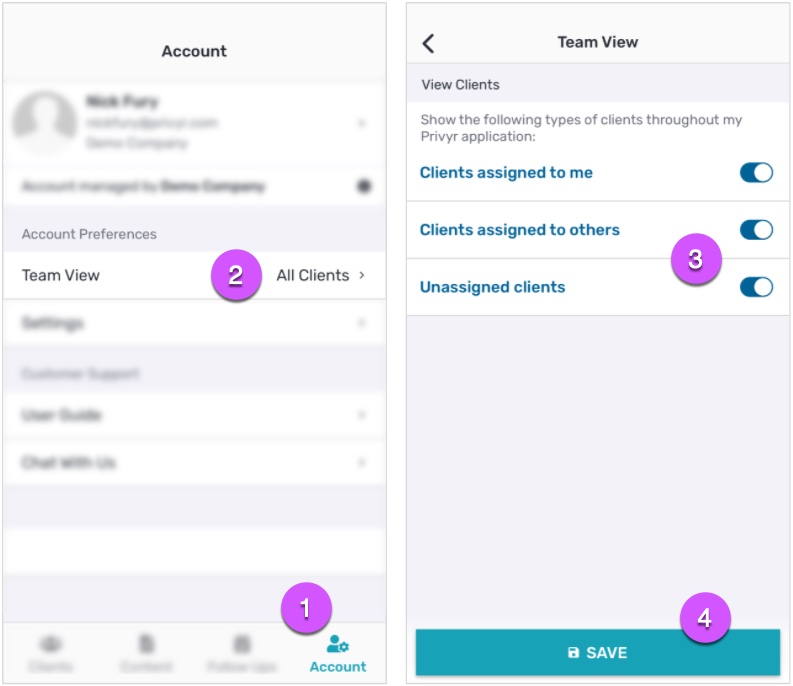
If a user account has permissions to view clients assigned to others and/or unassigned clients, they can adjust their Team View setting to only show certain types of clients in their Privyr application, via the following steps:
- Go to your Account tab
- Tap on Team View
- Select the types of clients you wish to show or hide
- Note that the options available for a user will depend on the permissions granted to their account
- Click SAVE
The Team View setting will not be available for accounts that only have access to view clients assigned to themselves, since they don’t have permissions to view any other types of clients.
Team Tab
If a user account has permissions to view clients assigned to others and/or unassigned clients, they’ll be able to access the Team tab in their Privyr app. This lets them quickly view clients that are assigned to themselves, unassigned clients, and clients assigned to each team member (depending on their permissions).
You can also quickly bulk assign or reassign clients from the teams tab.
- Go to your Clients tab
- Tap the Team tab
- Note that this tab won’t be available for accounts that only have access to view clients assigned to themselves
- Tap the Team Member or Unassigned to view the respective clients
- Note that the options available for a user will depend on the permissions granted to their account
- Tap on Options to quickly select and reassign some/all clients to someone else
Note that the Team tab is not affected by the Team View setting.

Lead Automation Rules
You can configure Privyr to automatically assign new leads from your lead sources to your team members, or leave leads as unassigned so that they can be claimed by whoever is available. This lets you control who will receive alerts for new leads, as well as who can view and act on those leads.
Lead Automation Rules apply to new leads received across all your lead sources, such as your website, Facebook Lead Ads, Google Ad Lead Forms, and other integrations like Zapier. You can also create Lead Automation Rules with Advanced Criteria to assign leads based on specific criteria such as by Facebook Page, Facebook Lead Form, or all Facebook Leads.
You can manage your Lead Automation rules via the following steps:
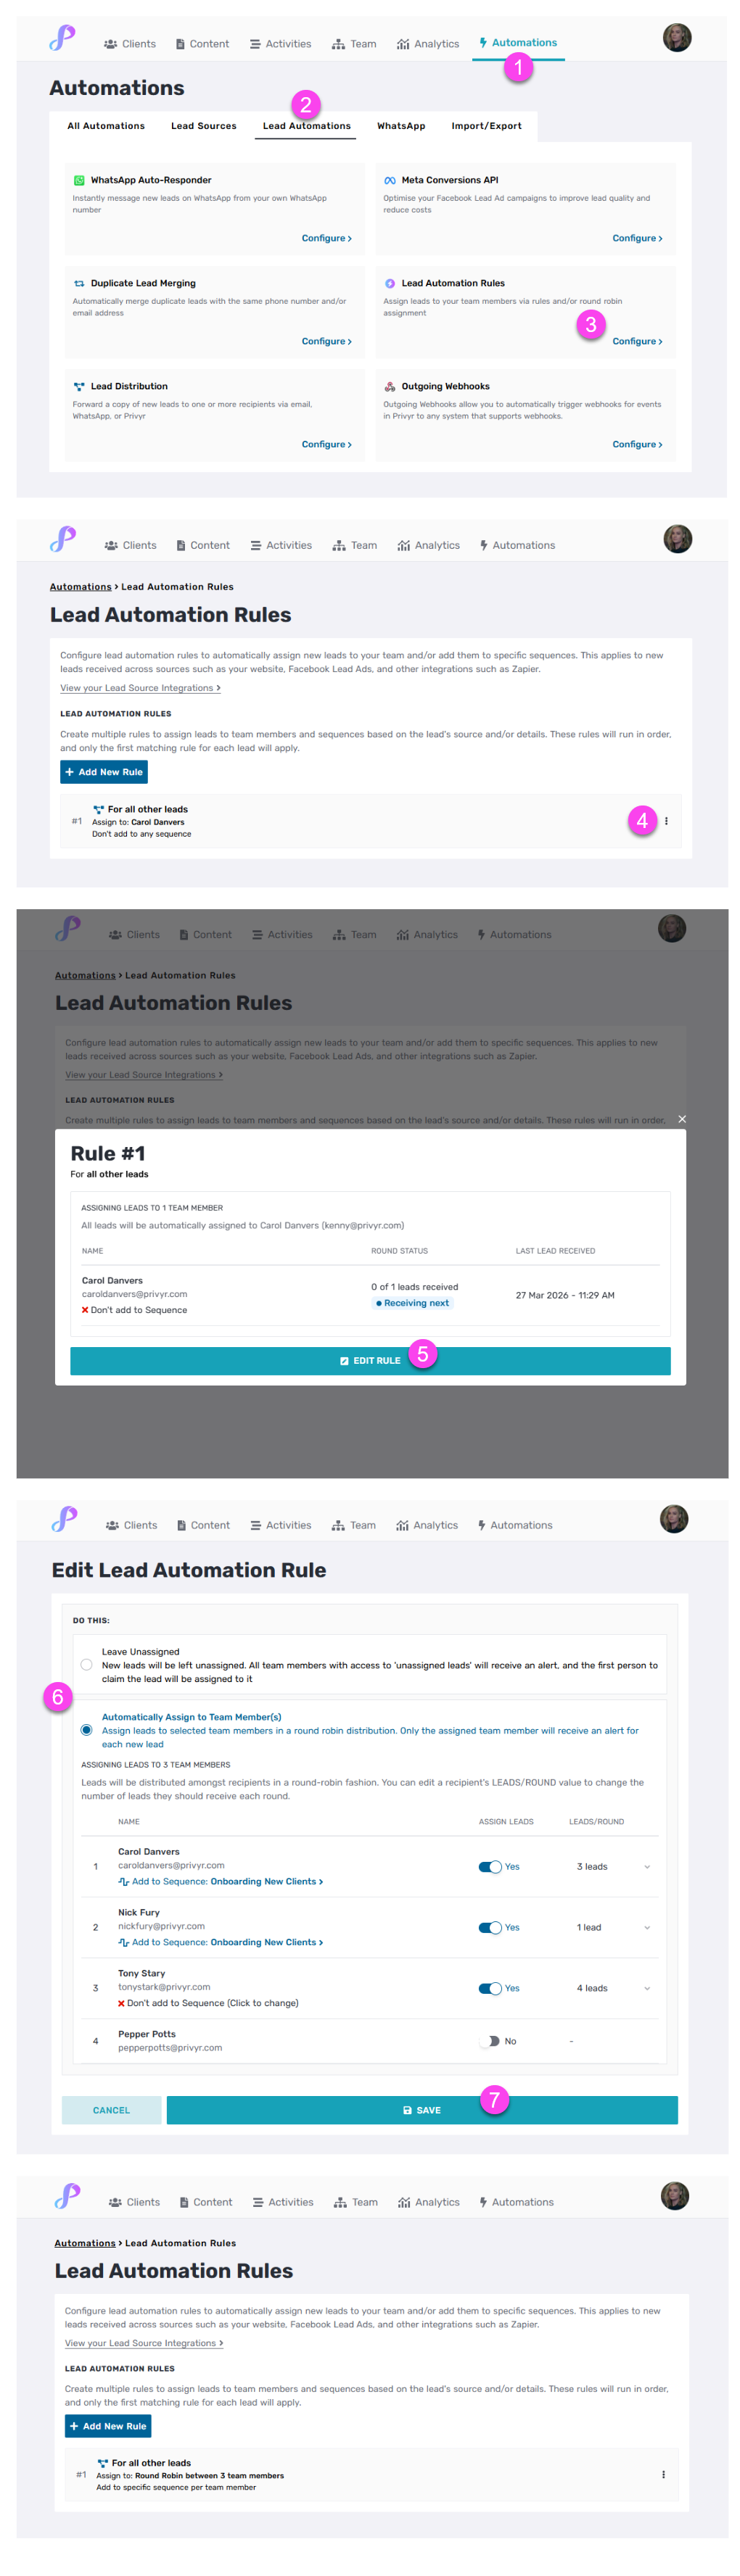
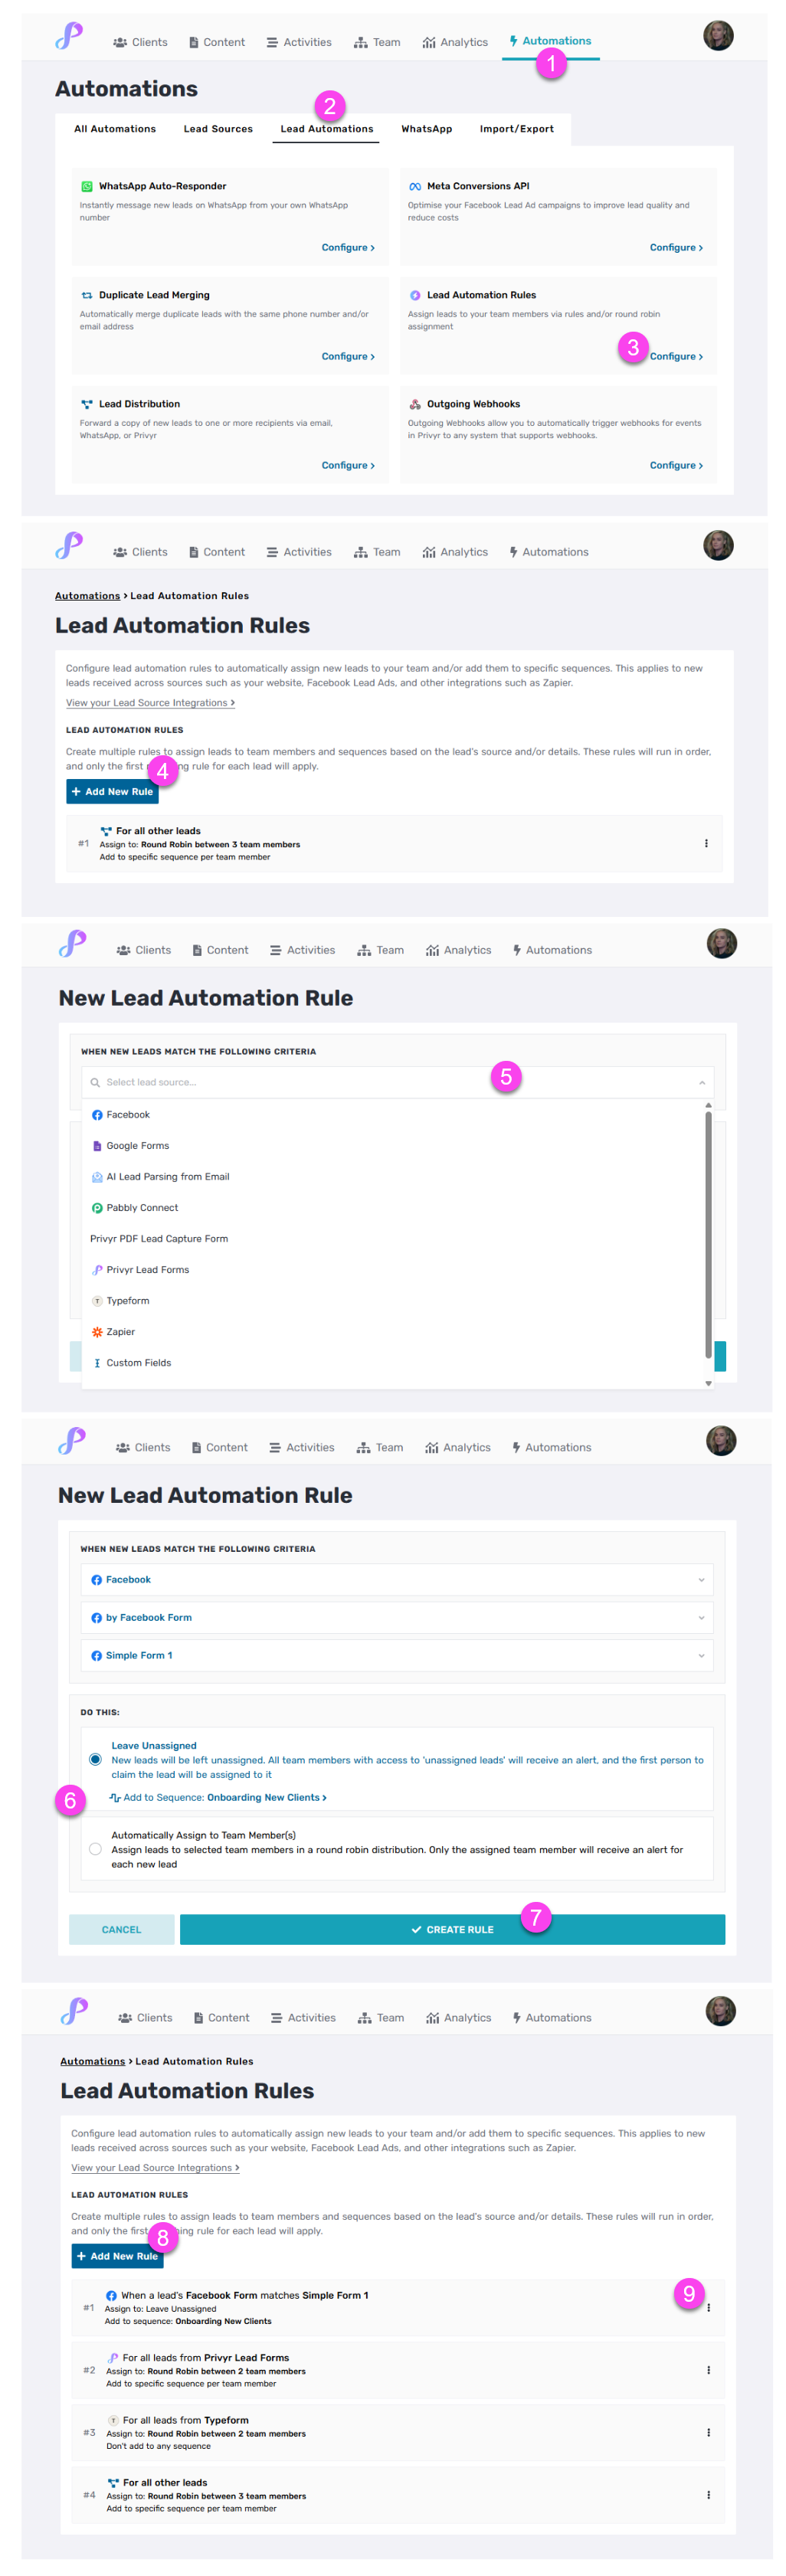
- Go to your Lead Automation Rules Dashboard by clicking on the Automations tab > Lead Automations tab > Lead Automation Rules on the Privyr desktop site
- Click on the three-dotted (⋮) button next to the For all other leads rule
- Click on Edit Rule
- Select what happens whenever a new lead is received:
- Leave Unassigned will leave all new leads as unassigned. This will send new lead alerts to all team members with permissions to view unassigned clients. The first person to view and claim the lead will be assigned to it.
- Automatically Assign to Team Member(s) will assign leads to selected team members in a round robin distribution, so that each member is assigned a single lead in each round. Only the assigned team member will receive an alert for each new lead.
- If you selected Automatically Assign to Team Member(s):
- You can toggle Assign Leads next to each team member’s name to include or exclude them in the round robin distribution.
- You can change the LEADS/ROUND column to change how many leads each team member should receive per round (up to 10 leads per round).
- You can also choose to add the new lead to a specific Sequence or Automated WhatsApp Sequence under each team member
- You can toggle Assign Leads next to each team member’s name to include or exclude them in the round robin distribution.
- Lastly, click on SAVE
Lead Automation Rules with Advanced Criteria
You can create advanced rules to assign leads to team members (or leave them unassigned) based on specific criteria such as by Facebook Page, Facebook Lead Form, all leads from a specific lead source, or custom fields. As an example, you can set up the following rules:
- For leads from Facebook Form X, leave them Unassigned
- For leads from Facebook Page Y, distribute in round robin between Team Members A, B, C, and add them to Sequence A
- For all leads from Elementor, assign to Team Member D and add them to Automated WhatsApp Sequence B
- When a lead’s preferred_contact_method matches WhatsApp, assign to Team Member E
- For all other leads, leave them Unassigned
You can create Lead Automation Rules with Advanced Criteria via the following steps:
- Go to your Lead Automation Rules Dashboard by clicking on the Automations tab > Lead Automations tab > Lead Automation Rules on the Privyr desktop site
- Tap on +ADD NEW RULE under Lead Automations Rule
- Select your Rule Criteria (e.g. by Facebook Page, by Facebook Lead Form, All Facebook Leads, or Custom Fields).
- Configure how you want leads matching this rule to be assigned (e.g. assigned to specific team members, left unassigned).
- Configure how you want leads matching this rule to be added to a specific sequence under each team member
- Click on CREATE RULE once done. You’ll see your list of rules.
- You can add more rules by tapping on ‘+ Add new rule’ and following the same process.
- You can view and edit a rule by clicking the (⋮) button on the right side of the table. You’ll have options to view rule, edit rule, or move the rule up or down.
Note that rules will run in order from top to bottom, and only the first matching rule for each lead will apply. The default rule is always last and will apply to all leads that don’t match any other rules.
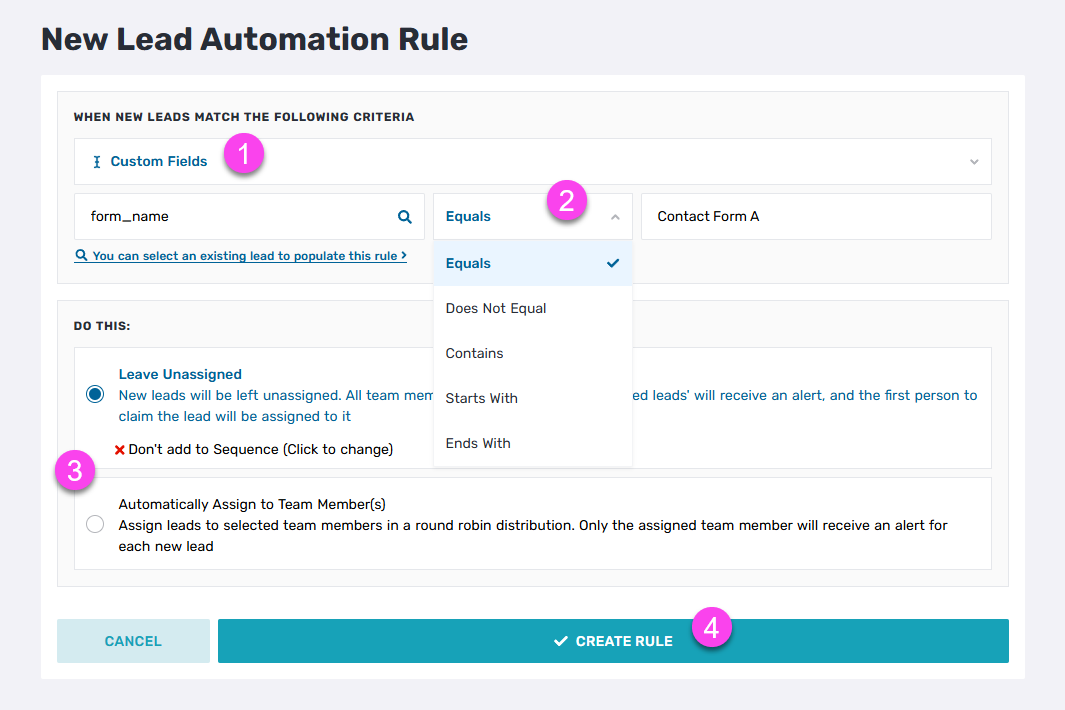
Advanced Criteria and Logic Using Custom Fields
You can also create Lead Automation Rules with Advanced Criteria by using Custom Fields combined with logic operators such as Equals, Does Not Equal, Contains, Starts With, and Ends With.
The Lead Automation Rule would depend on the value of the Custom Field submitted by your lead and how it matches the logic and criteria you’ve set.
Here’s the list of logic options:
- Equals – the rule applies if the Custom Field value is exactly the same value as the criteria you set
- Does Not Equal – the rule applies if the Custom Field value is not exactly the same value as the criteria you set
- Contains – the rule applies if the Custom Field value contains or includes the same value as the criteria you set
- Starts With – the rule applies if the Custom Field value starts or begins with the same value as the criteria you set
- Ends With – the rule applies if the Custom Field value ends with the same value as the criteria you set
Note that all logic operators are Case Sensitive.
Tip: You can click on ‘You can select an existing lead to populate this rule’ to easily select a Custom Field Key based on an existing lead in your Client List.
Assigning and Reassigning Clients
If a user account has permissions to view clients assigned to others, they’ll be able to assign clients to anyone else on the team. When client(s) are assigned, the newly assigned team member will receive an alert on their Privyr app to inform them of the newly assigned client(s).
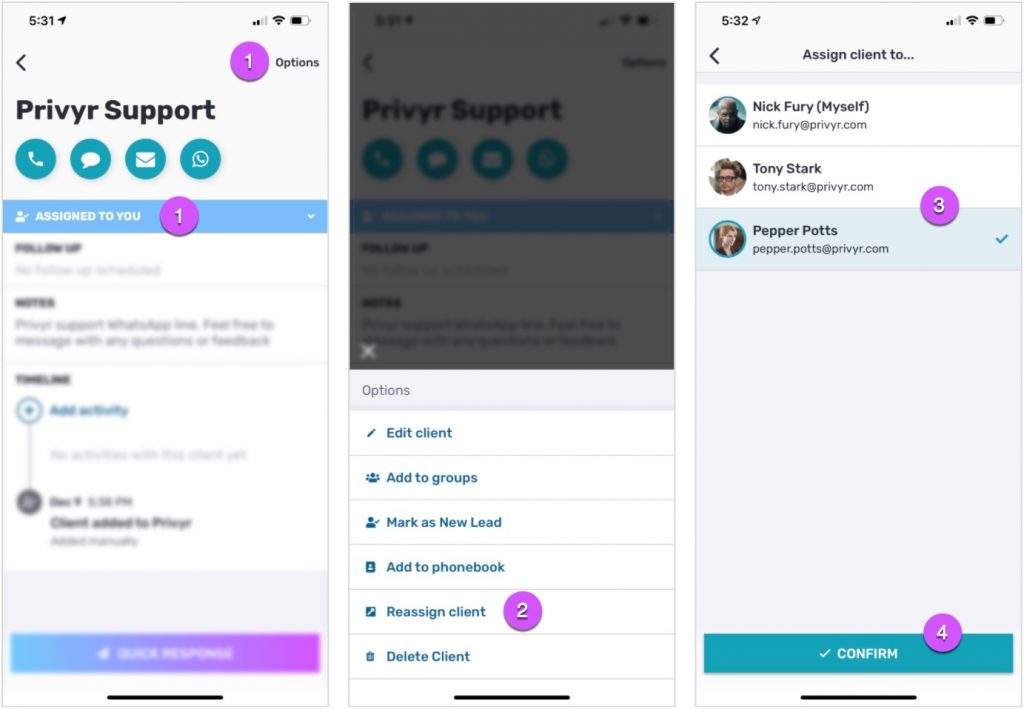
REASSIGNING A SINGLE CLIENT
When viewing the client details screen, you’ll be able to reassign the client to someone else via the following steps:
- Tap on Options
- Tap on Reassign Client
- Select a team member to reassign the client to
- Tap on CONFIRM
BULK REASSIGNING CLIENTS
You can reassign multiple clients at a time via the Bulk Actions feature on any list of clients. Just tap and hold on a client to trigger multi-select mode, then select the square icon with an arrow, or More Actions > Reassign Clients.
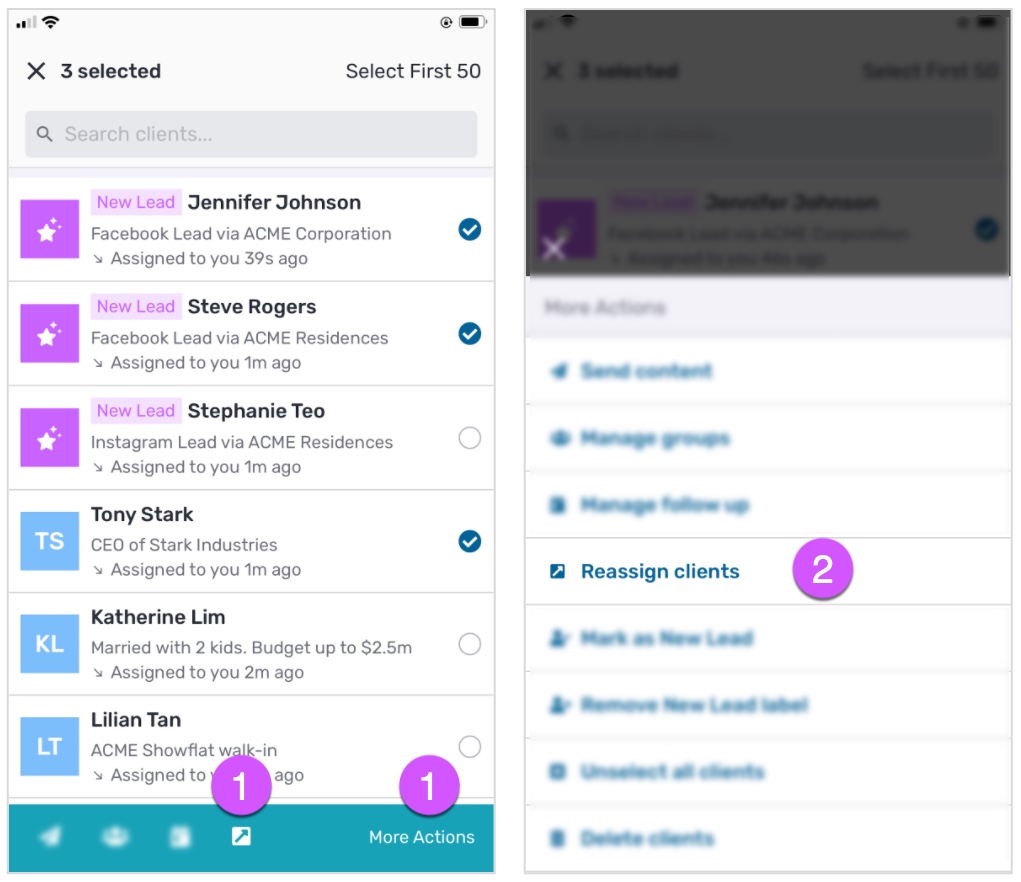
Note that on client lists other than the team tab, you can only select and reassign clients that are currently assigned to yourself.
Alternately, you can quickly bulk assign or reassign clients from your Team tab, even if they aren’t currently assigned to you.
- Go to your Clients tab
- Tap the Team tab
- Note that this tab won’t be available for accounts that only have access to view clients assigned to themselves
- Tap the Team Member or Unassigned to view the respective clients
- Note that the options available for a user will depend on the permissions granted to their account
- Tap on Options
- Tap on Reassign some clients (to manually select which clients to reassign) or Reassign all clients (to reassign all clients to someone else)

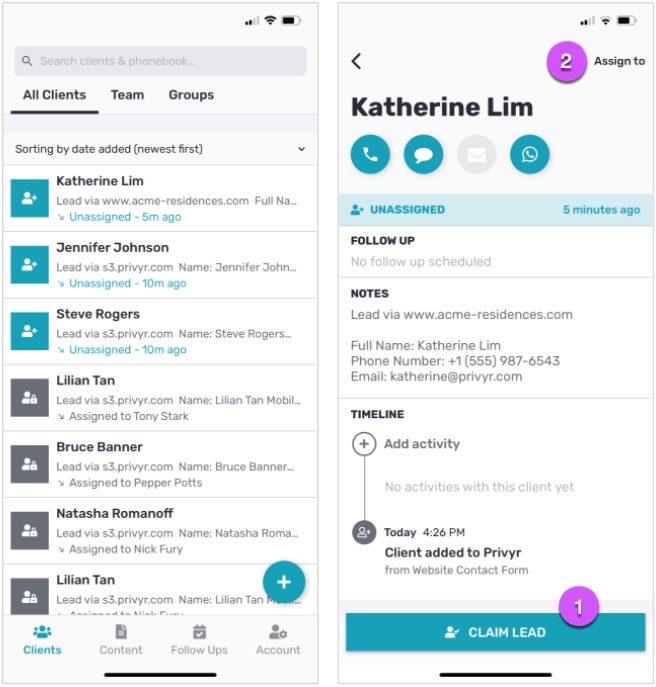
Unassigned Clients
If you’ve configured your Lead Automation rule to Leave Unassigned, all new leads will send new lead alerts to all team members who have permissions to view unassigned clients. The first person to claim the lead will be assigned to it.
If you have permissions to view unassigned clients and configured your Team View settings to show unassigned leads, you’ll see unassigned clients displayed on your client lists in a teal blue colour with the word ‘Unassigned‘ in the preview. You can also view all unassigned clients under your Team tab > Unassigned.
When viewing an unassigned client, you’ll have two options:
- CLAIM LEAD will immediately assign the client to yourself
- Assign to will let you assign the client to another team member
Note that once a lead has been assigned to a team member, it can be reassigned to someone else later on, but can’t be changed back to unassigned.
Deactivating Team Accounts
You can deactivate an account at any time to immediately revoke access and stop payment for that account, via the following steps:
On Privyr web:
- Go to your Team Members dashboard by clicking on Team > Team Members on the Privyr desktop site
- On the account you wish to deactivate, click on ‘…‘ then ‘Deactivate Account‘
- Once completed, the account status will be updated to ‘Deactivated‘
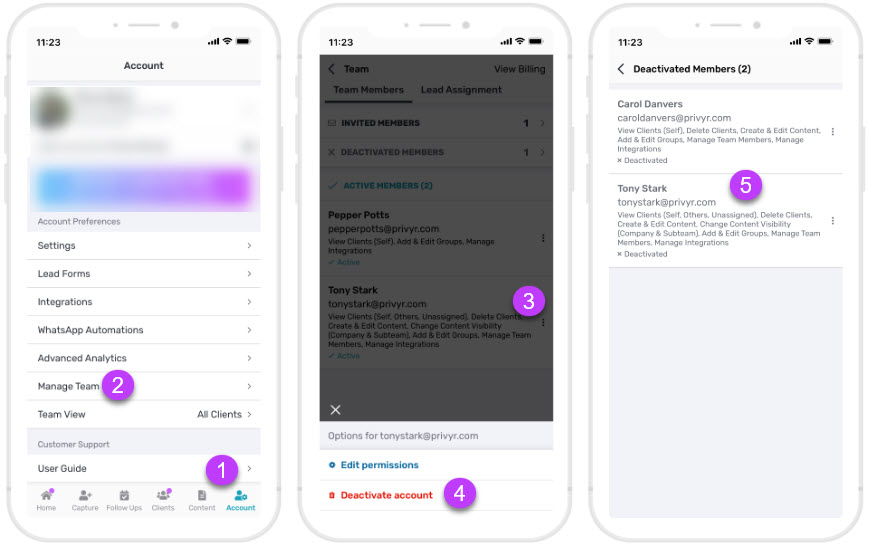
On Privyr Mobile app:
- Go to your Account tab
- Click Manage Team
- Click on ‘…‘ beside the Team Member
- Then choose ‘Deactivate Account‘
- Once completed, the Team Member will be moved to the ‘Deactivated Members‘ list
When a user’s account is deactivated, their access will be immediately revoked and they won’t be able to log into Privyr or access any data on the team. Billing for the account will also be immediately stopped and any unused paid-up days will be automatically converted as credits to your account, which can be used on the next subscription charges.
However, any clients that were assigned to the deactivated user will still be assigned to their account, to ensure no information is lost. You can reassign some or all of these clients to other team members via the Privyr app.
Reactivating Team Accounts
If you wish to reactivate an account that has been deactivated, simply click on ‘…‘ then ‘Reactivate Account‘. Once an account is reactivated, it will appear as ‘Active‘ on your Team Member dashboard and the user will be able to log into Privyr again. This will also restart billing for their account.
Canceling a Team Account Invitation
You can also retract the invitation sent to your Team Member by canceling the invitation. Simply click on ‘…’ then ‘Cancel Invite’. Once the invitation is canceled, the Team Member will disappear from your Team Member dashboard and won’t be able to accept the team account invitation that was sent via email.
Billing for Team Accounts
Billing for each account starts once a team member gets invited or reactivated, and stops when the account is deactivated. If you invite a new team member midway through your billing cycle, you will be charged upfront with the pro-rated days of your subscription period. You can deactivate an account at any time to revoke access and stop billing for that account.
If you are currently on the free trial, you can invite unlimited team accounts and will not be charged for any team accounts unless you subscribe to Privyr Pro. Billing does not start until your free trial ends.
You can view your active team accounts and team billing details via the following steps:
- Go to your Team Members dashboard by clicking on Team > Team Members on the Privyr desktop site
- Click on ‘View Billing Details‘ to view a full breakdown of the billing for your team