Introduction
Enhance your lead generation process and capture leads with Privyr’s built-in form builder. This feature allows you to create and manage lead forms directly from Privyr, without the need for external lead sources or complex integrations.
You’ll be able to share these lead forms anywhere to capture leads both online and offline, via a link or QR code.
Once a lead submits interest, they’ll automatically be added as a contact in your Privyr account’s client list. You’ll also get an instant lead alert so you can immediately contact them or send an auto-personalised Quick Response.
Here’s a step-by-step video about how to use Privyr Lead Forms. You can also find information in text form in the sections below.
Managing your Lead Forms
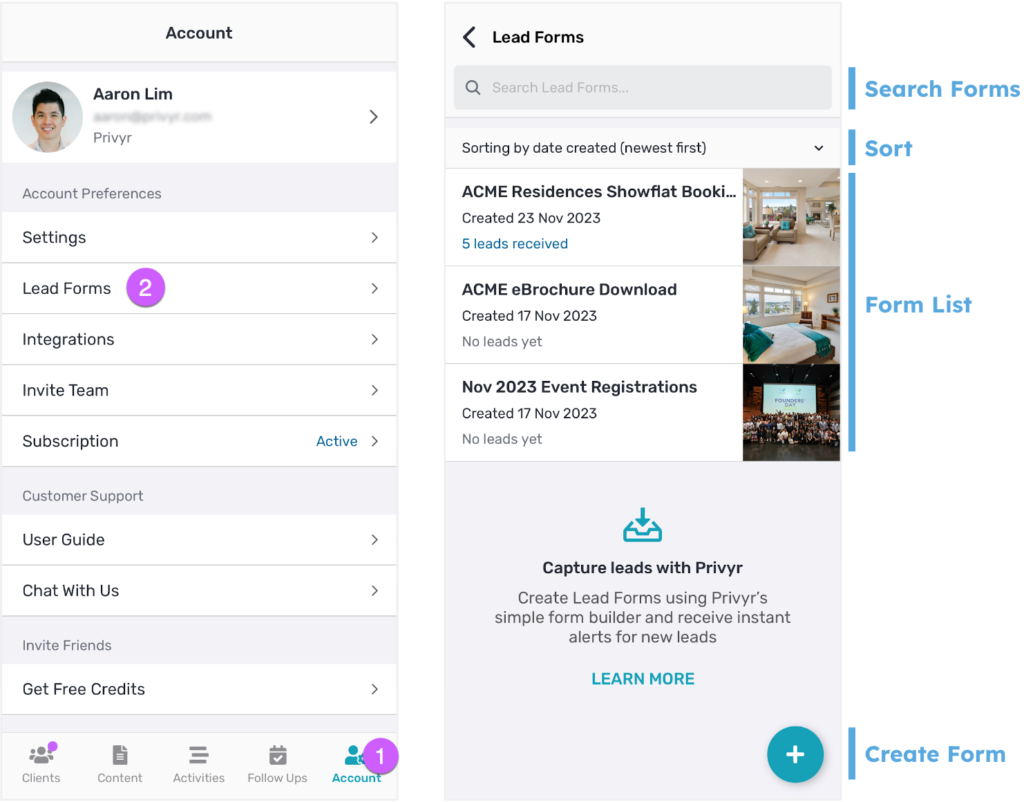
To view your Lead Forms, tap the Account icon in the footer, followed by Lead Forms. You can also access Lead Forms on web by going to the Integrations tab > Privyr Lead Forms.
Your Lead Forms List shows all Lead Forms you’ve created or have access to. It also displays the date that the Lead Form was created, as well as how many leads you’ve received via each form. Tap on a form to view more details and share, edit, or delete it.
Use the search box at the top of the screen to find specific forms, or tap on the sorting options to sort the forms alphabetically, by date created, or by when the last lead was received.
Tap the (+) button at the bottom to create a new Lead Form.
Note that only Privyr team admins can access the Lead Forms page.
Creating Lead Forms
Tap the (+) button on your Lead Forms list to start creating a new page.
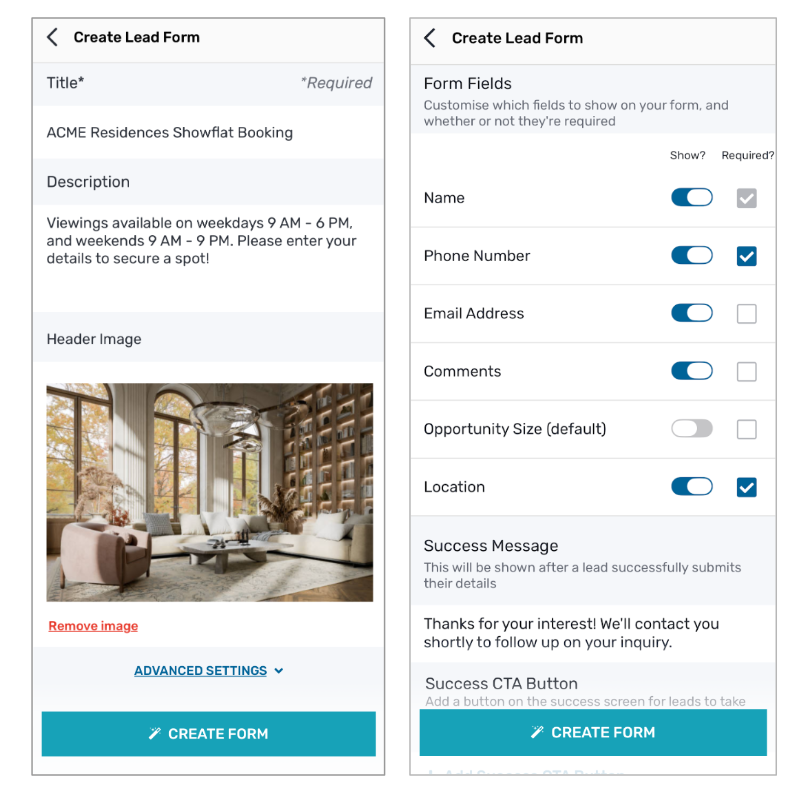
You can add a title, description, and header image to your form. Only the title field is required, though we highly recommend adding a description and image to increase the chances of attracting a lead’s attention and getting them to submit interest.
Under Advanced Settings, you can select which form fields to show, and mark them as required or optional.
To include Custom Client Fields in the Privyr Lead Form, you must have an existing Custom Client Field created in your account. If you don’t have one yet, you’ll need to create a Custom Client Field first for the fields to appear in the list of Form Fields when creating or editing a Privyr Lead Form.
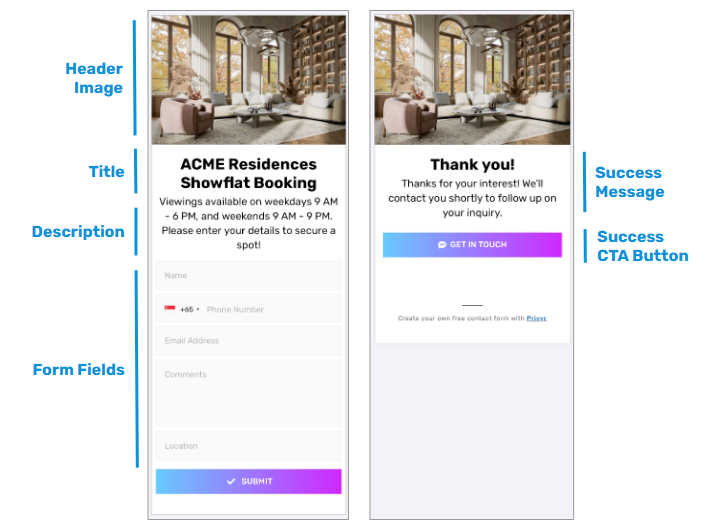
Additionally, you can define a Success Message that will be displayed to leads after they submit the form. The Lead Form and success screen will be generated based on your selections:
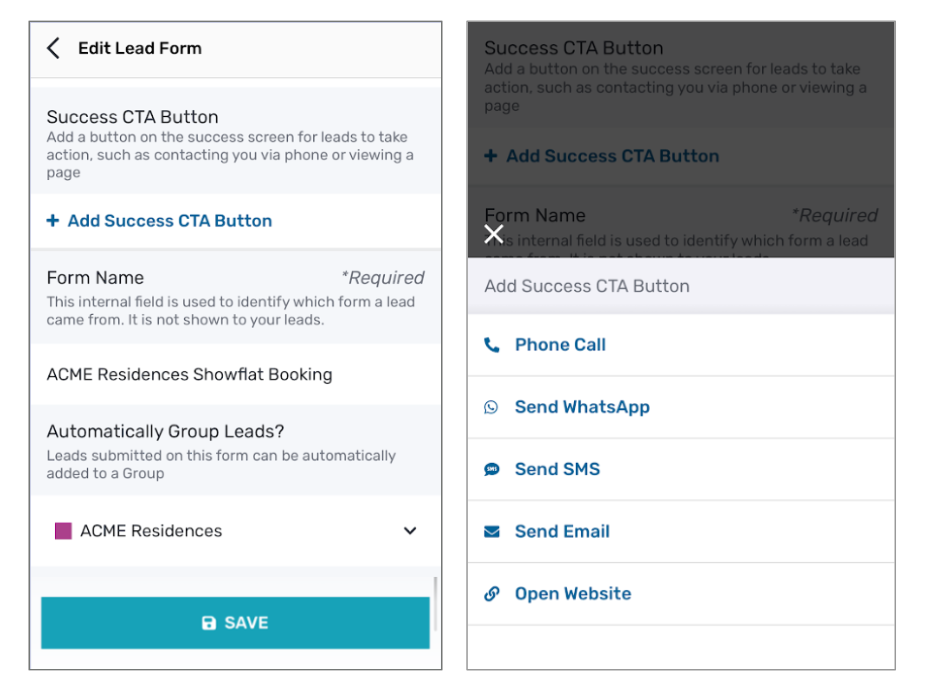
Also under Advanced Settings, you’ll find options to configure the Success CTA Button, internal Form Name, and Automatic Grouping.
- The Success CTA Button allows you to add a button on the success page that enables leads to take specific actions, such as:
- Contacting you via Phone Call
- Sending you a WhatsApp message
- Sending you an SMS
- Sending you an Email
- Opening a Website link
- Form Name is strictly for internal reference (such as for your Privyr lead alerts), and will not be visible to leads anywhere on the lead form.
- Automatic Grouping automatically adds all leads received via the form into the specified client group.
Note that the Success CTA Button can only be configured on the Privyr mobile app at this time.
Once you’re done, tap the CREATE FORM button to save the form and see how it looks. Once completed, the form will appear in your Lead Forms list and can be viewed, shared, edited, or deleted at any time.
Here’s a video about how to design and share your Privyr Lead Form, so you can maximise the number of leads you capture.
Lead Form Details
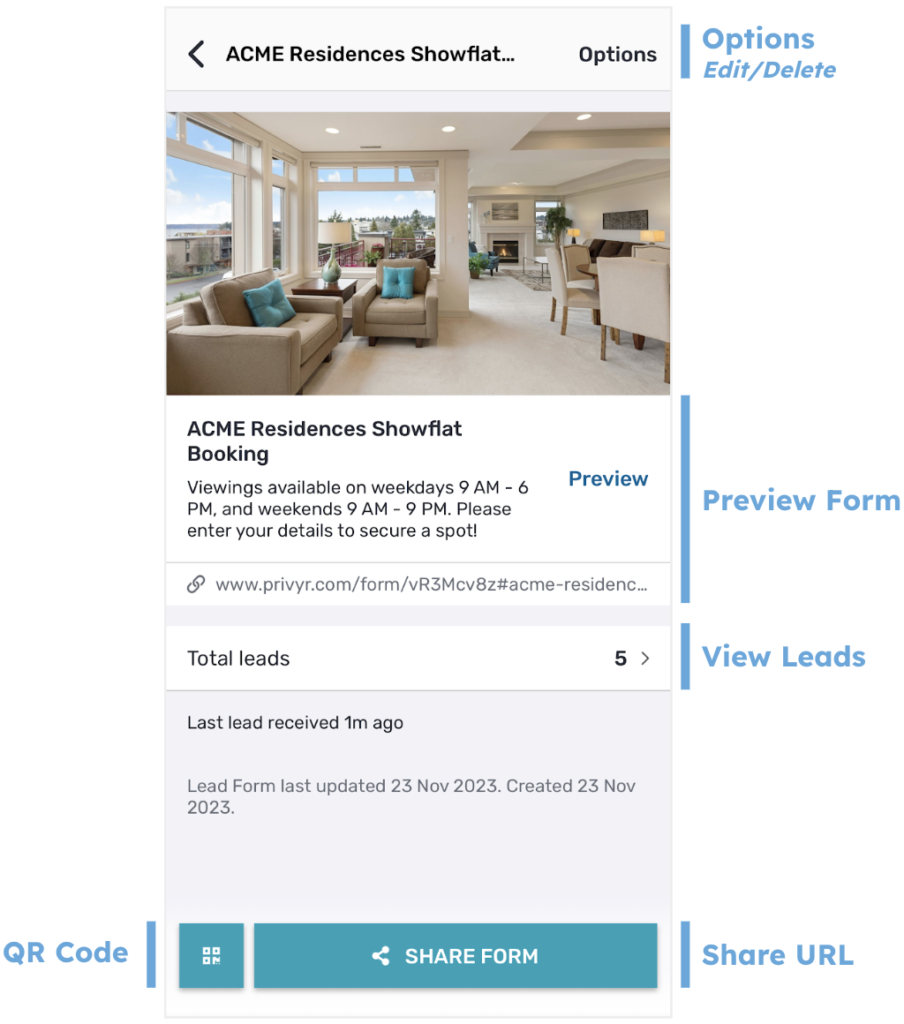
Select a form from your Lead Forms list to view all details related to it.
Tap the Preview button to see what the form looks like to your clients. Both the form and success screen will be shown.
Total leads shows the total number of leads that were submitted via the form. Tap on it to view a list of the clients with more details and options available. Note that leads that you’ve manually deleted will not be shown or counted here.
The SHARE FORM button at the bottom allows you to share your form by copying the link or sharing via Facebook, WhatsApp, LinkedIn, or any other apps you use.
The QR Code button generates a QR code that leads to your form. You can physically show it to potential clients to scan from their phones, or save the image to share or print on slides, brochures, flyers, or other materials.
Tap on the Options button in the top right to edit the form or delete it. If you delete your form, the QR code and link will be made invalid, but your existing leads received from that form will not be affected.
New Lead Alerts

Any new leads submitted via your Privyr Lead Forms will send you a new lead alert via the Privyr app. You can configure these alerts via your Account Notification Settings.
Tap the alert to view the lead with all the captured information displayed on their notes field. You can immediately contact them or send an auto-personalised Quick Response.
You can also enable additional alerts if you haven’t acted on a new lead within 15 minutes and 60 minutes, in case you missed the first notification. You can enable these extra alerts via your Account Notification Settings.
All new leads from Privyr Lead Forms will be displayed with an UNCONTACTED label in their client details and the client list until you act on them. They’ll also appear in your Uncontacted Leads group and Actions tab.
Depending on your Uncontacted Leads Settings, the UNCONTACTED label may be automatically removed when you view the lead, click their contact buttons, send them content, and/or set a follow up date. You can also manually mark or unmark a lead as UNCONTACTED via the options menu when viewing the lead.
WhatsApp Auto-Responder
You can set up a WhatsApp Auto-Responder to instantly message new leads on WhatsApp. Any new lead you receive via your integrations will be immediately and automatically messaged from your own WhatsApp number, even when you’re busy or offline.
All messages are sent from your existing WhatsApp Business number, so you can view and continue all conversations directly in the WhatsApp Business app on your phone or laptop.
Privyr’s Auto-Responder works through WhatsApp’s official APIs (Privyr is a verified Meta Business Partner), keeping your WhatsApp account and data safe while complying with WhatsApp’s Terms and Conditions.
For more information on setting this up, view our full guide on WhatsApp Auto-Responder.
Distribute leads from Privyr Lead Forms to other Recipients
You can automatically share leads from Privyr Lead Forms with other recipients via email, even if they don’t have a Privyr account. This is useful if you’d like to distribute leads to your clients or colleagues, and can be configured to forward all leads to all recipients, or distribute leads equally in a Round Robin fashion.
Recipients will receive new lead details instantly via email and/or the Privyr app, with attribution ‘This lead was sent to you by @name at @company’ (where @name and @company are replaced with the Name and Company from your User Profile, respectively).
Find out more about Automatic Lead Distribution.