FAQ and Common Issues
Here are some of the common questions and issues faced when using the Facebook integration with Privyr. Most can be solved by ensuring you have admin permissions to the connected Facebook Page(s).
Connecting Facebook to Privyr
- I have multiple Facebook accounts. How do I select or change the account to use with Privyr?
- I can’t see or select the Facebook Page(s) I want to connect to Privyr
- How do I connect more Facebook Pages to Privyr?
- I created a new Facebook Lead Form. How do I connect it to Privyr?
- Error: ‘Insufficient Permissions’ when connecting Facebook Pages
- Error: ‘Failed to Connect’ when connecting Facebook Pages
- Error: ‘Permissions Expired’ on Facebook Pages
Receiving and Viewing Facebook Leads in Privyr
- I’m not receiving any Facebook Leads
- Some of my Facebook Leads are missing
- My Facebook lead alerts are delayed. Why aren’t they immediate?
- How do I view the Campaign, Adset and Ad Details for a lead?
Checking Facebook Permissions to View Leads
- How do I check if I have Admin permissions to a Facebook Page?
- How do I check if I have Leads Access in Facebook Business Manager?
- How do I check if I have Admin or Advertiser permissions on Facebook Ads Manager?
- How do I download leads directly from Facebook?
Multiple Facebook Accounts
Each Privyr account can connect to a single Facebook account and unlimited Facebook Pages. If you have multiple Facebook accounts, simply grant one of your Facebook accounts admin permissions to all the Facebook Page(s) you wish to connect to Privyr.
When connecting your Facebook account to Privyr, it will use the Facebook profile logged into on your Facebook mobile app and/or mobile web browser. Follow the steps below to change the Facebook account you use with Privyr:
- Open the Facebook app on your phone and make sure you’re logged into the correct Facebook account
- Open the Facebook website (www.facebook.com) on your mobile browser, and make sure you’re logged into the correct Facebook account
- iPhone: Check on your Safari browser
- Android: Check on your Google Chrome browser
- Open the Privyr app and connect to the new Facebook profile
- Go to your Account tab and tap on Integrations
- Tap on Facebook > Options > Disconnect Facebook Account (if you’ve already connected)
- Tap on Facebook and connect to Privyr. Make sure that the Facebook account shown is the one you want to connect (if not, repeat steps 1 & 2)
Once you’ve connected the correct Facebook account to Privyr, you can change the Facebook account logged into your Facebook app and mobile browser without affecting your Privyr settings.
Can’t Connect Facebook Page
UNABLE TO SEE OR SELECT FACEBOOK PAGE(S) or ERROR: INSUFFICIENT PERMISSIONS
If you can’t see the Facebook Page(s) you wish to connect to, or get an ‘Insufficient Permissions’ error while connecting to Facebook, it is likely that your Facebook account does not have sufficient permissions to access leads from those Facebook Page(s).
To fix this, please ensure that your Facebook account has the following permissions for each of the Facebook Page(s):
- Permissions: Facebook Page Admin
- Permissions: Facebook Business Manager Leads Access (if applicable)
ERROR: FAILED TO CONNECT
If you’re receiving a ‘Failed to Connect’ error when connecting to Facebook, it is likely that the Facebook account that you’re trying to connect to Privyr doesn’t have the necessary permissions to the Facebook page(s).
To fix this issue, please make sure that the correct Facebook account is logged in on your Facebook mobile app and/or web browser when accessing www.facebook.com.
Additionally, please ensure that your Facebook account has the following permissions for each of the Facebook Page(s):
Updating your Connected Facebook Pages
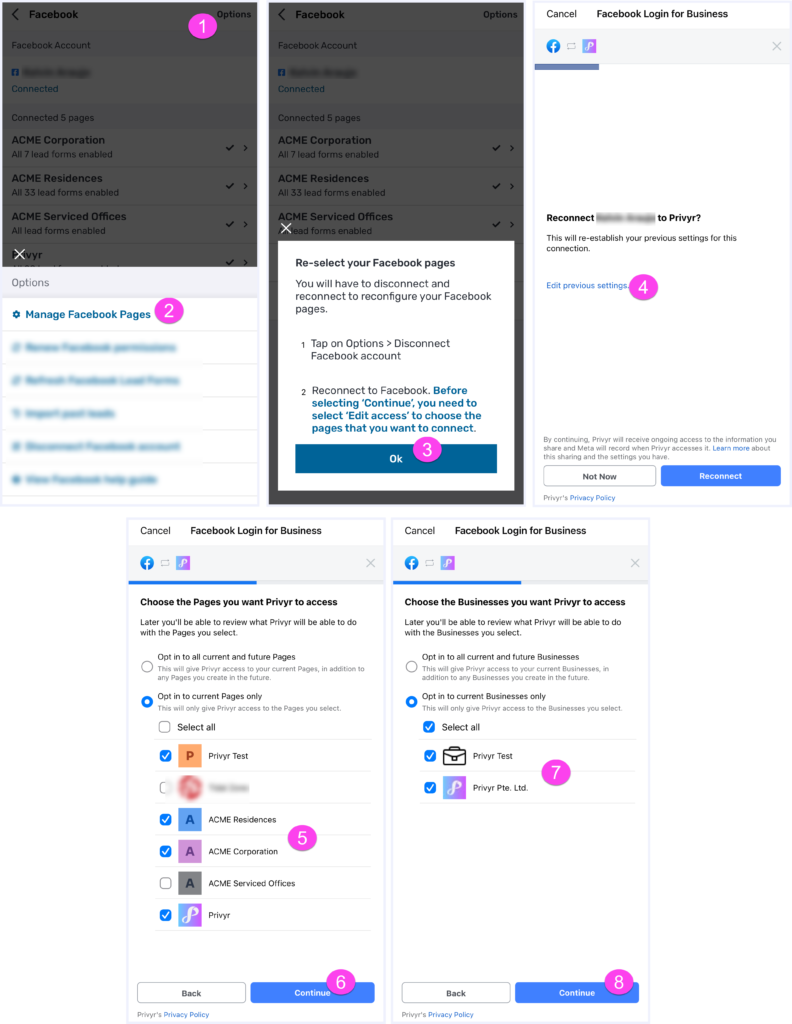
If you want to add or remove Facebook Pages linked to your Privyr account, you may do so by Managing your Facebook Pages through your Account tab > Integrations > Facebook page and complete the following steps
- In the Facebook integration screen, click on Options
- Select Manage Facebook Pages
- Click on OK
- When setting up your Facebook connection, select Edit Previous Settings
- Toggle the pages to add or remove them from Privyr
- Finally, select the Facebook Business Accounts managing the Facebook pages, then continue with your Facebook setup
Connect New Facebook Lead Forms
When you connect your Facebook Page(s) to Privyr, it connects to all existing Lead Forms on those Pages to receive new leads. The connected lead forms are refreshed once every 24 hours to detect and link recently created forms.
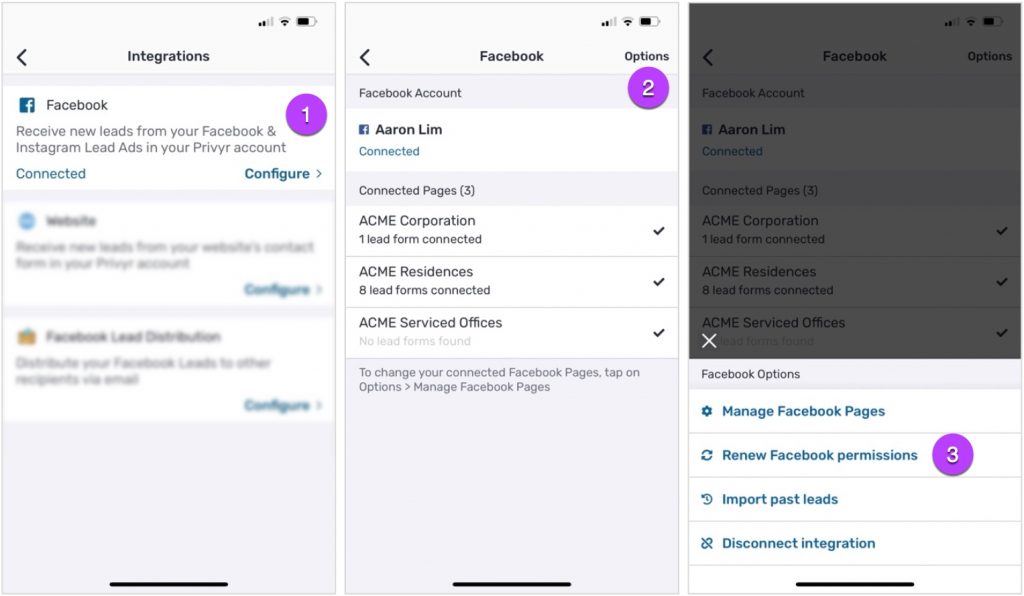
If you created a new lead form and wish to immediately connect it to Privyr to start receiving leads, you can manually refresh the linked Facebook Pages and Lead Forms by renewing your Facebook Permissions.
Renew Facebook Permissions
Facebook permissions to access leads will automatically expire a few weeks to months after connecting to Facebook (or sooner in some cases). This is normal and is part of Facebook’s process to ensure permissions are always opt-in and under your control.
When this happens, you will receive warnings via the Privyr app and email that your Facebook permissions are expiring or have expired.
To fix this issue and refresh your Facebook permissions, go to your Account tab > Integrations > Facebook page and tap on Options > Renew Facebook Permissions. Simply follow the instructions to Continue and renew access.
Note that permissions will also expire if you change your Facebook account password or edit access to your Facebook Pages. In either case, just reconnect to Facebook from the Privyr app to update the permissions and ensure you don’t miss out on any leads.
Not Receiving or Missing Facebook Leads
If you’ve connected your Facebook account to Privyr but aren’t receiving new leads into your Privyr account, please check the following items:
- Ensure you’ve connected the right Facebook Account and Page(s)
- In the Privyr app, go to your Account tab > Integrations > Facebook to view the connected Facebook Account and Page(s). You can change your connected Facebook Account or update the connected Facebook Pages.
- Ensure that your Facebook Lead Ads are running and generating new leads
- Privyr connects to Facebook Lead Ads and will give instant alerts for new leads. You can confirm that you’re running Facebook Lead Ads and generating new leads by downloading leads from your Facebook Forms Library. If there are no new leads on Facebook since you connected to Privyr, there won’t be any leads added to your Privyr account.
- Note that you can also import your past leads to Privyr.
- Ensure that your Facebook Account has sufficient permissions to access leads
- Please check your Facebook account permission to ensure it has Facebook Page Admin Permissions and Facebook Business Manager Leads Access (if applicable) for each Facebook Page. These permissions are required by Facebook to be able to access the leads of a Facebook Page.
- You can also quickly check your permissions by trying to download the leads directly from your Facebook Page. If you aren’t able to view or access the leads from Facebook, it means your Facebook account has insufficient permissions.
- Ensure that recently created Lead Forms are linked to Privyr
- If you created a new Lead Form on Facebook within the last 24 hours, it may not be connected to your Privyr account yet. You can manually refresh the Lead Forms linked to your connected Facebook Pages by renewing your Facebook permissions, to ensure all lead forms are linked to Privyr. You can then import leads from the past 24 hours to fetch any new leads that you may have received during this short time window.
- Note that lead forms are automatically refreshed once every 24 hours to detect and link recently created forms on connected Facebook Pages, so the steps above are only needed if you created a new form and immediately start running ads on it.
We also have a comprehensive guide on the best ways to download and view leads from your Facebook Ads manager.
Delayed Facebook Leads
Privyr gives instant alerts for new leads generated via Facebook Lead Ads, so you can immediately get in touch with your leads.
However, there are cases where new lead alerts are delayed due to your Facebook settings. This issue may occur if you previously connected certain systems such as Hubspot to receive your Facebook Leads and/or changed your Facebook Business Manager settings, which can impact whether Facebook allows lead alerts to other systems.
If we detect delayed alerts for your account, we’ll give you warnings in the new lead alert emails that your leads may be delayed. Follow the steps below to ensure that real-time lead notifications are enabled for Privyr and all other connected systems:
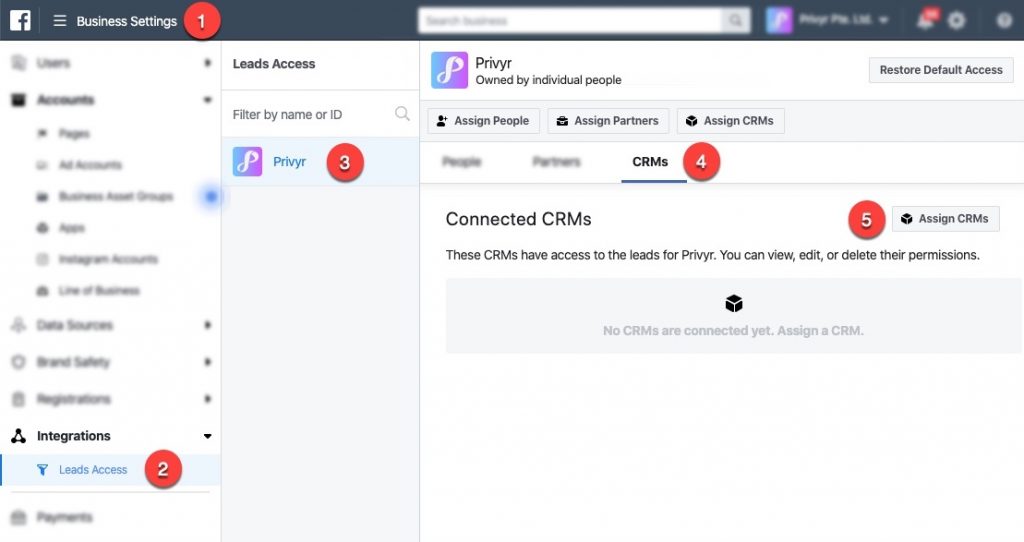
- Go to your Facebook Business Manager Settings at https://business.facebook.com/settings/leads-accesses/
- Click on Integrations > Leads Access
- Select the Business / Page that you’re receiving leads from
- Click on the CRMs tab
- Note that if you’re using the default settings for this Business / Page, the screen will be greyed out with the option to ‘Customize Access’. In this case, all lead alerts will happen in real-time, so there’s no need to change anything further.
- Click on the Assign CRMs button
- Select Privyr from the list
- Click on the Assign button
- Click on Done
- Privyr should now appear under your Connected CRMs list, and you’ll receive instant new lead alerts going forward
Viewing the Campaign, Adset, and Ad Details of your Leads
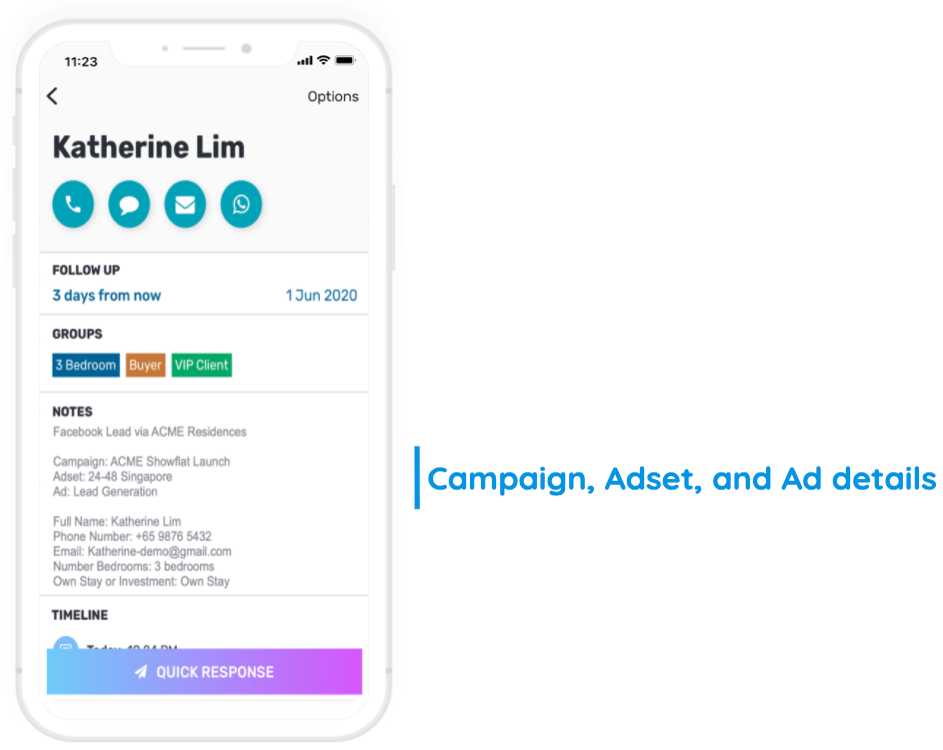
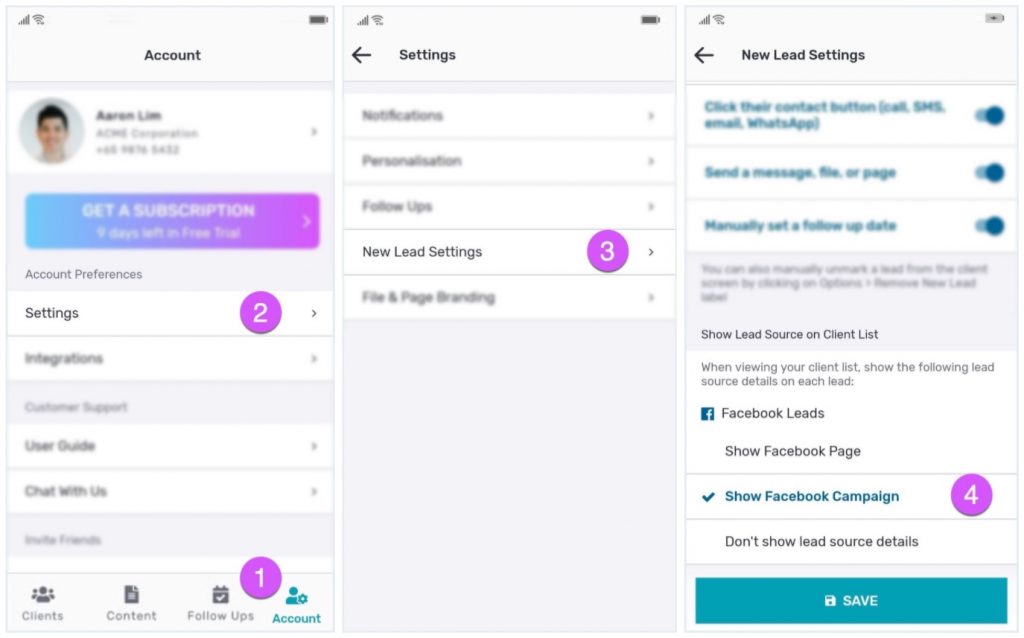
The Facebook Campaign, Adset and Ad details of your leads will be displayed in the NOTES section of your Client Details screen.
You can also choose to display the Facebook Campaign name on the preview of a lead on your client lists, by adjusting the setting under your Account tab > Settings > New Lead Settings.
If your Facebook Campaign, Adset, or Ad details are missing, this could be due to one of two reasons:
- Your Lead Ad(s) may not be set up with an Ad Structure
- If you created the Lead Form directly from your Facebook Page(s) and boost it without going through Facebook Ads Manager to set up and label the Campaign, Adset, and Ad details, then there won’t be any ad structure on your leads.
- You can check this by downloading the leads directly from your Facebook Forms Library to see if they contain the Campaign, Adset, and Ad details.
- Your Facebook account may not have permissions to view Ad Structure details from the Facebook Page(s)
- Please ensure that your Facebook account has Facebook Ads Manager Admin or Advertiser Permissions for the Facebook Page.
- You can check this by downloading the leads directly from your Facebook Forms Library to see if the Campaign, Adset, and Ad details are accessible.
Permissions: Facebook Page Admin
Your Facebook account will typically need Admin permissions to a Facebook Page to be able to access leads from it. You can check whether or not you have Admin Permissions to a Facebook Page through the Facebook mobile app or desktop site, via the steps below.
If you don’t have Admin permissions to a Facebook Page, please contact the owner of the Facebook Page to grant you Admin permissions so you can access the leads.
Note that if the Facebook Page is being managed by Facebook Business Manager with custom access settings, it is possible to use the ‘Leads Access‘ permissions to allow viewing leads without having admin rights to the Facebook Page , or prevent Page admins from being able to view leads.
FACEBOOK MOBILE APP: CHECK PAGE ADMIN PERMISSIONS
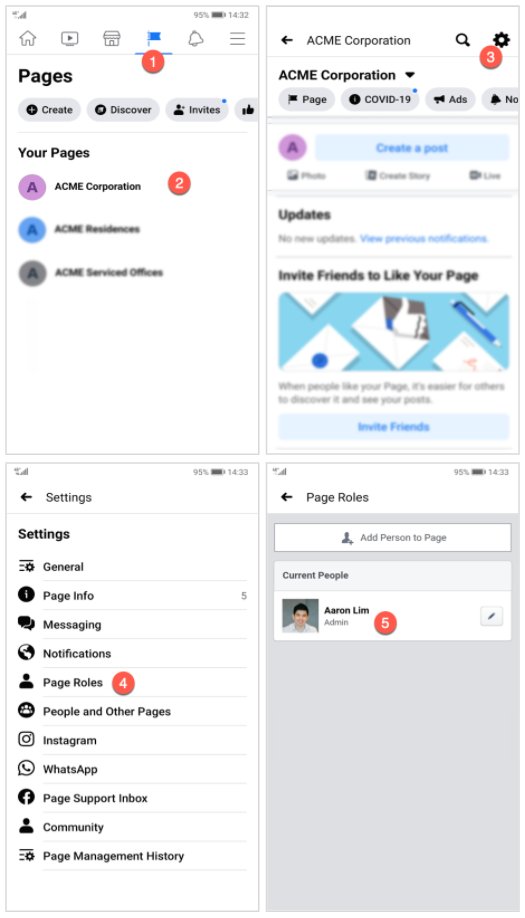
- Open your Facebook app and tap on the Flag icon to view your Page List
- Tap on the Page name you wish to check permissions for
- Tap on the Settings Cog icon in the top right of the screen
- Tap on Page Roles
- Confirm that your role is set to Admin
FACEBOOK DESKTOP SITE: CHECK PAGE ADMIN PERMISSIONS
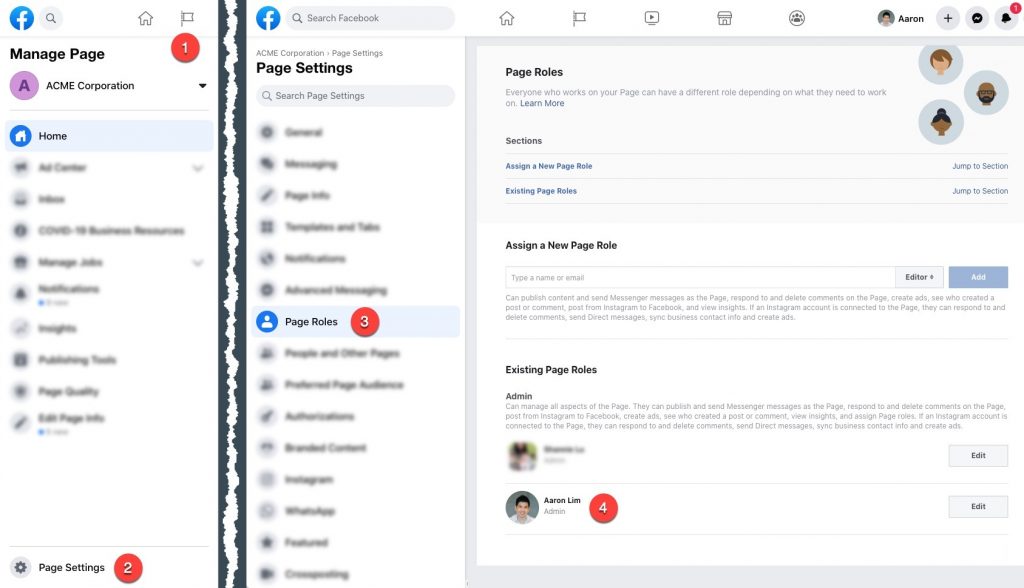
- Go to your Facebook Page list at https://www.facebook.com/pages/ and select the Page to check
- Click on Page Settings in the bottom left of the screen
- Click on Page Roles in the left column
- Confirm that your roles is set to Admin under Existing Page Roles
Permissions: Facebook Business Manager Leads Access
The Leads Access setting in Facebook Business Manager gives Business Manager admins the ability to customise who is able to access leads from the managed Facebook Page(s). By default, all Facebook Page Admins are able to access leads from a Page, unless the Leads Access settings are changed.
If you’ve confirmed that you are a Facebook Page Admin but are still unable to access leads from the Page, it is likely that the Leads Access setting has been customised and that your account does not have those permissions. In this case, please contact the Facebook Page’s Business Manager Owner/Admin and request Leads Access permissions, via the steps below:
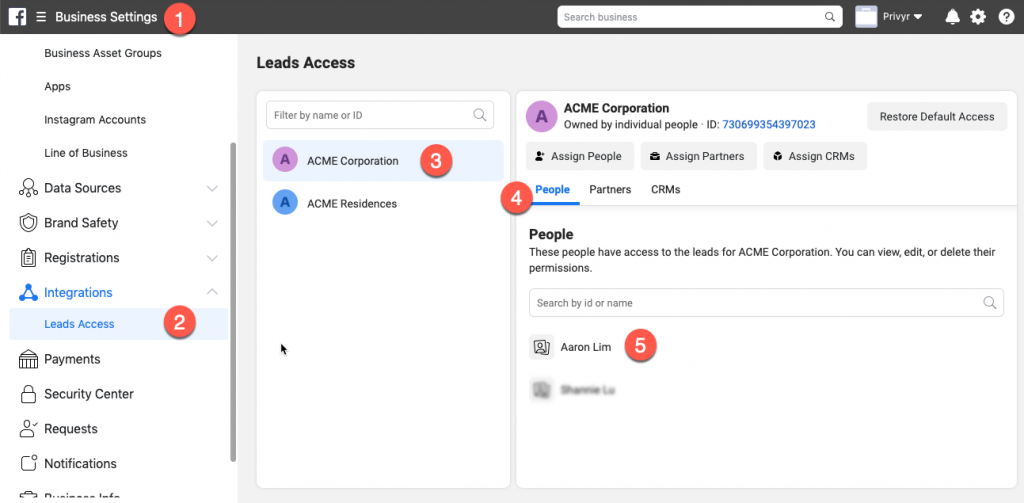
- Go to your Facebook Business Manager Lead Access Settings at https://business.facebook.com/settings/leads-accesses/
- Click on Integrations > Leads Access in the left column
- Select the Business / Page that you’re receiving leads from
- Click on the People tab to see who can access leads for the Page
- Note that if your Business Manager admin has not enabled Leads Access manager, this screen will be greyed out and disabled, and all Facebook Page admins will be able to access leads (default setting). If Leads Access is enabled, can also revert to the default settings by clicking on ‘Restore Default Access’ in the upper right of the screen.
- Confirm that your Facebook Account is listed here (you can add it if needed)
Note that if you customised your Leads Access on Business Manager settings, new Page admins and CRMs won’t have access by default. You’ll need to assign access manually for each new user or CRM.
Permissions: Facebook Ads Manager
The Facebook Ads Manager is a place to manage your ads and configure who can access your ads and ad structure. By default, users with admin access to a Facebook Page will be able to view the Ad Structure (e.g. the Campaign, Adset, and Ad details) on their Facebook Leads.
If you’ve confirmed that you are a Facebook Page Admin and that your Facebook Lead Ads are set up with an Ad Structure, but you still can’t see the Campaign, Adset, or Ad details of your leads, then it is likely that the Ads Manager permissions are preventing you from accessing that information.
In this case, please contact the Facebook Page’s Ads Manager Owner/Admin and request either Admin or Advertiser permissions to the Ad Account, via the steps below:
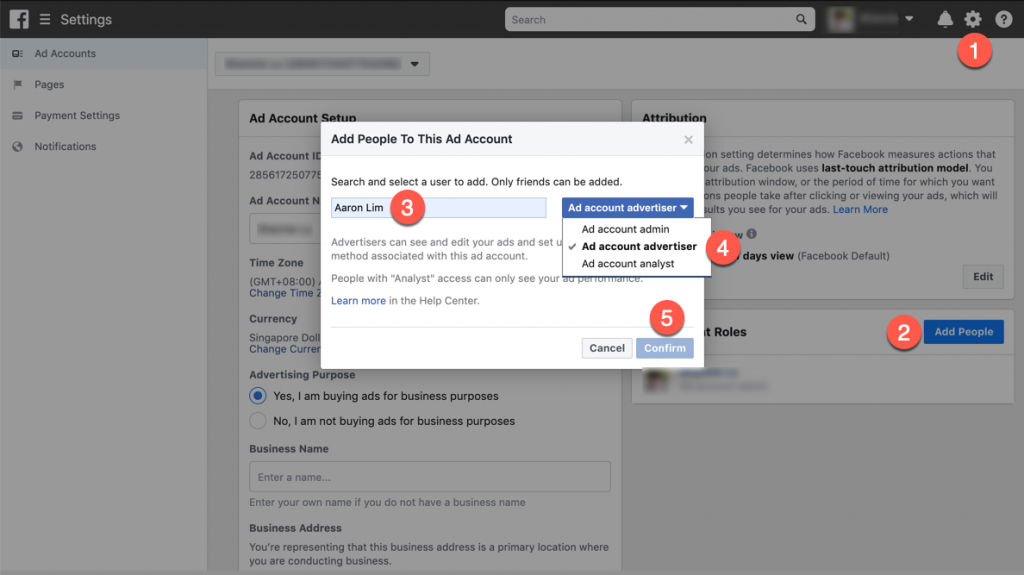
- Go to your Ads Manager Settings at https://www.facebook.com/ads/manager/account_settings
- If you have multiple Ad Accounts or Businesses, make sure the correct one is selected
- Under Ad Account Roles, click on Add People
- Search for the Facebook User to grant access to
- Use the dropdown menu to select either Admin or Advertiser access to view ad structure details
- Click Confirm
Downloading Leads Directly From Facebook
The leads data that is submitted through your Facebook Lead Form can be downloaded via a CSV or Excel export from your Facebook Page via the steps below:
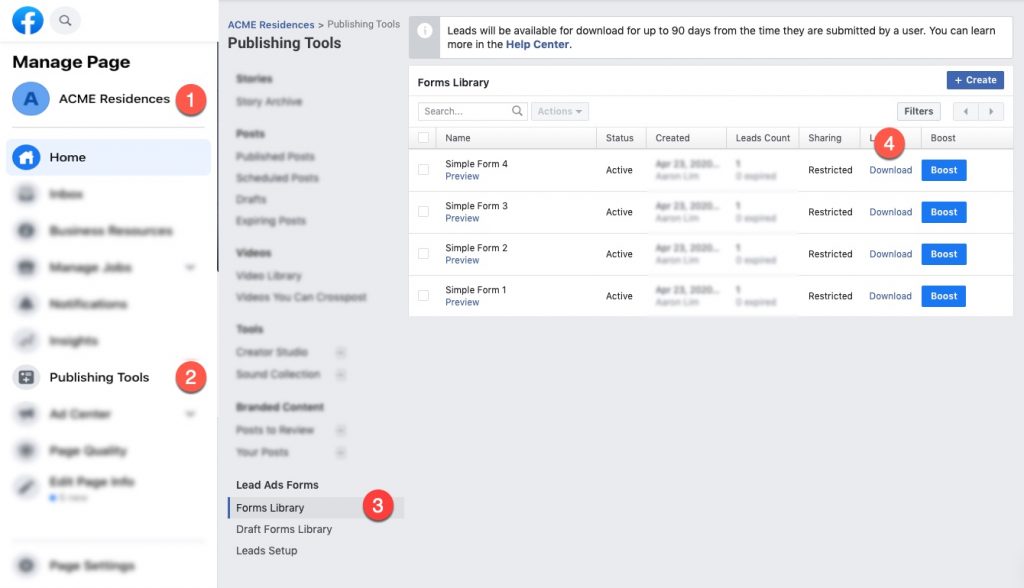
- Log in at www.facebook.com and go to your Facebook Page
- Click Publishing Tools
- Click Forms Library
- Choose the form for which you want to download leads, and click Download
- Click Download New Leads if you only want to download the leads you’ve received since the last time you downloaded the leads.
- Click Download by Date Range if you want to download all leads you received during a certain time period. After choosing this option, select the preferred date range and click Download.
- A screen will appear with the form name and a total leads count. Select CSV or Excel to download the file in your preferred file type.
Downloading leads directly from Facebook can help to confirm if your Facebook account has sufficient permissions to access leads or view lead Campaign, Adset and Ad details on Privyr.
Note that lead information is only available on Facebook for 90 days and older leads cannot be downloaded, but once you’ve connected your Facebook account to Privyr, all leads will be kept in your Privyr account for as long as you like.