You can set up multi-step WhatsApp Sequences to automatically engage and follow up with new or existing leads.
These sequences can send multiple messages from your WhatsApp Business number to keep your leads engaged across days, weeks, or months.
WhatsApp Sequences can be set to automatically stop once a lead responds, or when you take over the conversation in the WhatsApp Business app. This ensures you won’t accidentally over-message a lead who’s actively chatting with you.
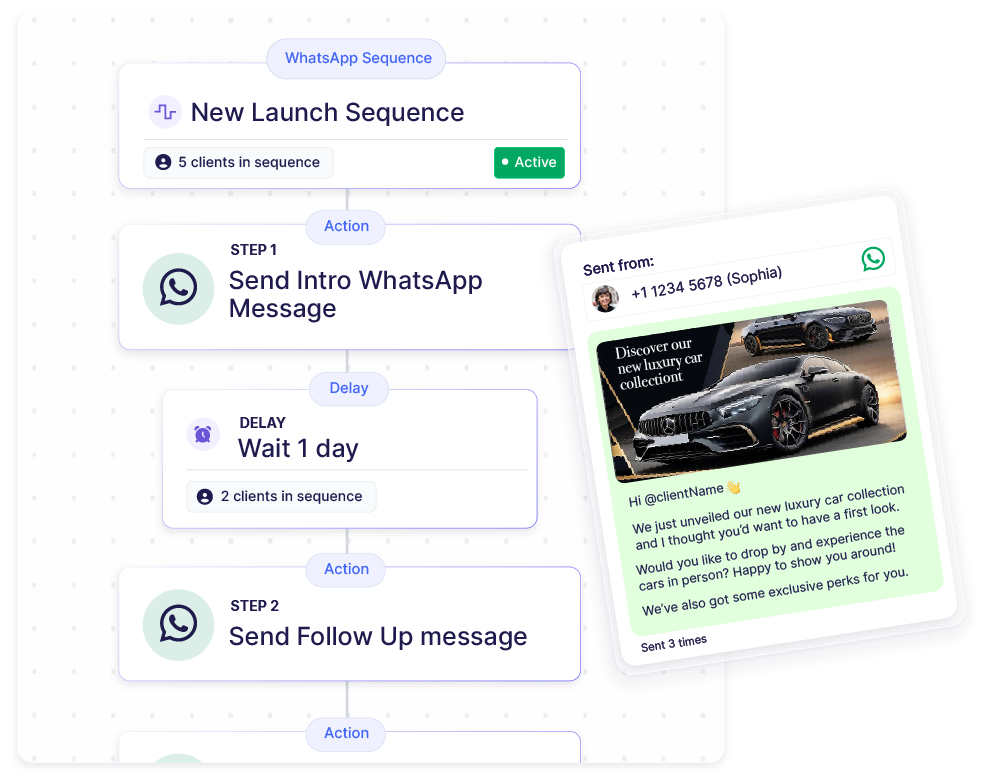
For example, here’s a sample introduction WhatsApp sequence for new leads:
- 💬 Instantly send an introduction WhatsApp message to a new lead
- ⏰ Wait 1 day
- 💬 Send an automated WhatsApp follow-up message to arrange a meeting
- ⏰ Wait 2 days
- 💬 Send an automated WhatsApp follow-up to share more listing details
As each step is due, Privyr automatically sends the WhatsApp message to your leads. Then, it automatically moves the client to the next sequence step and starts counting down to the next follow-up.
All actions that are due, upcoming, or overdue can be viewed on the Actions tab.
You can create multiple Automated WhatsApp Sequences to use in different situations, such as:
- A Default Introduction Sequence to engage and follow up with new leads
- A Post-Meetup Sequence for leads who attended a meeting with you
- A Post-Purchase Sequence to check in with leads who converted
- A Quarterly Catch-Up Sequence to stay in touch with existing clients or leads who are not ready to buy at the moment
Sequence Tab
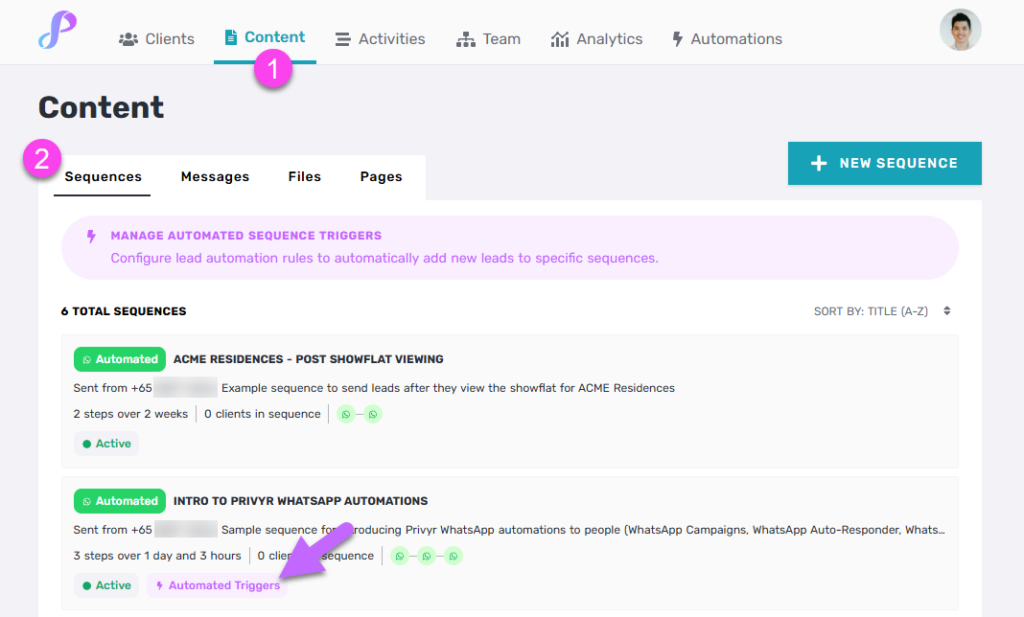
To view your Sequences, tap the Content icon in the footer and select the Sequences tab at the top.
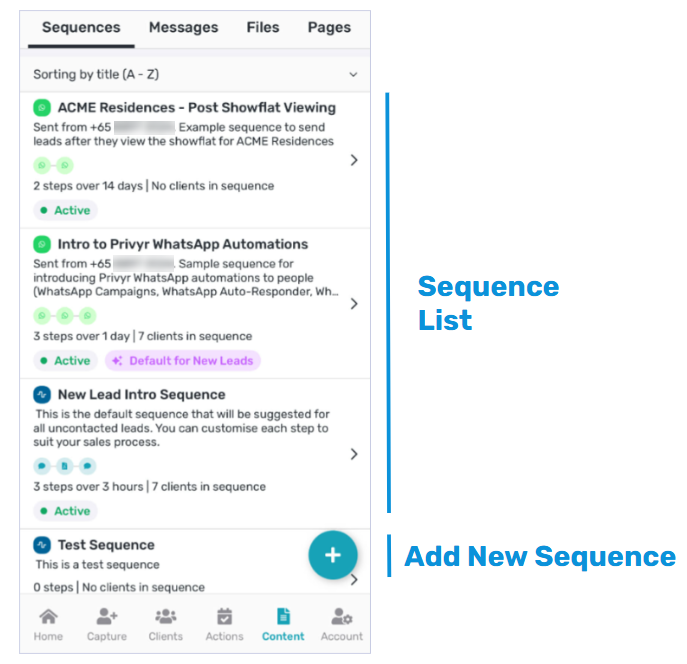
Your Sequences List shows all the sequences you’ve created or have access to. It also displays the description, step summary, and the number of clients that are currently in it. You can tap on any sequence to view more details or edit it.
To create a new Automated WhatsApp Sequence, tap the ‘+’ button at the bottom. You can find the detailed steps here.
WhatsApp Sequence Details
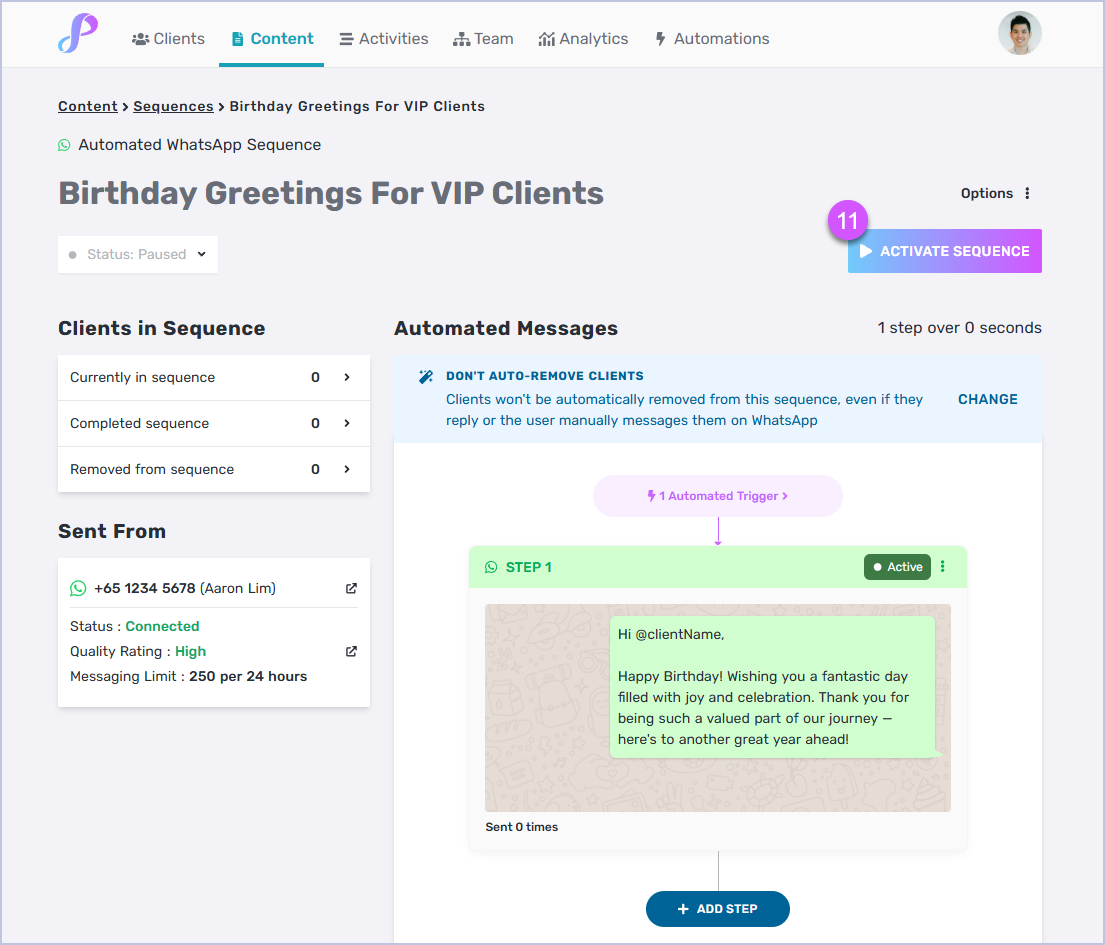
You can tap on any sequence in your list to view more details. Here’s a breakdown of the details screen:
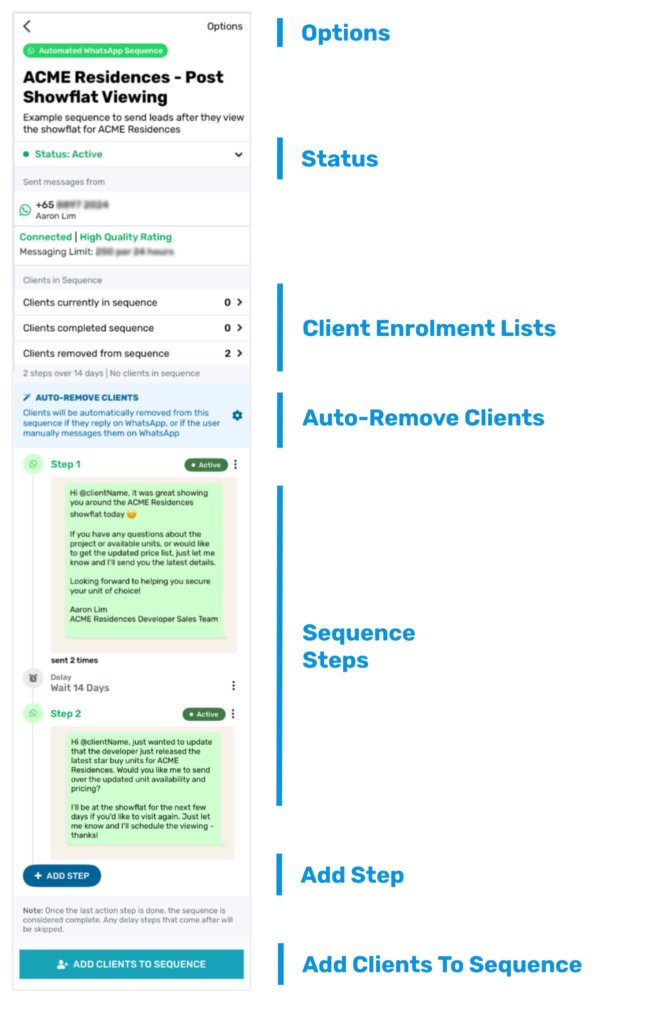
- Options: Tap on the Options button in the top right corner to edit the sequence title and description, create a copy, or delete it.
- Status: Tap on the status dropdown to toggle the sequence between Active and Paused. Pausing a sequence will pause all clients at their current steps, and all automated messages and alerts will be paused.
- Client enrolment lists: View the list of clients that are currently in the sequence, have completed it, or were removed before completion.
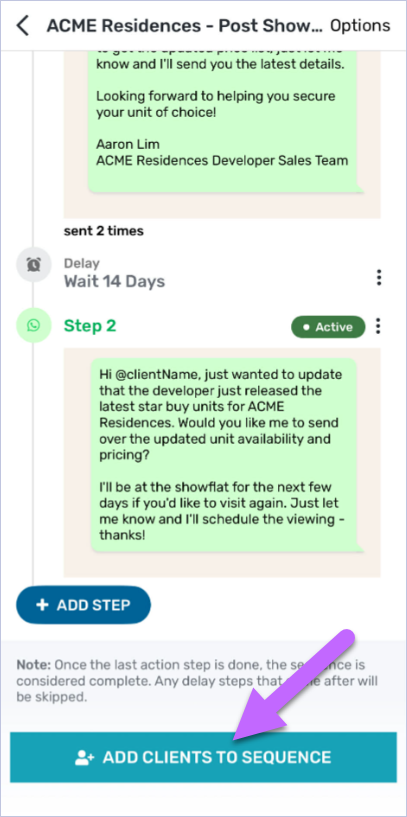
- Sequence steps: This displays all steps in the sequence. Tap on the “⋮” icon to reorder, edit, or delete a step.
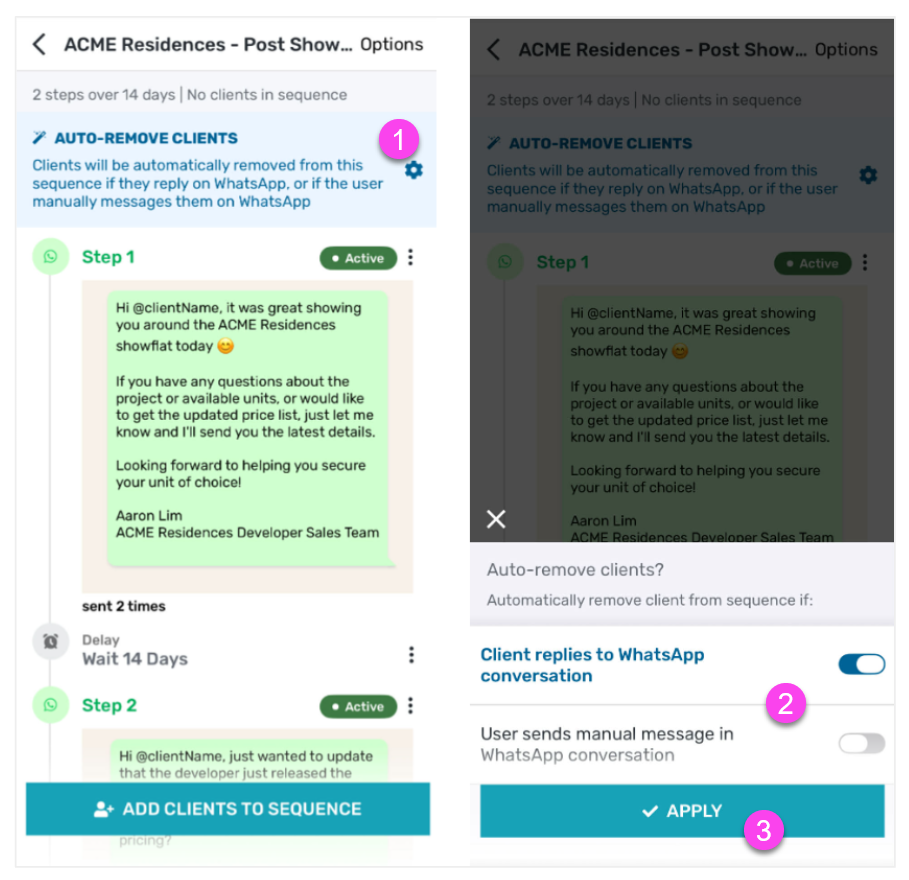
- Auto-Remove Clients: This setting allows you to automatically remove clients from the automated sequence once they’re actively chatting with you.
- Add step: Button to add a new step to the sequence, such as an automated WhatsApp message or a time delay.
- Add Clients to Sequence: This button lets you select and add clients to the Automated WhatsApp Sequence.
Creating Automated WhatsApp Sequences
To create an Automated WhatsApp Sequence, your WhatsApp Business phone number must be connected to Privyr. If you have not set up the connection yet, please follow the guide on Connecting your WhatsApp Business number to Privyr.
Once you’ve connected your WhatsApp Business number, you can set up your WhatsApp Sequence to start following up automatically:
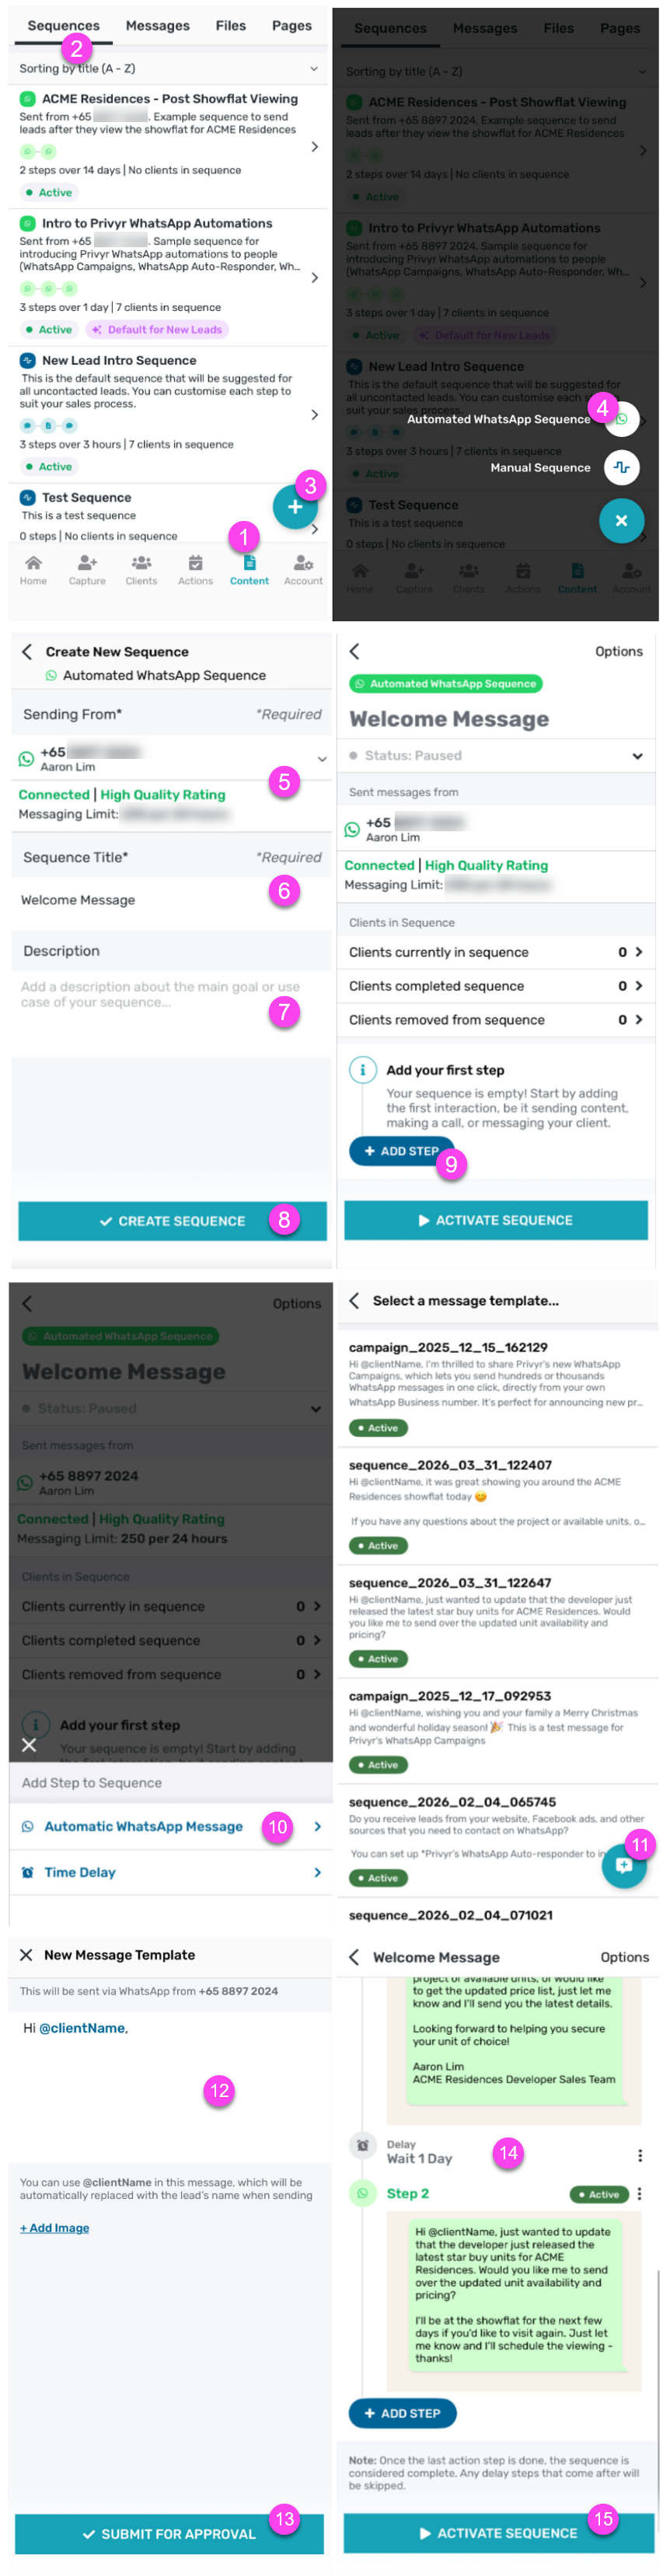
- On the Privyr mobile app, go to the Content tab.
- Here’s the direct link on the Privyr web: https://www.privyr.com/login
- Tap on the Sequences tab
- Tap on the (+) to create a new Sequence
- Select Automated WhatsApp Sequence
- Select the WhatsApp Business Number you’d like to use to send the automatic WhatsApp follow-ups
- Enter the Sequence Title
- Enter a Description about the main goal or use case of your sequence
- Click CREATE SEQUENCE
- Once created, you can start adding steps to your Sequence by clicking on + ADD STEP
- Select Automatic WhatsApp Message
- You can select an existing approved WhatsApp message template or tap on (+) to create a new WhatsApp message template
- Customise the message you want to use for this step
- You can use @clientName in this message, which is auto-personalised with your lead’s name during sending
- You can also add an image, which will be attached when the automated WhatsApp message is sent to your lead(s)
- Click on SUBMIT FOR APPROVAL and select the message as the next step
- The message template will be submitted to WhatsApp for approval, which usually takes a few minutes up to 24 hours for your first few templates.
- You can add further steps where necessary, such as:
- Time Delay: Specify the number of hours or days to wait before the next step starts. This is useful for spacing out your automated follow-ups or giving clients time to respond.
- Automatic WhatsApp Message: Add another automated WhatsApp follow-up that you’d like to send to the lead
- Once the steps have been created, you can tap on the “⋮” icon at each step to reorder the steps, edit them, or delete them.
- Click on Activate Sequence
- Review how many automation credits will be used for each client added to the Automated WhatsApp Sequence, then tap on Activate Sequence
- Credits will only be used for WhatsApp messages that are successfully sent.
- That’s it! You can then set up Lead Automations Rules to automatically add new leads to the appropriate Automated WhatsApp Sequence or manually add them to an Automated WhatsApp Sequence.
This Automated WhatsApp Sequence will be used to automatically send WhatsApp messages to all new leads received via your integrations once the message template gets approved by Meta. Then, it automatically moves the client to the next step of the sequence and starts counting down to the next follow-up.
You can submit a test lead on your connected lead source(s) to ensure it is working as intended.
Note: Each successfully sent automated message uses 1 automation credit, which is charged based on your Privyr subscription plan. You will NOT get charged for messages that you manually send and receive on the WhatsApp Business app.
Auto-Remove Clients from the Automated WhatsApp Sequence
You can configure your settings to automatically remove clients from an automated sequence once they respond to you or once you manually message them on WhatsApp.
This ensures they don’t continue receiving automated messages unnecessarily, while preventing duplicate communications.
In Privyr, sequences can automatically stop for leads that meet one or both of the following conditions:
- Client replies to user on WhatsApp: If a client responds to any of your messages on WhatsApp, they will be removed from the sequence. Once a real conversation begins, the automation stops, so you can continue the interaction manually.
- You manually message clients on WhatsApp: If you send a message to the client manually via WhatsApp, they will also be removed from the sequence. This prevents the client from receiving unnecessary follow-ups when you are already communicating with them directly.
You can enable one or both of these options depending on your preferences. For example:
- Enable both options if you want automation to stop as soon as any two-way interaction happens.
- Enable only the client-reply option if you still want automated follow-ups to continue until the client responds.
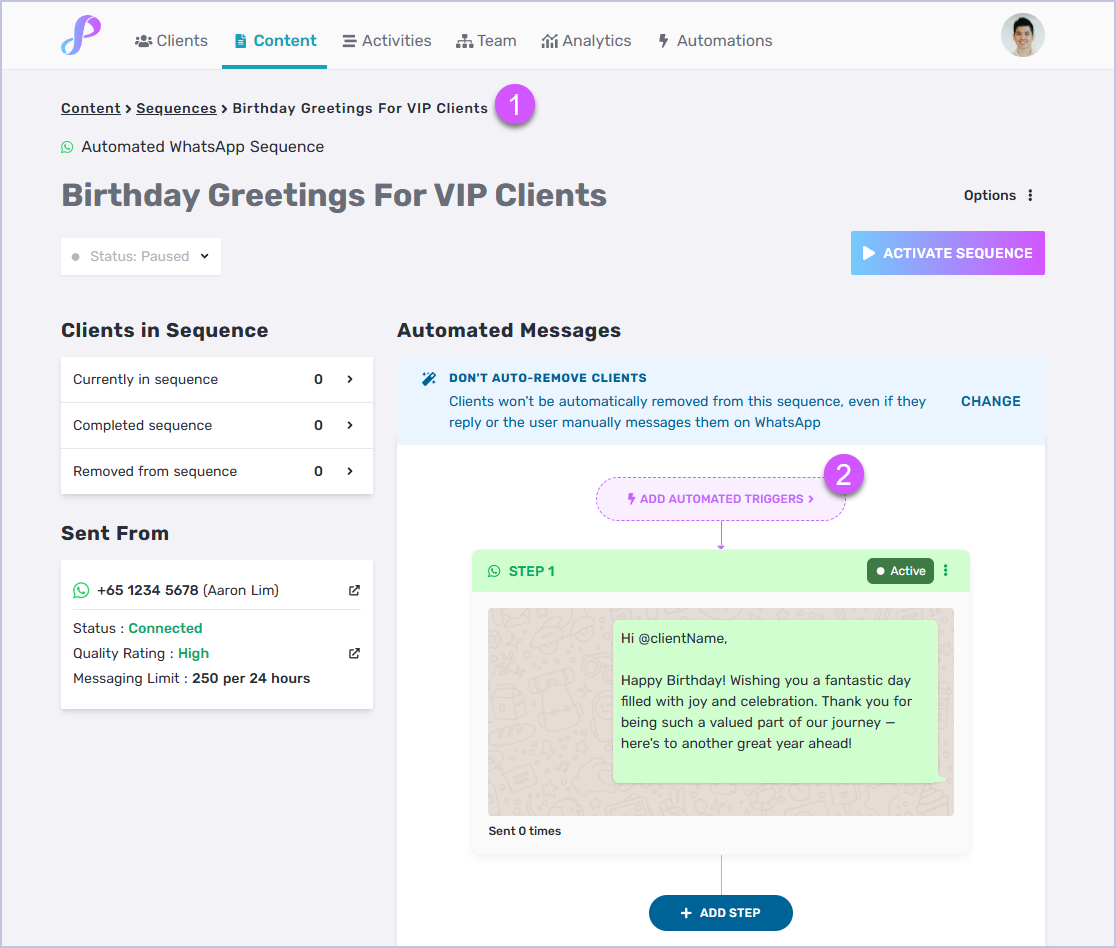
Setting Up Automated WhatsApp Sequences Based on Custom Date Fields
You can trigger a WhatsApp Sequence based on any custom date field – including a lead’s birthday, contract renewal date, anniversary, and more.
Without having to remember to do it yourself, this allows you to perfectly follow up with your lead for every important event at exactly the right time, such as:
🎂 Birthdays & anniversaries: Celebrate your lead’s milestones, send them special offers, and trigger the next steps to keep the conversation going
🏡 Lease renewals: Managing rental properties or any type of recurring contracts? Start renewal conversations weeks or months before the lease ends
📅 Appointment reminders: Remind clients ahead of time and help them prepare
This works with both automated & manual sequences, and you can decide what happens when an important date arrives.
With an Automated WhatsApp Sequence, Privyr can help you:
- Send a single WhatsApp message for greetings, special offers, or important updates.
- Send a series of messages over multiple days, weeks, or months to nurture the relationship and move the conversation forward.
You can also automatically trigger a Manual Sequence based on specific date fields, which is useful if you prefer to call clients about special events like lease renewals. You’ll receive reminders to follow up by phone call, SMS, or however you prefer, at exactly the right time.
This can be set up using the Privyr mobile app or Privyr web:
- Go to your Content tab > Sequences
- Create a new sequence, either Automated WhatsApp Sequence or Manual Sequence
- Add steps to your sequence
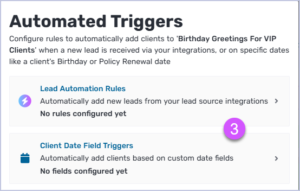
- Click ‘Add Automated Triggers’ > ‘Client Date Field Triggers’
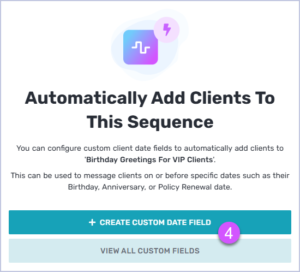
- Click ‘Create Custom Date Field’ to create a new date field, such as Birthday, Anniversary, Viewing Date, Lease Renewal Date, Policy Expiry Date, and more
- Set up the Date Field options:
- Notifications – this will notify you when a client’s selected date occurs, with the following options:
- Every year
- Only on the selected year
- Never (no notifications)
- Notification Timing – this will notify you when a client’s selected date is approaching, with the following options:
- On the date itself
- 1 day before
- 1 week before
- Automatically Add To Sequence – this will automatically add the client to a sequence when a client’s selected date is approaching, with the following options:
- Select the appropriate Sequence
- Set the day and timing when the lead is added to the Sequence:
- On the date itself
- Select custom days before
- Set the recurring option:
- Every year
- On the selected year
- Automatically Fill from Lead Data – you can enable this to automatically populate this field from new lead submissions. This requires your lead form field to exactly match the name of the Date Field.
- Notifications – this will notify you when a client’s selected date occurs, with the following options:
- Click SAVE CUSTOM FIELD
- Lastly, go back to your Sequence to Activate Sequence

That’s it! Once you update the custom date field for every lead, Privyr will automatically follow up as the date approaches by sending a WhatsApp message or notifying you to reach out personally, based on how you’ve set things up.
There’s no need to track important dates manually or set your own reminders, as Privyr monitors each lead’s date field for you and takes action exactly when it should.
Editing the WhatsApp Message Template in a Sequence Step
To edit a WhatsApp message template for a step on your Automated WhatsApp Sequence, follow these steps:
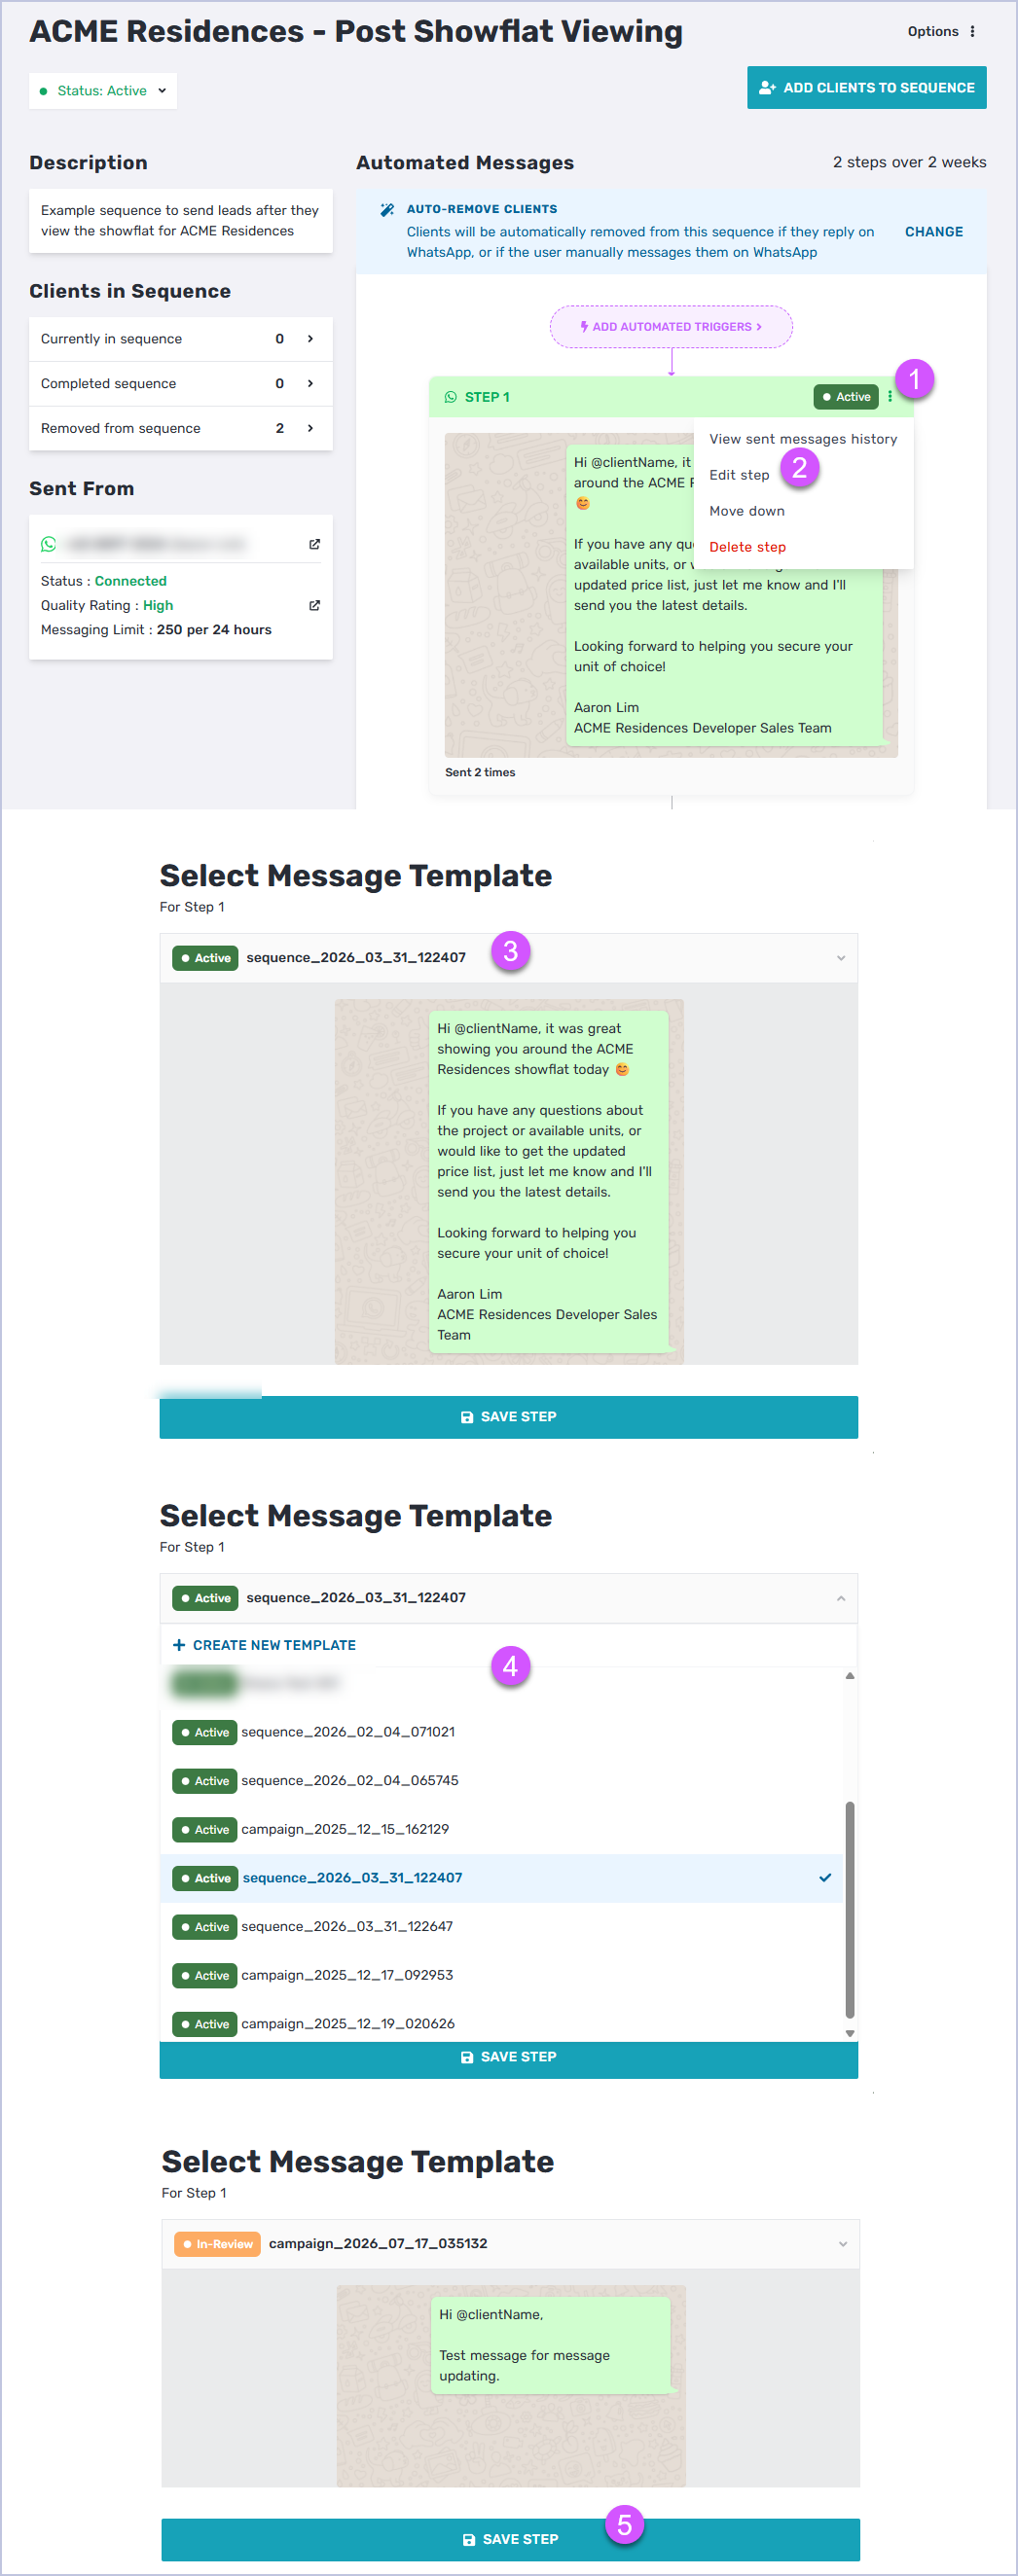
- When viewing your Automated WhatsApp Sequences, click on the three-dot button (…) next to the step of the message template you’d like to edit or update
- Click on Edit Step
- Click on the dropdown button
- Choose an existing WhatsApp message template to use for that step, or click ‘+ CREATE A NEW TEMPLATE’ to create a new one
- Once your new message template is finalised, click Submit for Approval > SAVE STEP
Please note that newly submitted WhatsApp message templates may take a few minutes up to 24 hours for Meta to approve. Once approved, it will automatically be used for your Automated WhatsApp Sequence and sent to your client(s) via WhatsApp when they reach that step.
Viewing your Automated WhatsApp Sequence History
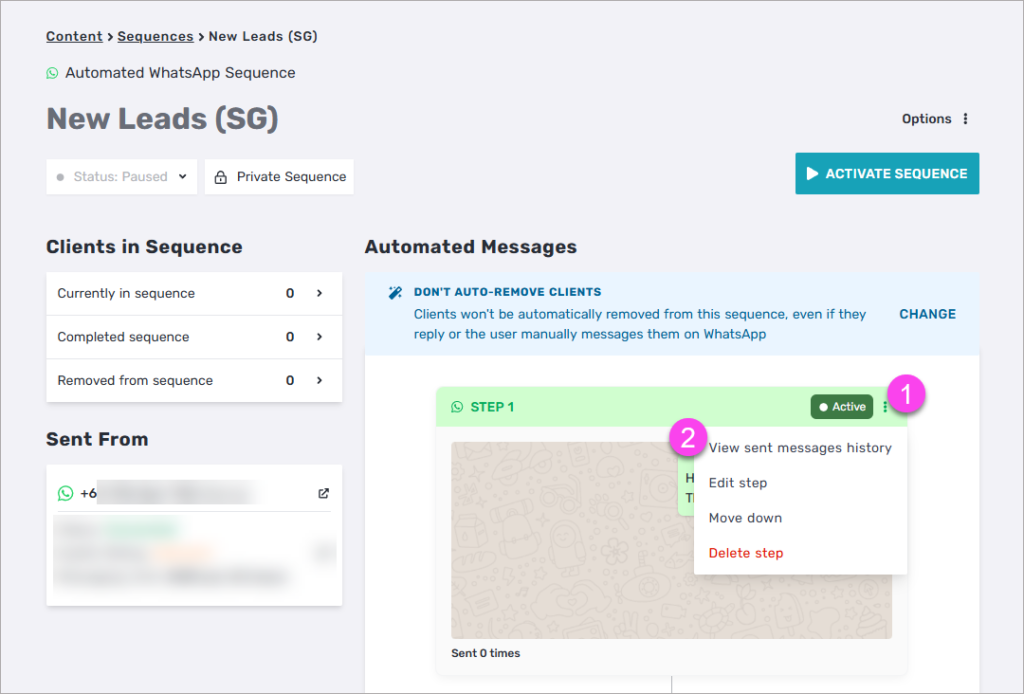
When viewing a WhatsApp Sequence, you can track the send history of each step. Simply click on the three-dotted (⋮) icon at the top right corner of the message step. Then, click on ‘View Sent Message History’.
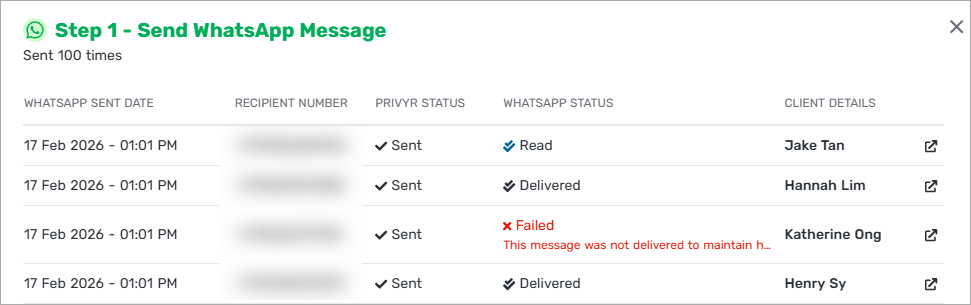
You’ll see all the leads that completed this step, along with the following details:
- WhatsApp Sent Date
- Recipient number
- Privyr Status, which indicates whether Privyr has attempted to send the message
- WhatsApp Status, which indicates whether the messages was delivered successfully by WhatsApp
- Sending: Message is still being delivered on WhatsApp’s end
- Sent / Delivered / Read: Message was successfully sent on WhatsApp, with delivery and read status shown if available
- Failed: WhatsApp could not deliver the message (e.g. no valid WhatsApp account found)
- Client Details
This list will only show leads that were successfully messaged through this automation. Leads that weren’t messaged successfully will not appear in this list. Click on any lead to view their full details.
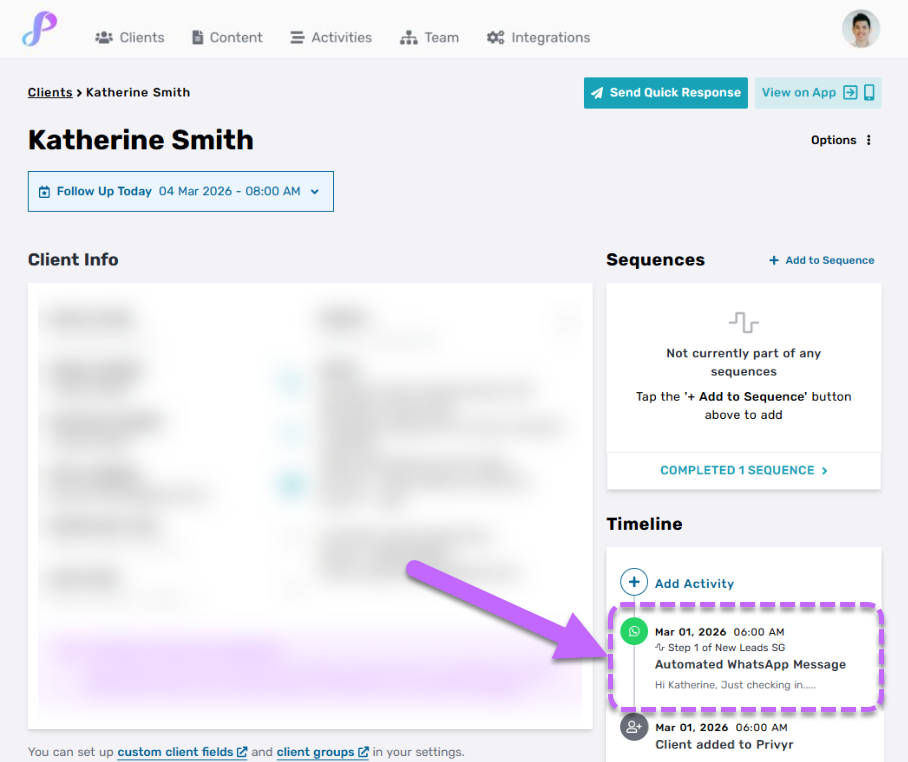
When viewing a client in Privyr, you’ll also see the Automated WhatsApp Messages logged to the client’s timeline, if they were sent successfully.
How to set up Lead Automation Rules for Automated WhatsApp Sequence
You can configure Privyr to automatically add leads to an Automated WhatsApp Sequence based on the lead source/details. When a new lead comes in and matches specific criteria, Privyr automatically adds them to the right sequence based on these rules.
Lead Automation Rules apply to new leads received across all your lead sources, such as your website, Facebook Lead Ads, Google Ad Lead Forms, and other integrations like Zapier. You can also create lead automation rules with advanced criteria to automatically add leads to an Automated WhatsApp Sequence based on specific criteria, such as by Facebook Page, Facebook Lead Form, or Custom Fields.
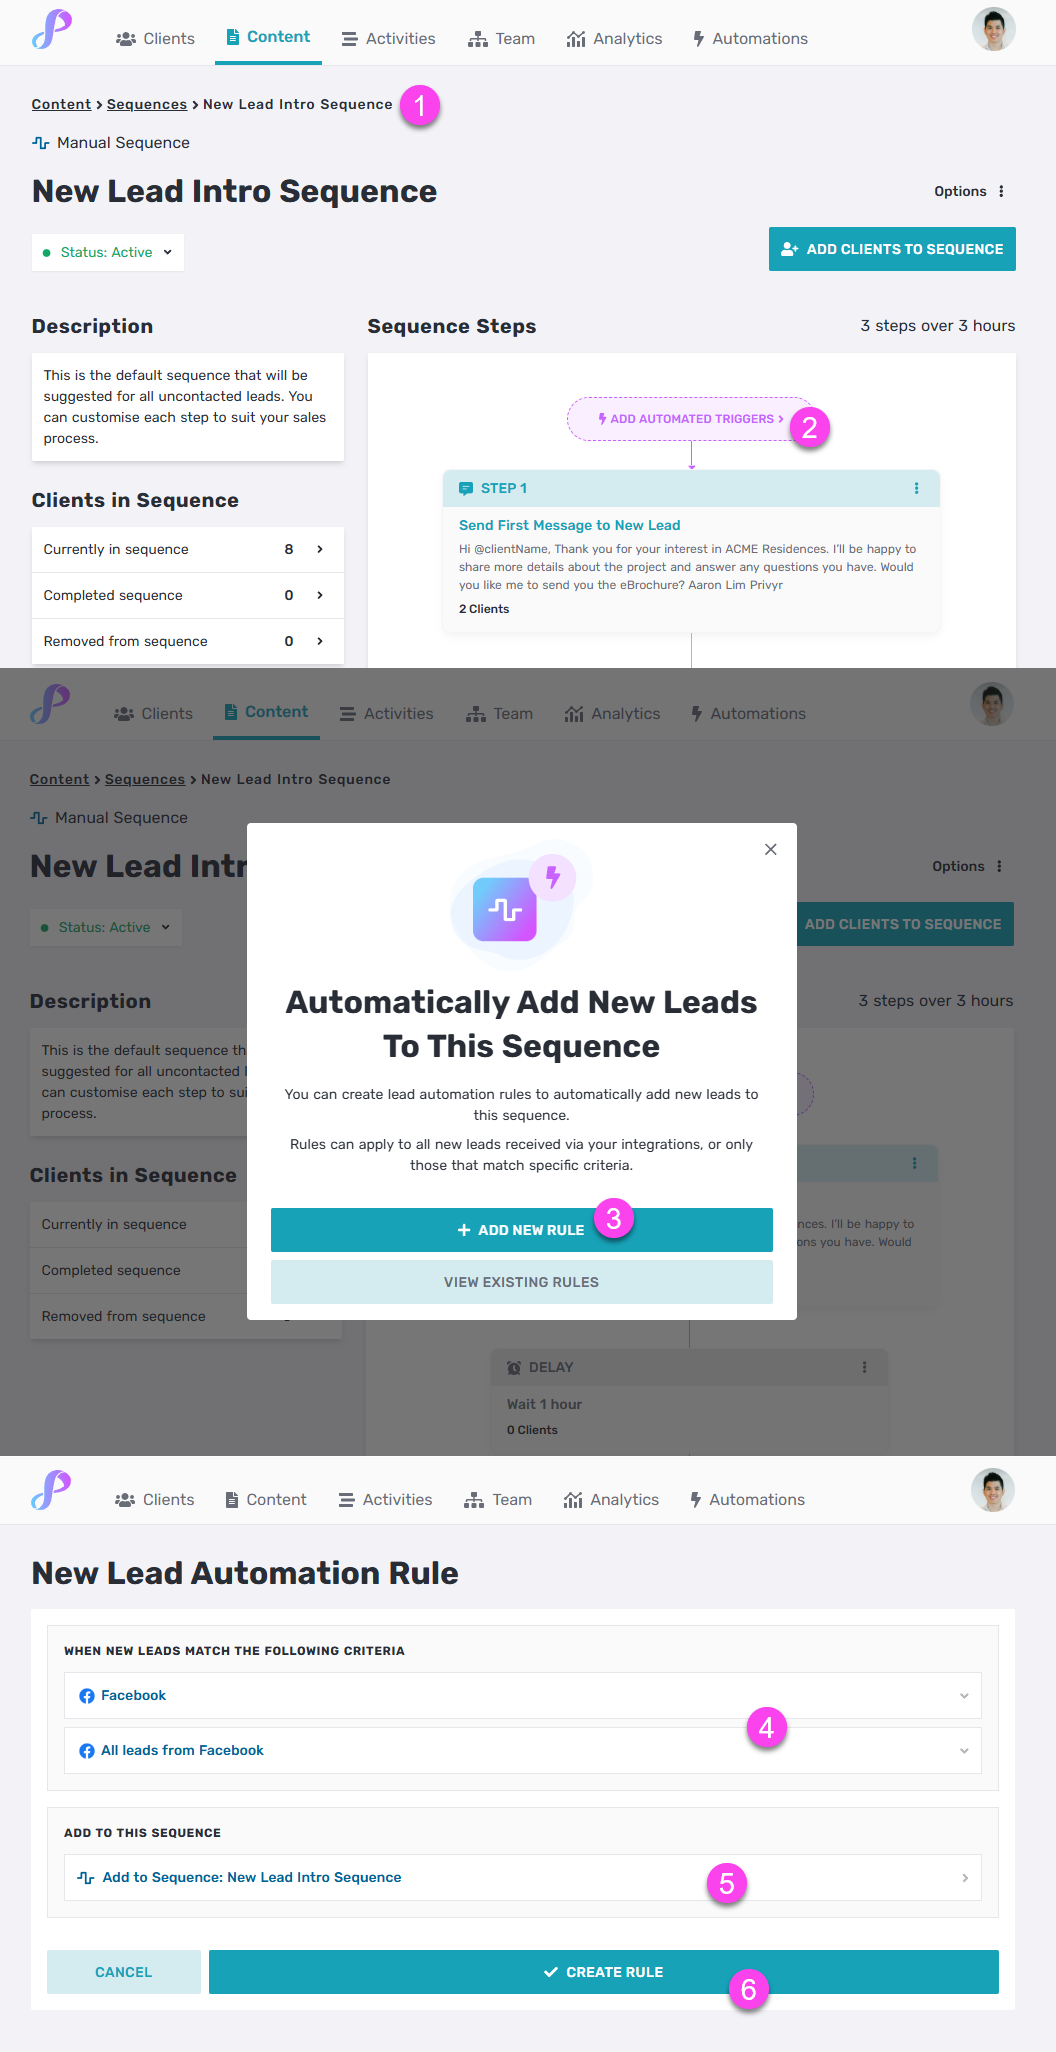
When viewing a Follow Up Sequence, you’ll see this pink button to ‘ADD AUTOMATED TRIGGERS’. This lets you create lead automation rules to automatically add new leads to the sequence.
Tap on + ADD NEW RULE, then select the criteria to define what type of leads should be added to the sequence. You can create different rules based on the lead source, custom field values, and more.
Next, select which sequence those leads should be added to – this is automatically populated from the sequence you started on. If you’re in a team, you can also select who the lead gets assigned to, and customise different sequences for each team member.
Once you’re done, click CREATE RULE to save. You’ll be redirected to your Lead Automation Rules list, where you can create as many rules as you need.
Please note that rules run in order, so when you have more than one rule, only the first matching rule will apply to a lead.
When you go back to your Content > Sequences tab, you’ll see a pink ‘Automated Triggers’ label on sequences that have matching lead automation rules. When you click to view that sequence, you’ll see the number of automated triggers linked to it, and can click to view and edit those matching rules.
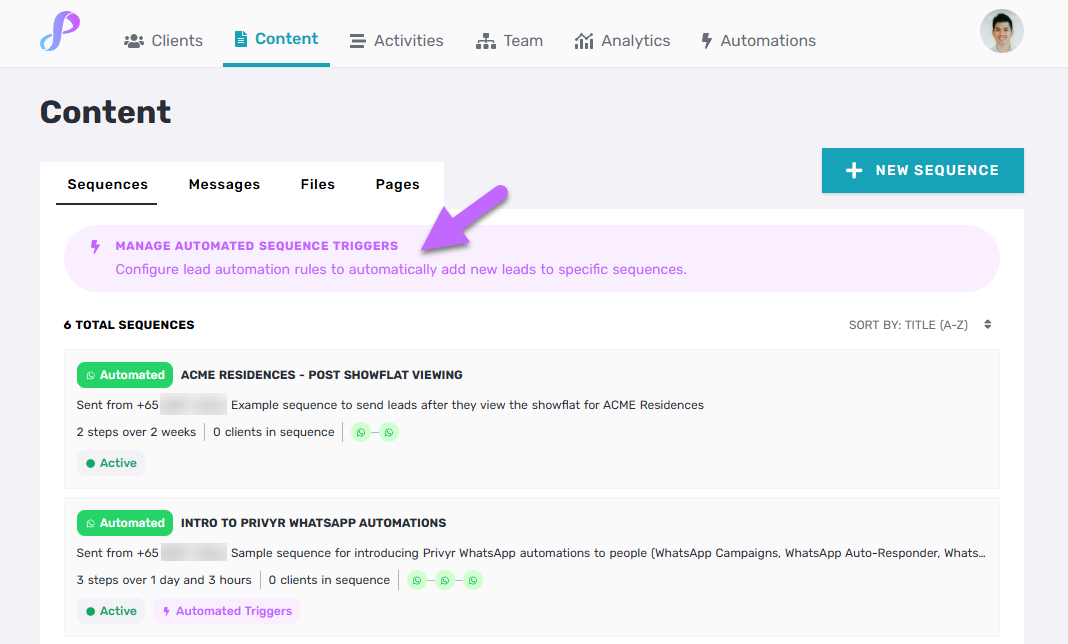
You can easily manage all of your lead automation rules by clicking the pink ‘MANAGE AUTOMATED SEQUENCE TRIGGERS’ banner at the top of your Sequences list, which will bring you to your full Lead Automations Rules list.
Last but not least, you can also access your Lead Automation Rules on the Privyr web via your Automations tab > Lead Automation Rules, or on the mobile app under your Account tab > Lead Automation Rules.
Manually Adding Clients to an Automated WhatsApp Sequence
There are several ways to manually add your clients to an Automated WhatsApp Sequence.
When viewing the Automated WhatsApp Sequence, you can tap on ADD CLIENTS TO SEQUENCE to filter your clients and manually add them to the sequence.
In the overview tab of your client details screen, you will see your client’s Sequences Overview. Tap on it to add your client to a sequence. You can also add them by tapping on Options > Add to Sequence.

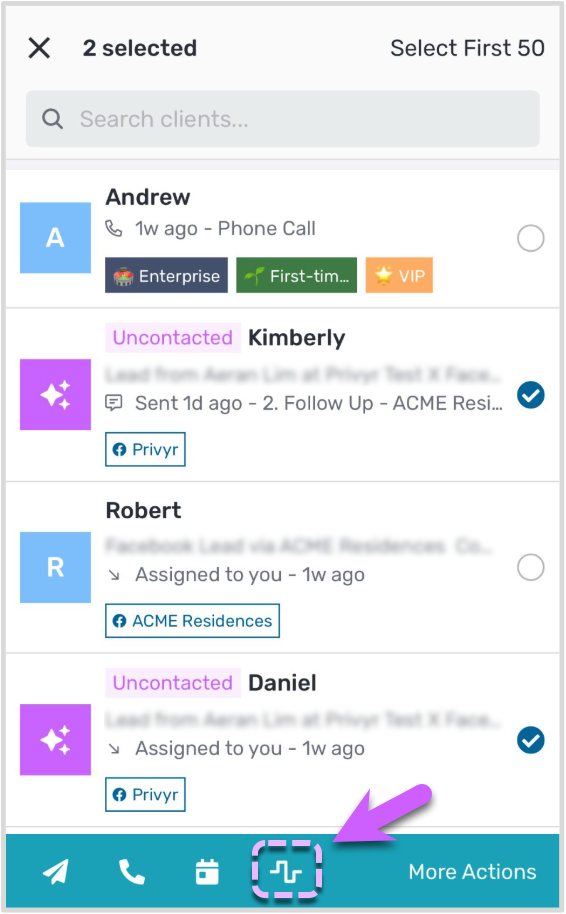
You can also add clients to a sequence in bulk from your client list or client search results screen. Tap and hold on any client to trigger multi-select mode and perform bulk actions. You can select up to 50 clients at a time, then tap on the sequences icon to add them to the selected sequence.
Once your clients have been added to a sequence, the automated WhatsApp messages will then be sent to the clients.
Managing Clients In A Sequence
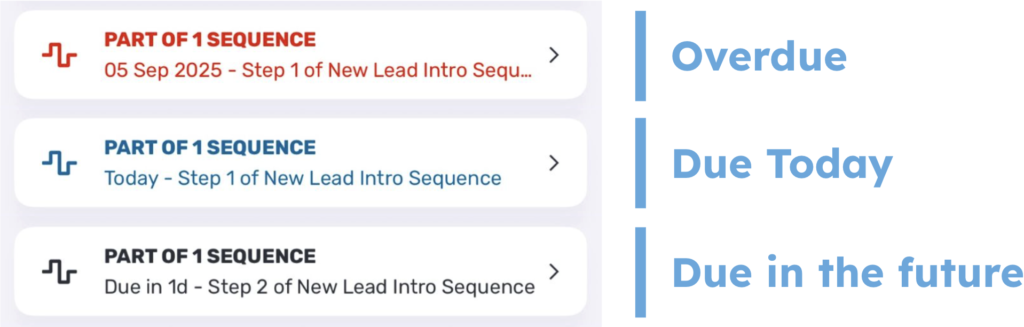
If your client is part of any active sequences, your Sequence overview will display the total number of active sequences, and highlight the step that needs your attention first, whether it is overdue, due today, or due in the future.
Tap on the sequence overview to view the full list of sequences that your client is part of, or add them to new ones. When viewing the list of active sequences, you can tap on any sequence to see an overview of the Automated WhatsApp Sequence, and perform the pending step or skip it for manual Follow Up Sequences.