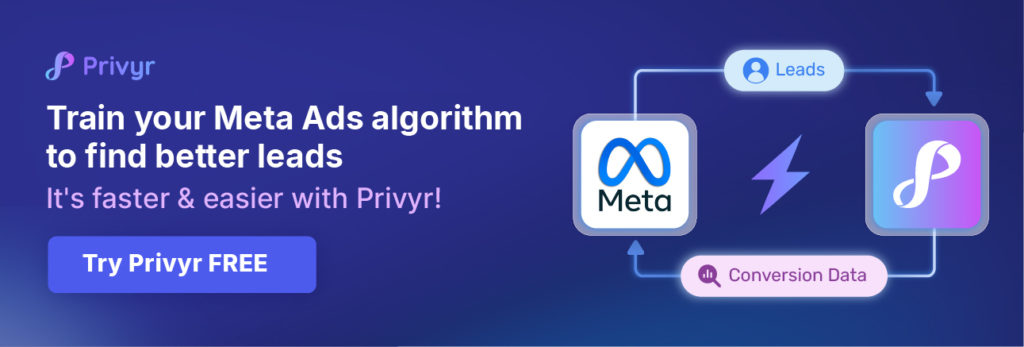
The Meta Conversions API (CAPI) integration is used to optimise your Facebook Lead Ad campaigns, improving lead quality while reducing cost per qualified lead. It works by sending lead quality signals back to Meta to train their ad algorithms on which leads are good for your business, so your campaigns can be optimised to maximise the number of high-quality conversion leads.
Privyr’s Meta Conversions API (CAPI) integration takes less than 5 minutes to set up, and can be powered by the Privyr mobile app on your phone or the web version of Privyr on your laptop, desktop computer, or tablet.
Whenever you update the LEAD STAGE field on any Facebook lead in Privyr, the data is automatically sent to Meta to optimise your ad targeting, decrease cost per result, and accurately measure campaign outcomes. And if you’re also using WhatsApp to engage those leads, Privyr can help you manage conversations seamlessly and ensure every update in your sales process is reflected in your customer interactions.
- Optimised Ad Targeting: Your conversion data will be used to fuel Meta’s AI to locate and convert new customers more accurately
- Cost Efficiency: Reduce your cost per result by allocating your ad budget more effectively toward high-potential customers based on your conversion data
- Campaign Outcome Measurement: Gain a clearer understanding of which channels yield the best results, allowing you to focus on strategies that work
Setting up Meta Conversions API (CAPI) on Privyr
It takes less than 5 minutes to set up Privyr’s Meta Conversions API (CAPI) integration, via the following steps:
- Connect your Privyr account to Facebook Lead Ads
- This lets you instantly and automatically receive new leads from Meta Lead Ads into your Privyr account
- In Privyr, update the LEAD STAGE field on leads from Facebook
- This can be done from the Privyr mobile app or Privyr web, and trains the Meta ads algorithm on which leads are good for your business
- Keep updating the LEAD STAGE field as each lead progresses, and also on past Facebook leads received within the last 90 days.
- In Meta Ads Manager, optimise your ads for Conversion Leads
- Create a new Ad Set with the following options:
- Conversion Location: ‘Instant forms’
- Performance Goal: ‘Maximise number of conversion leads’
- Dataset: ‘<Page_Name> Event Data’
- Conversion Event: <Target_Lead_Stage>
- This tells Meta to optimise your campaigns to find higher-quality leads, based on the lead quality signals you’re sending from Privyr
- Create a new Ad Set with the following options:
Step 1. Connect your Privyr account to Facebook Lead Ads
Connecting your Privyr account to your Facebook Lead Ads only takes 30 seconds, and can be done from the Privyr mobile app or web version:
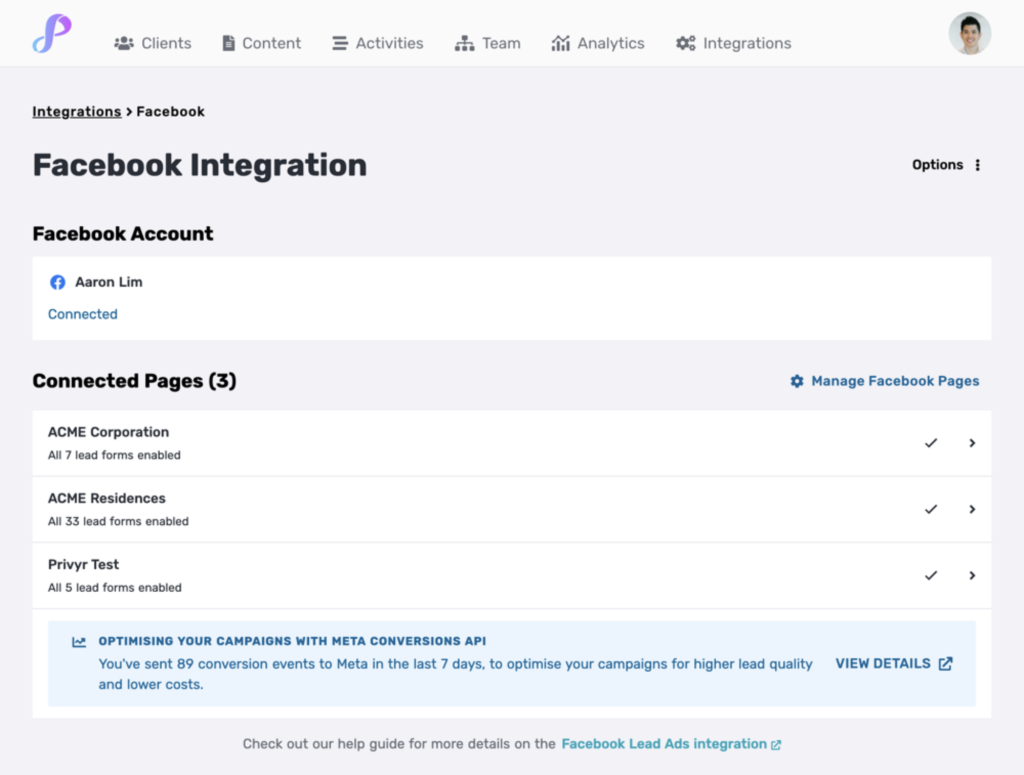
- Privyr Mobile App: Go to your Account tab > Integrations > Facebook. Follow the steps to connect your Facebook account.
- Privyr Web: Go to the Integrations tab and click on Facebook. Follow the steps to connect your Facebook account.
Once connected, you’ll see a list of your connected Facebook Pages and can import past leads. All new leads from your Facebook Lead Ads will be instantly and automatically added to your Privyr account going forward.
For more information on connecting to your Facebook account, view our full guide on connecting to Facebook Lead Ads.
Step 2. Update the LEAD STAGE field in Privyr
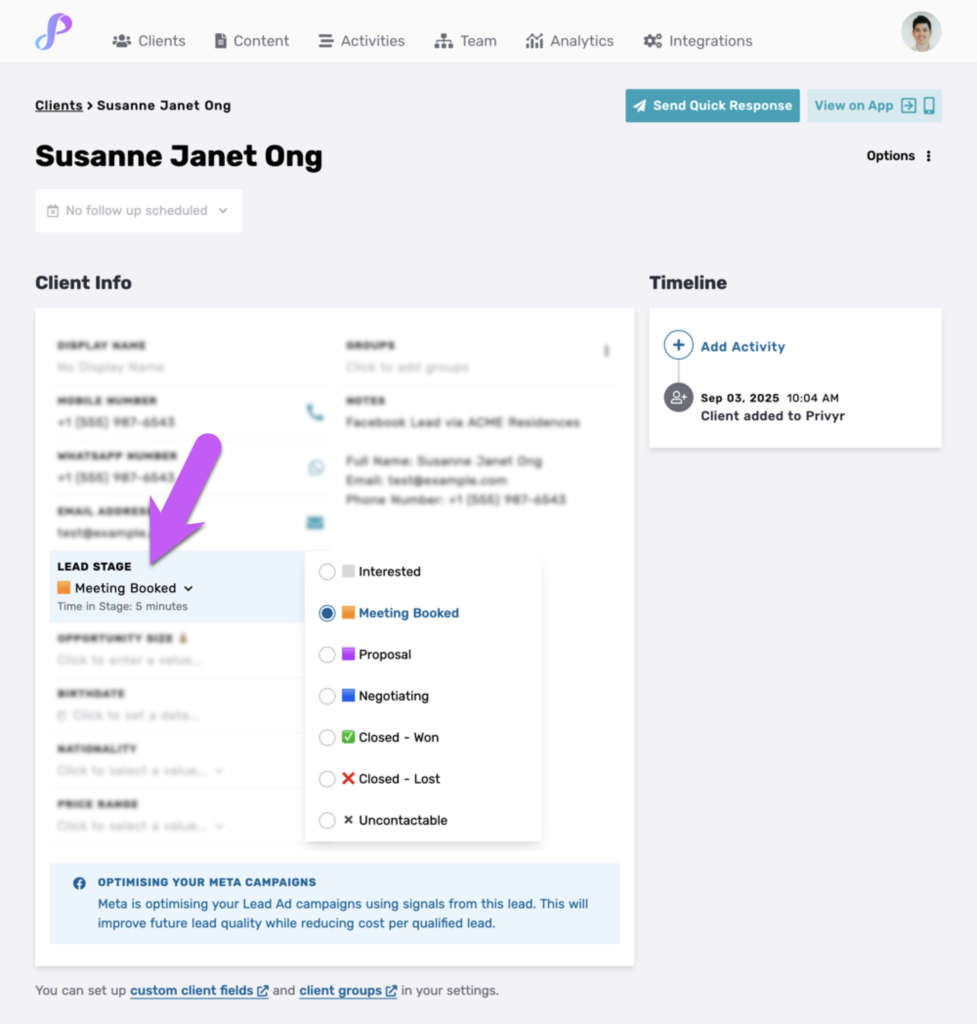
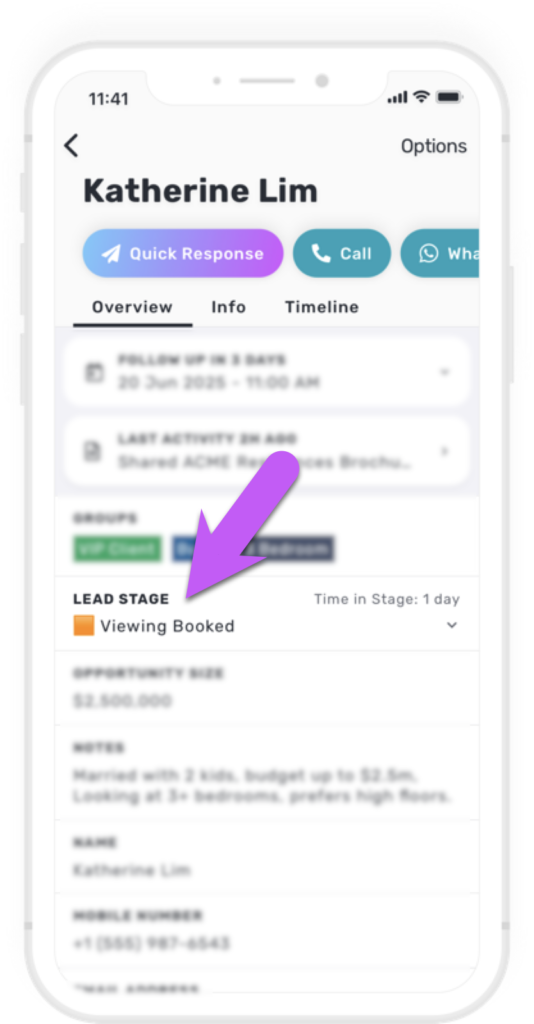
When viewing a Facebook lead in Privyr, click on the LEAD STAGE field and update it to the correct value (e.g. Interested, Meeting Booked, Closed Won, etc). This can be done from the Privyr mobile app and web version.
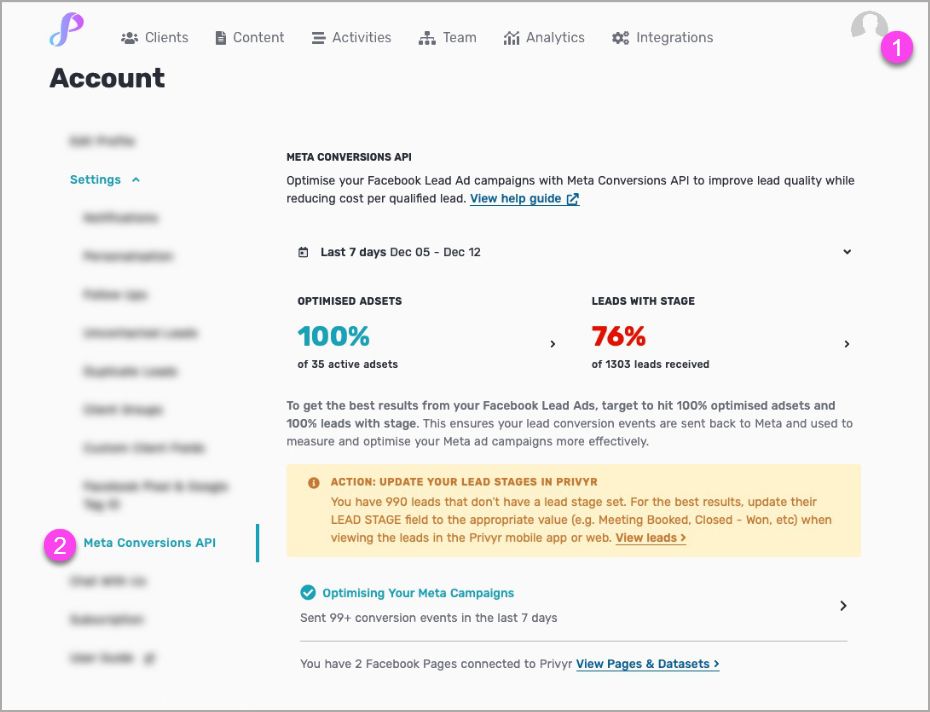
Keep updating the LEAD STAGE field as each lead progresses, to ensure the latest lead quality signals are sent to Meta. You can also update the LEAD STAGE field on your past Facebook leads, to give Meta more data to train their algorithms on.
Once you update the LEAD STAGE field, you’ll see a confirmation at the bottom of the client details screen that Privyr is optimising your Meta campaigns.
Note that Facebook does not keep your leads for more than 90 days, so any updates to leads older than 90 days won’t be used to optimise your campaigns.
You can also view the Meta Conversions API settings page on Privyr web to confirm that conversion events are being sent correctly.
Step 3. Optimise your Meta Ads for Conversion Leads
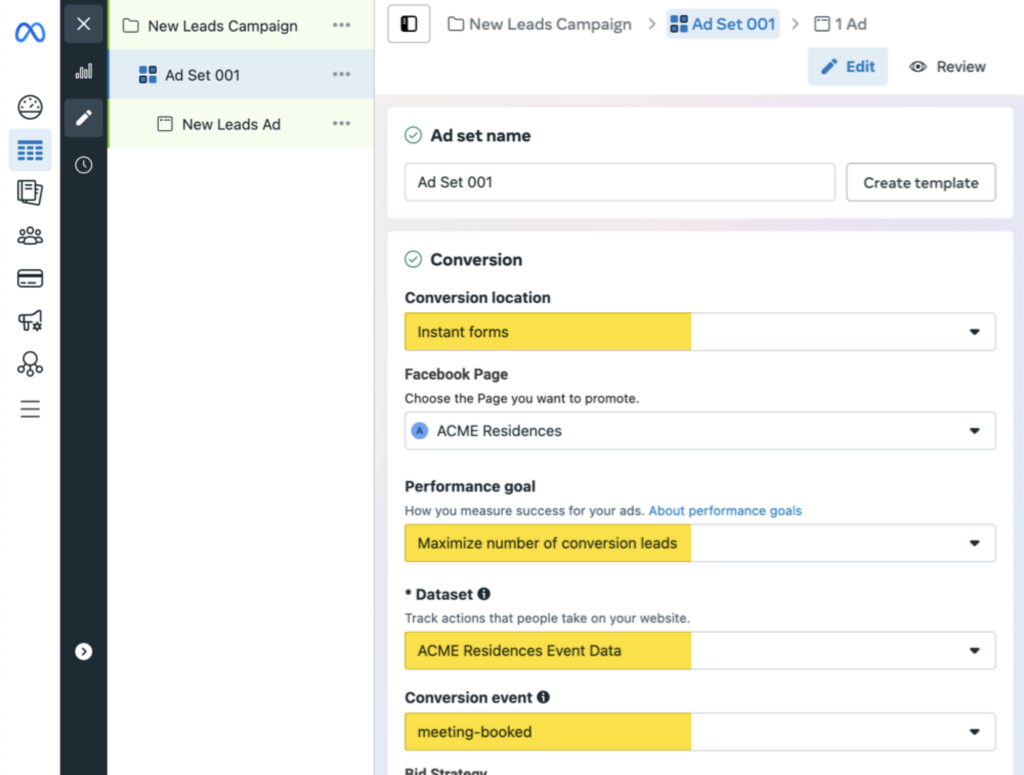
In Meta Ads Manager, create a new Ad Set with the following options:
- Conversion Location: ‘Instant forms’
- Performance Goal: ‘Maximise number of conversion leads’
- Note that you can’t change the Performance Goal for an Ad Set that has already started running. If you have existing Ad Sets, you can stop them and create/duplicate a new Ad Set to get conversion leads instead.
- Dataset: ‘<Page_Name> Event Data’
- For example, if your Facebook Page is named ACME Residences, the Dataset will be ‘ACME Residences Event Data’
- If you can’t find the relevant dataset, you may need to grant your Ad Account permissions to the dataset.
- Conversion Event: <Target_Lead_Stage>
- This is the lead stage you want to optimise on (e.g. Meeting Booked, Closed Won, etc).
- If you can’t find the lead stage you want to use, go to an existing lead from the same Facebook Page in Privyr and update the LEAD STAGE field to the one you want to use. You may need to wait a few minutes and refresh Meta Ads Manager for the new stage to appear.
- If you don’t see the ‘Conversion Event‘ dropdown on your Ad Set after correctly selecting the Performance Goal and Dataset, your Meta Ads Manager may not be updated to the latest version yet. In this case, you can configure your Sales Funnel instead.
Once done, your new Ad Set will be optimised to find higher-quality leads based on the lead quality signals you’re sending from Privyr.
Configuring your Sales Funnel on Meta Ads Manager
You can configure your sales funnel on Meta Events Manager to let Meta know which stages signal a quality lead, and the order of stages in your funnel. You must have admin access in your Meta Business Manager suite to complete this section.
- In Meta Ads Manager, go to Events Manager Overview
- Click on Datasets, then select the dataset called ‘<Page_Name> Event Data’
- Alternatively, you can go to the Meta Conversions API settings page on Privyr web, and click on the relevant Facebook Page at the bottom. This will open the relevant dataset in Meta Events Manager.
- On the Overview tab, click on Configure sales funnel
- If you’ve previously configured your Sales funnel, this option will be under CRM > Modify on the right column.
- Note that you may not be able to configure your sales funnel until you have updated the LEAD STAGE field in Privyr for real leads from ads on the same Facebook page. Updating test leads may not be enable funnel configuration.
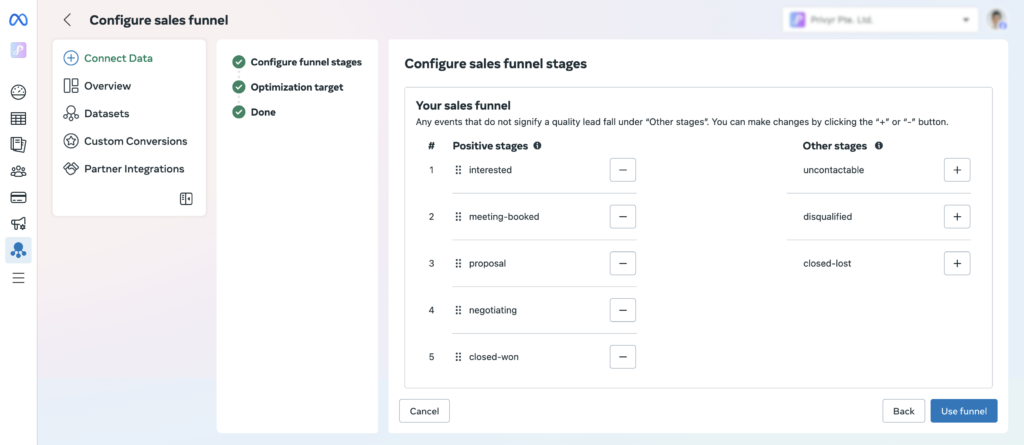
- Under Configure Funnel Stages, map the positive stages that relate to a quality lead, and drag and drop them to set the order of your funnel:
- Positive stages: Stages that signify a quality lead (e.g. interested, meeting-booked, proposal, negotiating, closed-won).
- Other stages: All remaining stages that don’t relate to a quality lead (e.g. uncontactable, closed-lost)
- Once done, click Use funnel
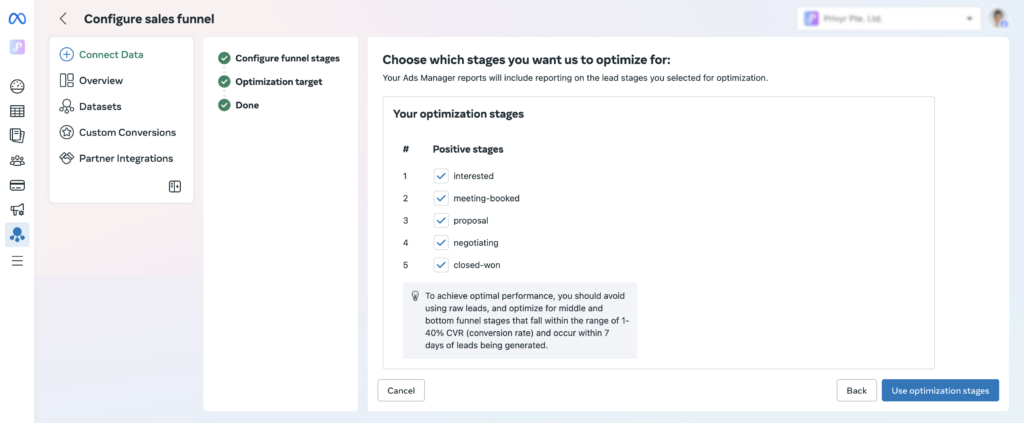
- Under Optimisation target, select the earliest positive stages you want to optimise for, and include any subsequent positive stages in your funnel.
- Once done, click Use optimisation stages, then Finish
Sharing Dataset Permissions with your Ad Account
If you aren’t able to find or select the correct Dataset (named ‘<Page_Name> Event Data’) when configuring your Ad Set for conversion leads optimisation, it may be because your Ad Account does not have permissions to access the dataset.
This can be solved by sharing the dataset with your ad account(s), via the following steps:
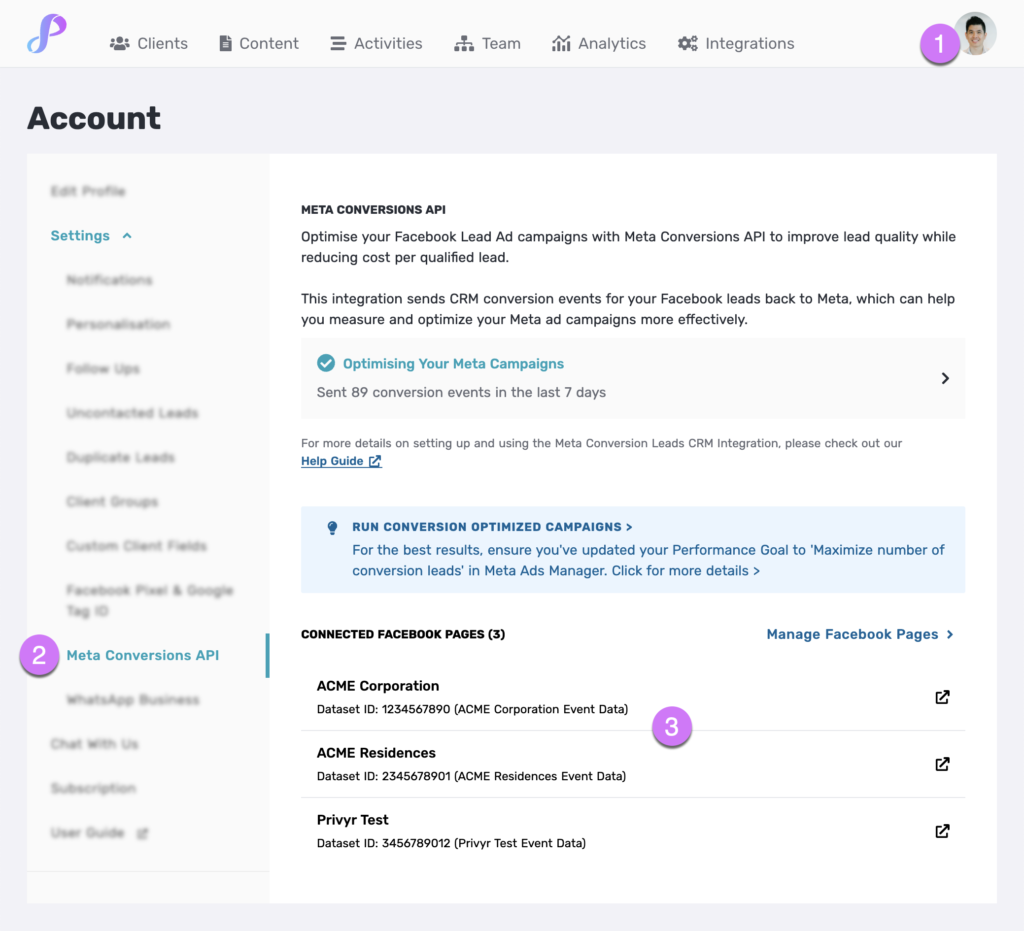
- On Privyr web, click on your Profile Photo > Settings under the top-right menu
- Under Settings in the left column, click on Meta Conversions API to open the Meta Conversions API settings page
- Under Connected Facebook Pages, click on the Facebook Page you want to run conversion-optimised ads on.
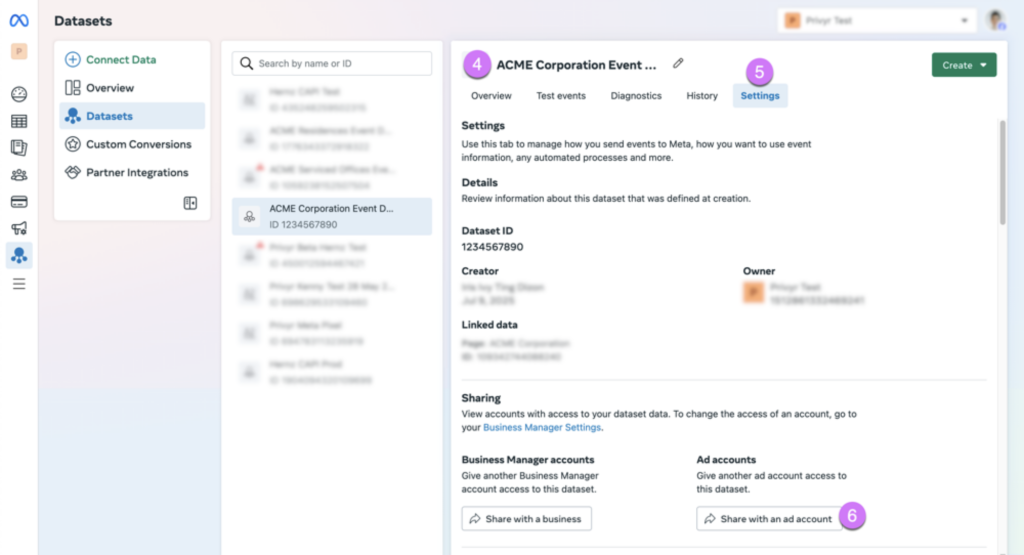
- This will open the dataset named ‘<Page_Name> Event Data’ directly in Meta Events Manager
- Click on the Settings tab of the dataset
- Under Sharing > Ad accounts, click on ‘Share with an ad account‘
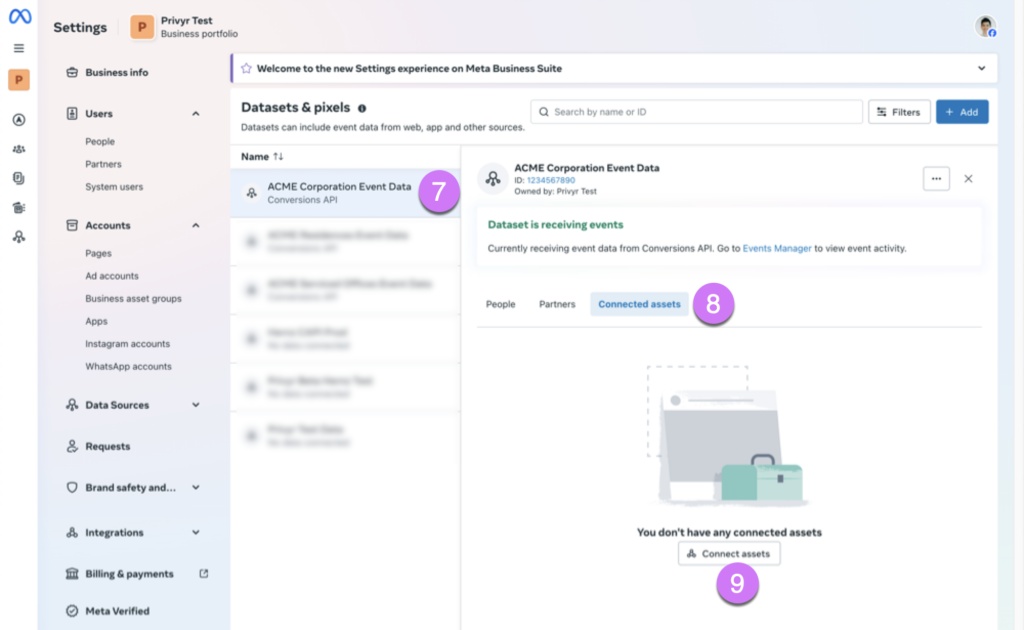
- This will lead you to Datasets & Pixels under your Business Portfolio. Re-select the correct dataset from the list if needed
- Click on the Connected Assets tab under the dataset
- Click on Connect Assets, then select Other Business Assets, check the ad account(s) that you want to grant access to, and click ‘Add’
- Once done, your Ad Account should have access to the dataset, and you can proceed to Optimise your Meta Ads for Conversion Leads