Introduction
You can set up WhatsApp Campaigns in Privyr to instantly message hundreds or thousands of leads from your connected WhatsApp Business number, without worrying about getting restricted or banned.
Whether you’re announcing a new product, promoting a limited-time offer, or following up with existing clients, campaigns make it easy to reach large groups of people quickly and safely.
You can use WhatsApp Campaigns to:
- Bulk send WhatsApp messages to hundreds or thousands of clients at once
- Announce new products, offers, or updates efficiently using pre-approved message templates
- Monitor campaign performance with detailed reports on delivery, reads, failures, and unsubscribes — all in one place
All messages are sent from your existing WhatsApp Business number, so you can view and continue all conversations directly in the WhatsApp Business app on your phone or laptop.
As Privyr is a verified Meta Business Partner, our WhatsApp Campaigns work through WhatsApp’s official APIs. This keeps your WhatsApp account and data safe while complying with the platform’s Terms of Service.
WhatsApp Campaigns are a part of a comprehensive WhatsApp Automation toolkit you can access with Privyr.
Setting up WhatsApp Campaigns
To start running WhatsApp Campaigns, simply connect your WhatsApp Business number to Privyr through your Facebook account. The setup process only takes around 5 to 10 minutes.
Steps to Connect:
- On the Web version of Privyr, go to the WhatsApp Campaigns setup page under your Automations tab > WhatsApp > WhatsApp Campaigns
- Click Set Up Campaign to get started
- Follow the guide on Connecting your WhatsApp Business number to Privyr to complete your setup

Once you’ve completed the steps, you can continue with Creating a WhatsApp Campaign.
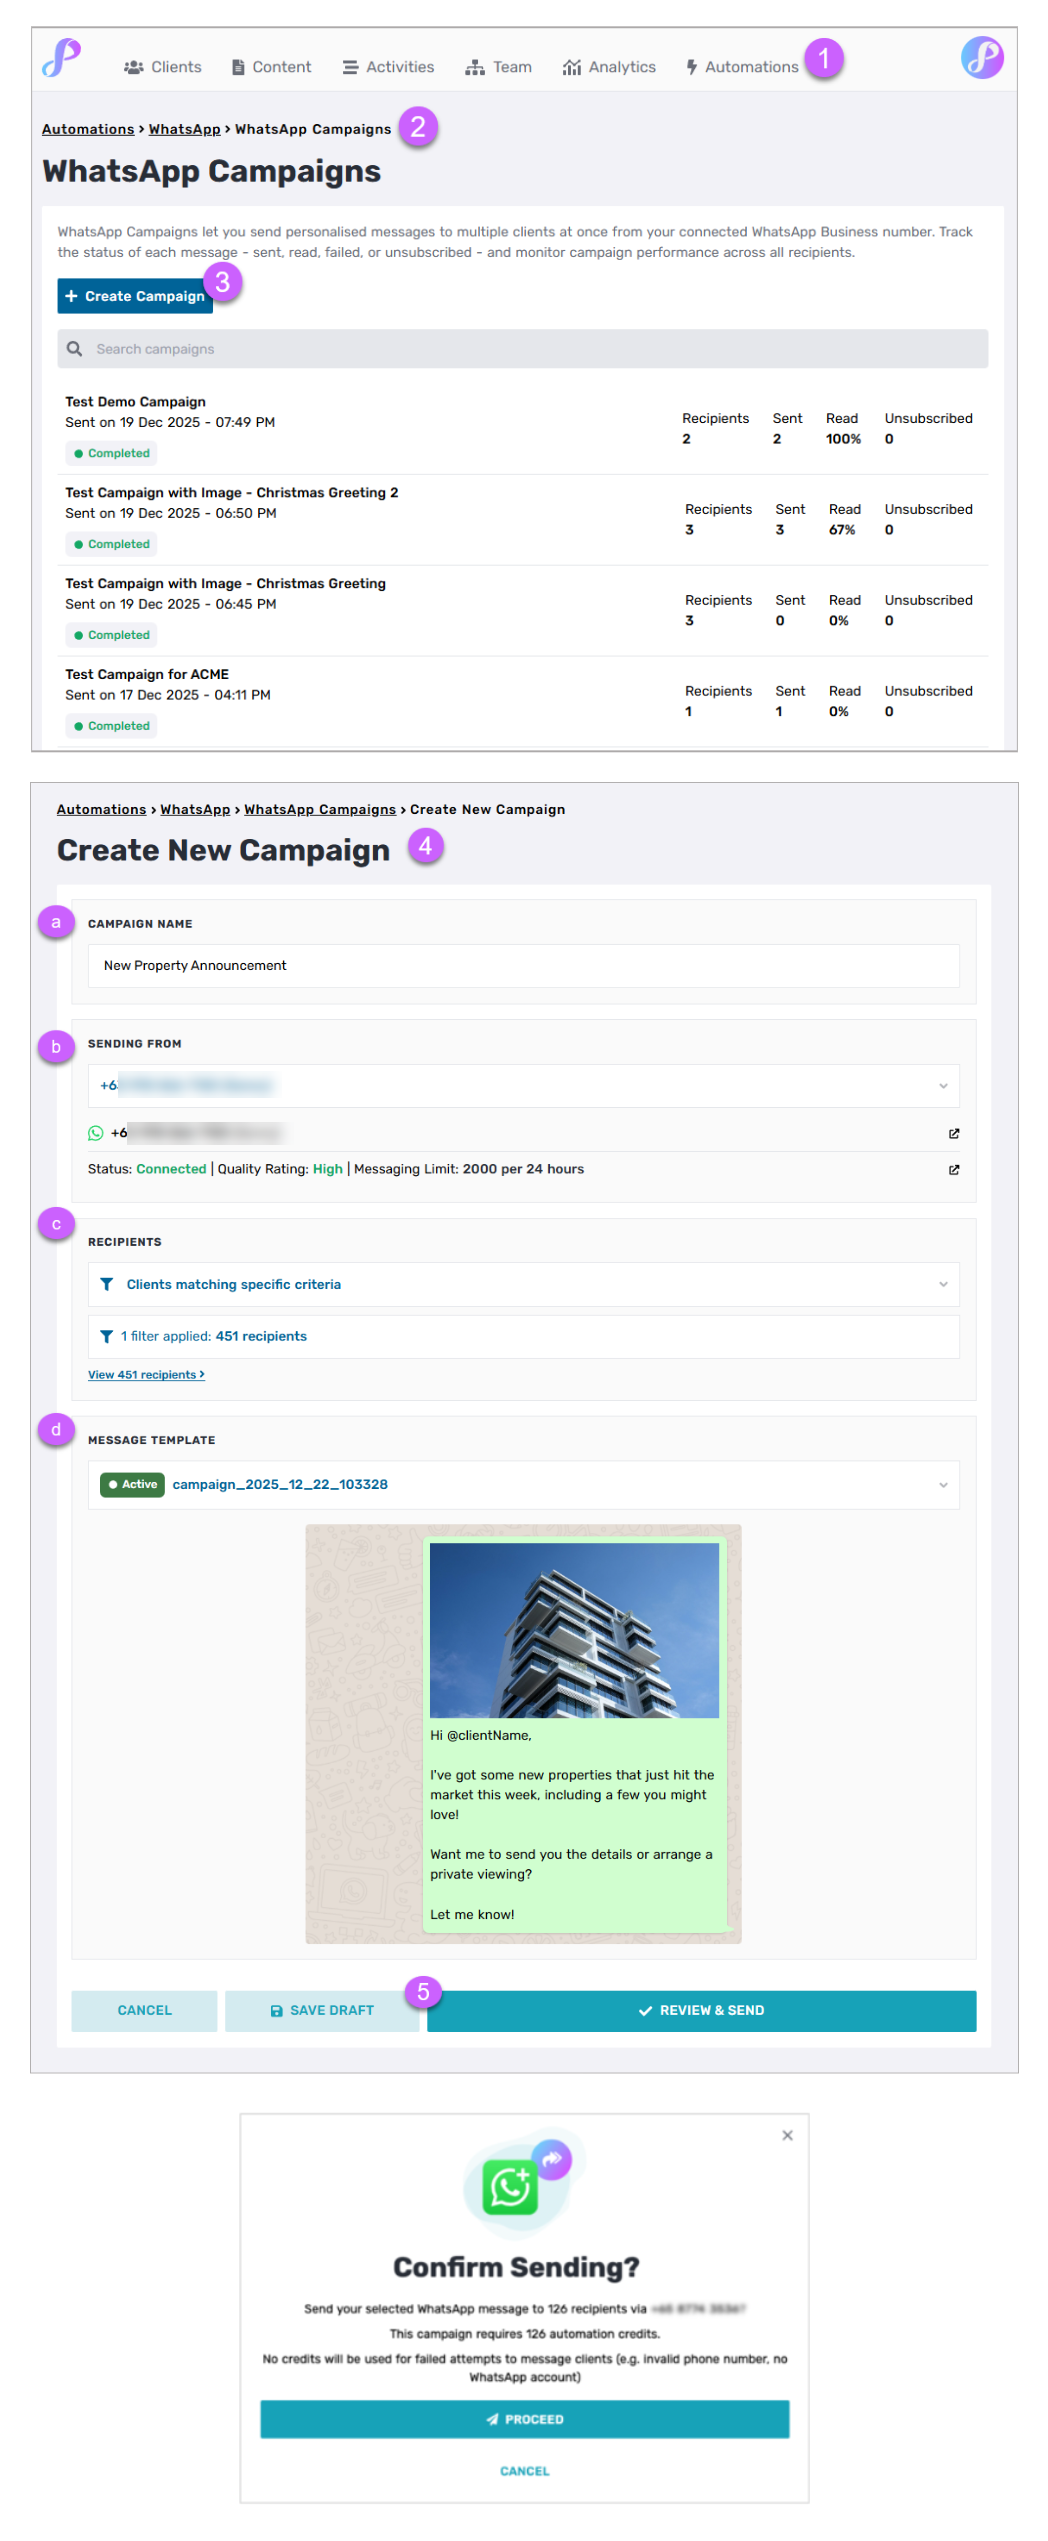
Creating a WhatsApp Campaign
To create a campaign, your WhatsApp Business phone number must be connected to Privyr. If you haven’t connected it yet, please follow the steps for Setting up WhatsApp Campaigns.
Once your setup is complete, you can create a campaign to bulk send messages to your clients. Here are the steps:
- Access the Campaigns Page
- On the Web version of Privyr, go to the WhatsApp Campaigns setup page under your Automations tab > WhatsApp
- Select WhatsApp Campaigns
- Create a New Campaign
- Click on “+ Create Campaign”
- Configure Your Campaign
- Campaign Name: Give your campaign a descriptive title
- Sending From: Select the WhatsApp Business number you want to send the message from
- Recipients: Choose to send to All Clients or filter for Clients matching specific criteria
- Message Template: Select an existing message template, or create a new one.
- If you are creating a new message template, you must first submit it to WhatsApp for approval before the campaign can go live. Approval may take up to 24 hours.
- You can use @clientName in the message, which will automatically personalise the message with your lead’s name.
- You can also attach an image to your message template, which will be sent to your leads together with the message.
- Save or Publish Your Campaign
- Save Draft: If your message template has not been approved yet, or if you wish to publish your campaign at a later time, you can save it as a draft.
- Review & Send: When you are ready to publish your campaign, click Review & Send, then Proceed to publish. Your message will be sent to all recipients with a valid WhatsApp number.
- To send your campaign, you must have enough automation credits for all recipients.
- Credits are only used for messages that are successfully sent. Failed messages do not consume credits.
Note that each successfully sent automated message uses 1 automation credit, which is charged based on your subscription plan. You will NOT get charged for messages that you manually send and receive on the WhatsApp Business app.
Monitoring your Campaign Performance
After your campaign is published, you can track its performance and see how each recipient was handled. Click on a campaign in the Campaigns List to view its details.
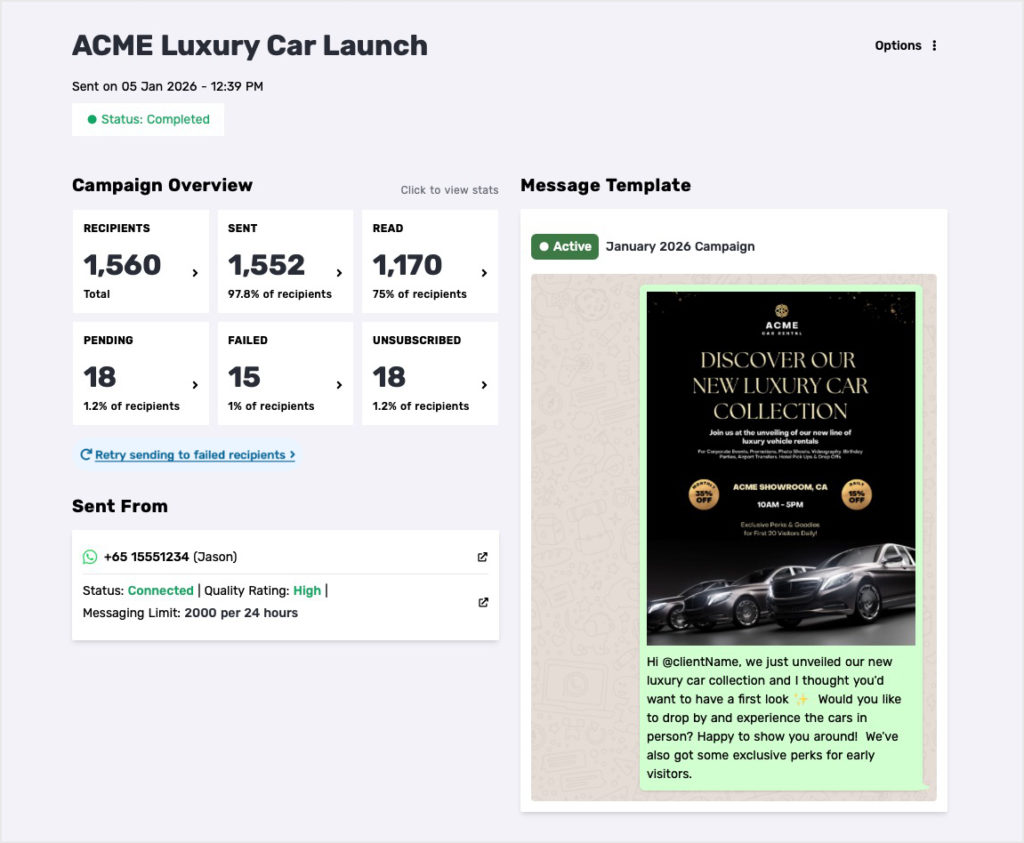
Campaign Details
- Campaign Overview
The overview shows you a summary of your campaign performance. You can click to view the recipients in each category.- Recipients: All clients you included when setting up this specific campaign
- Sent: Clients who successfully received the message (these messages consume automation credits, which are charged based on your subscription plan)
- Read: Clients who opened the message (this only counts recipients who have Read Receipts enabled)
- Pending: Clients whose messages are still being sent
- Failed: Clients whose messages could not be delivered
- Unsubscribed: Clients who opted out of receiving messages.
- Privyr’s WhatsApp Campaigns support unsubscribe functionality and automatically handle it so that recipients who opt out will no longer receive future marketing messages from you. You don’t need to take any action as Privyr manages this process for you automatically.
- Message Template
Preview the WhatsApp Template that was sent, and check its current status - Sent From
See which WhatsApp Business number was used to send the campaign, along with its status and quality rating - Retry sending to failed recipients
Retry sending the message to failed recipients or clients whose messages could not be delivered
You can click on any of the Campaign Overview cards to view the list of recipients in that category, along with each recipient’s:
- WhatsApp Sent Date
- WhatsApp number
- Privyr Status
- WhatsApp Status
- Client Details
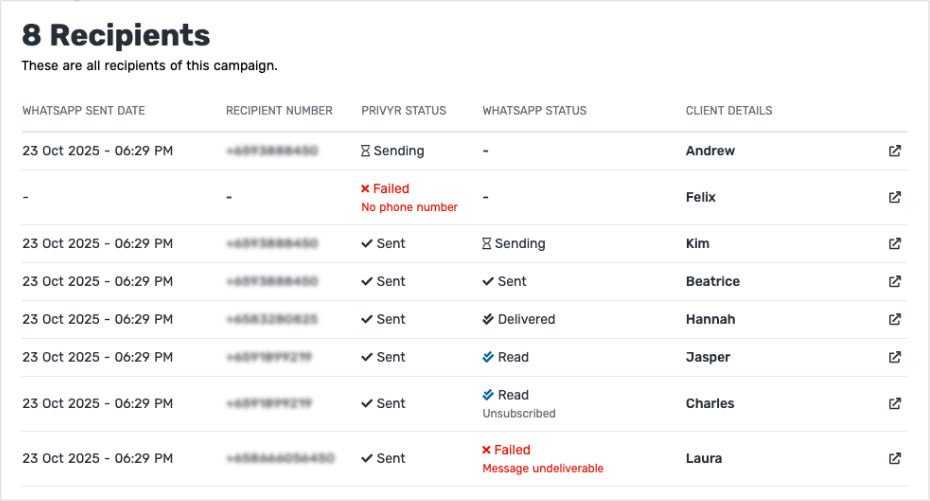
- Privyr Status
- Sending: Privyr is attempting to trigger the message
- Sent: Privyr successfully triggered the message. This does not guarantee delivery on WhatsApp
- Failed: Privyr could not trigger the message (e.g. no phone number)
- WhatsApp Status
- Sending: Message is still being delivered on WhatsApp’s end
- Sent / Delivered / Read: Message was successfully sent on WhatsApp, with delivery and read status shown if available
- Failed: WhatsApp could not deliver the message (e.g. no valid WhatsApp account found)
Unsubscribed WhatsApp Users
Privyr’s WhatsApp Campaigns support unsubscribe functionality and automatically handle it so that recipients who opt out will no longer receive future marketing messages from you. You don’t need to take any action as Privyr manages this process for you automatically.
This helps ensure compliance with WhatsApp policies while protecting your WhatsApp Business number quality and improving your overall WhatsApp Campaign efficiency.
When WhatsApp messages are sent to your recipients through Privyr’s WhatsApp Campaigns:
- Recipients see an info (ⓘ) icon next to the message in WhatsApp.
- By tapping the (ⓘ) button, they can choose options such as Interested or Not Interested, and then choose to Stop offers and announcements from {business_name}

- If your recipients choose to Stop offers and announcements from {business_name}, they are automatically unsubscribed from your future marketing campaigns (unless they opt back in), which is handled by both Privyr and WhatsApp.
Privyr automatically manages unsubscribed recipients for you:
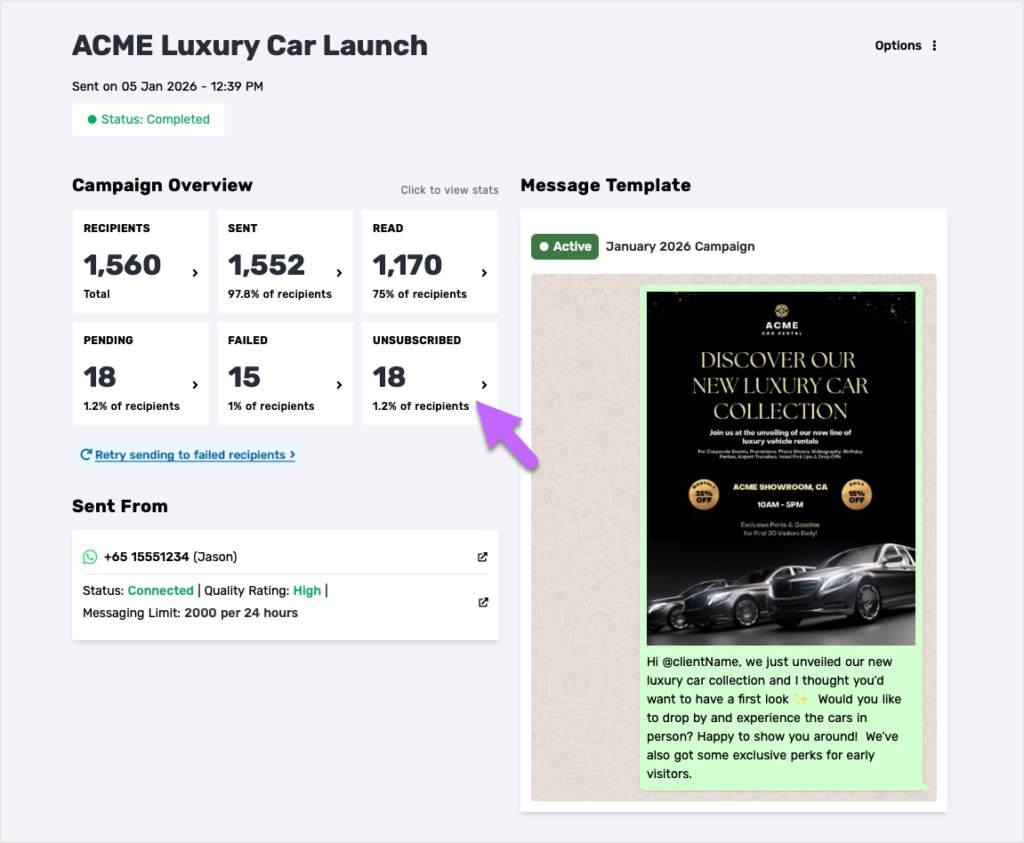
- Viewing Unsubscribed Recipients
You’ll see an UNSUBSCRIBED category in the Campaign Overview section. You can click UNSUBSCRIBED to view which recipients opted out.
- Automatic Exclusion from Future WhatsApp Campaigns
Any recipient who previously unsubscribed will be automatically excluded from future WhatsApp Campaigns. Privyr will not attempt to deliver the message if we already know the recipient opted out.
- Unsubscribing only applies to marketing messages or campaigns
Even if they unsubscribe, you can still message and respond to them manually via the WhatsApp Business mobile or desktop app. This ensures you can maintain relationships with interested leads while respecting marketing message preferences.
Managing your WhatsApp Connection
Refer to the relevant sections in our Using WhatsApp Business Automations with Privyr guide for detailed steps on disconnecting or troubleshooting your WhatsApp Business number.