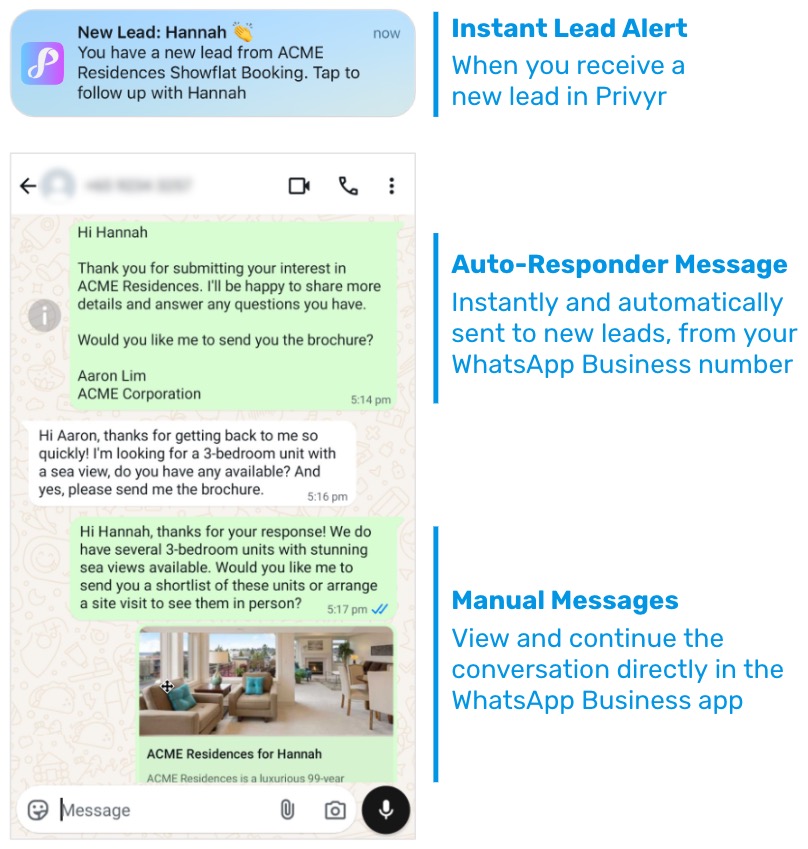
You can set up Privyr’s WhatsApp Auto-responder to instantly message new leads on WhatsApp. Any new lead you receive via your integrations will be immediately and automatically messaged from your own WhatsApp number, even when you’re busy or offline.
All messages are sent from your existing WhatsApp Business number, so you can view and continue all conversations directly in the WhatsApp Business app on your phone or laptop.
Privyr’s Auto-Responder works through WhatsApp’s official APIs (Privyr is a verified Meta Business Partner), keeping your WhatsApp account and data safe while complying with WhatsApp’s Terms and Conditions. Auto-Responder is a part of comprehensive WhatsApp Automation toolkit you can access with Privyr.
Connecting your WhatsApp Business Number to Privyr
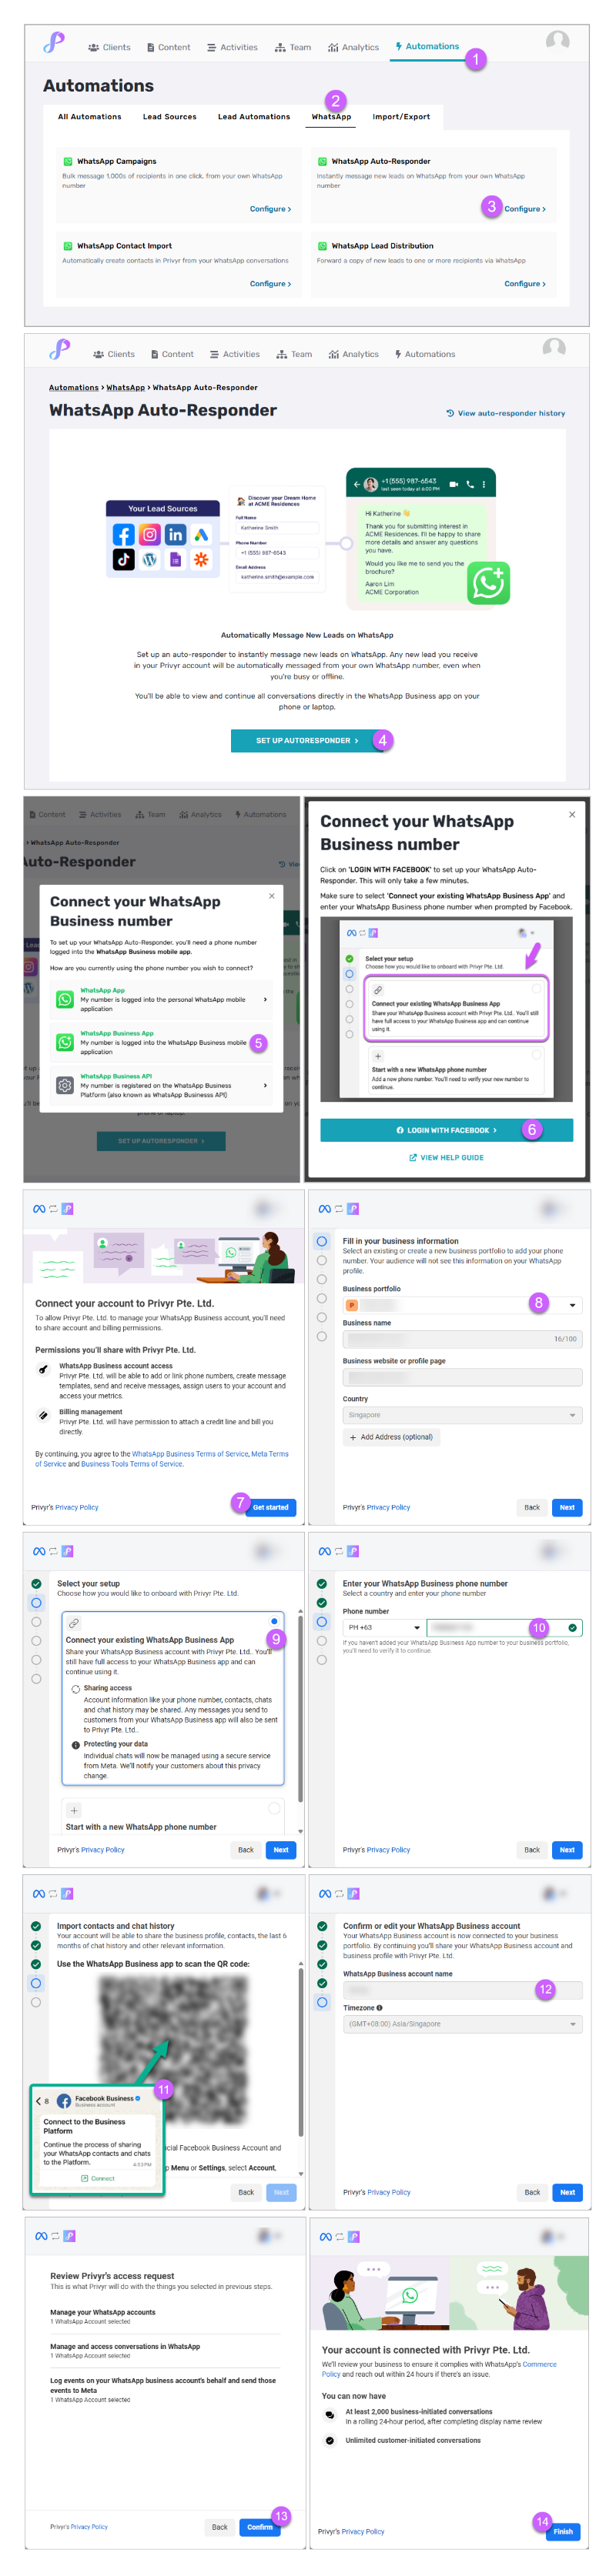
To use the WhatsApp Auto-Responder, connect your WhatsApp Business number to Privyr using your Facebook account. The setup process takes around 5-10 minutes.
Steps to Connect:
- On the Web version of Privyr, go to the WhatsApp Auto-Responder setup page under your Automations tab > WhatsApp > WhatsApp Auto-Responder
- Click Set Up Autoresponder
- Select WhatsApp Business App
- If you’re using the regular WhatsApp App, you’ll need to convert your phone number to a WhatsApp Business number by downloading the WhatsApp Business app on your phone and logging in with your existing number.
- If you’re using WhatsApp Business API, that number will not be compatible with Privyr. Please use a number that is logged into WhatsApp Business mobile app instead.
- Click Login with Facebook and sign in with a Facebook profile that has access to Meta Business Manager (if you have an existing Business Manager account)
- When prompted to Connect your account to Privyr Pte Ltd., click Get Started
- At the Fill in your business information prompt, select or create a Business Portfolio, then click Next
- When prompted to Select your setup, choose Connect your existing WhatsApp Business app, then click Next
- Note: The auto-responder only works with existing WhatsApp Business phone numbers. New numbers are not supported.
- When prompted to Enter your WhatsApp Business phone number, fill in your number then click Next. Verify the number if required.
- Note: Use a phone number that is logged into the WhatsApp Business app on your phone. If you’re using regular WhatsApp, you can just download the WhatsApp Business app and log in using your existing number.
- Do not select “Start with a WhatsApp API account” as it is incompatible with Privyr.
- When prompted to Share your contacts and chats, open the WhatsApp Business Application on your phone. You will receive a WhatsApp message from Facebook Business, prompting you to Scan QR code. Scan the code to grant Privyr permission to send WhatsApp messages via your account.
- At the Confirm or edit your WhatsApp Business account prompt, click Next
- At the Review Privyr’s access request prompt, click Continue
- Once complete, you will see that You’re now ready to chat with people on WhatsApp. Click Finish to return to Privyr.
Once you’ve completed the steps, you will see your Auto-Responder Setup Screen. After setting up your connection, please continue with Setting up your Auto-responder.
Setting Up WhatsApp Auto-Responder or Automated WhatsApp Sequence
To configure your auto-responder or Automated WhatsApp Sequence, your WhatsApp Business phone number must be connected to Privyr. If you have not set up the connection yet, please follow the guide on Connecting your WhatsApp Business number to Privyr.
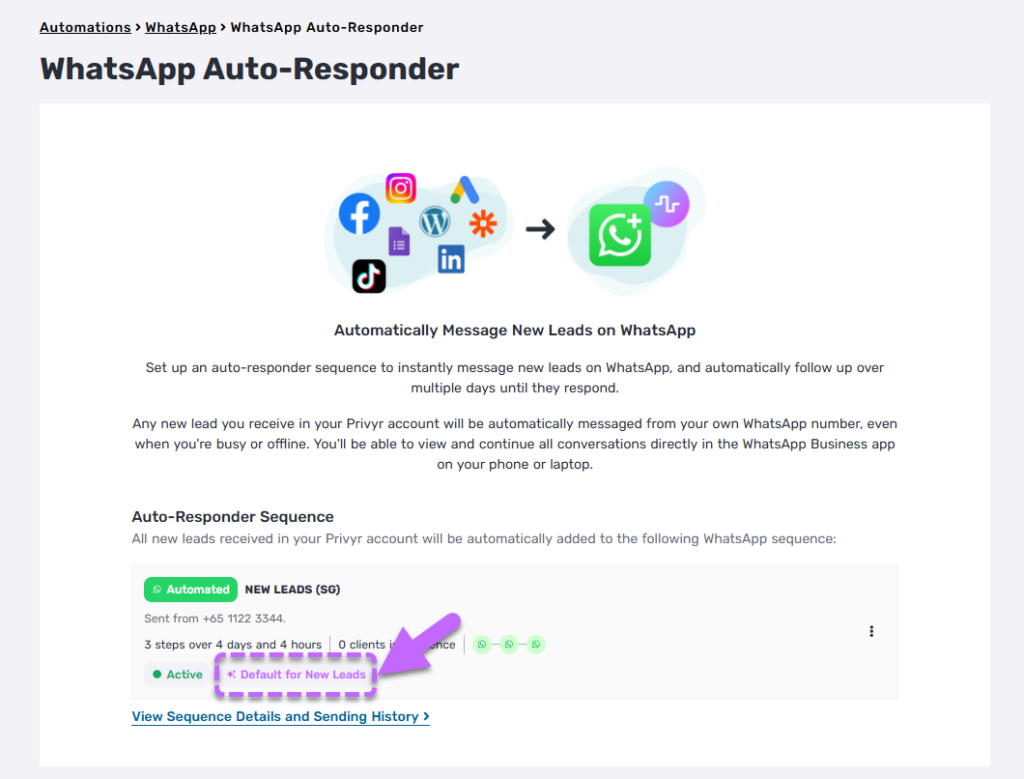
Once you’ve connected your WhatsApp Business number, you can set up your Automated WhatsApp Sequence to start messaging new leads:
- On the Web version of Privyr, go to the WhatsApp Auto-Responder setup page under your Automations tab > WhatsApp > WhatsApp Auto-Responder
- Click + CREATE DEFAULT SEQUENCE
- Select the WhatsApp Business Number you’d like to use to send the automated WhatsApp message
- Enter the Sequence Title and enter a Description about the main goal or use case of your sequence
- Click CREATE SEQUENCE
- Once the Automated WhatsApp Sequence is created, you can add a step to your Sequence by clicking on + ADD STEP
- Select Automatic WhatsApp Message
- Click + CREATE NEW TEMPLATE
- Customise the message you want to send to all new leads received via your integrations
- You can use @clientName in this message, which will automatically personalise the message with your lead’s name
- Click on SUBMIT FOR APPROVAL
- The message template will be submitted to WhatsApp for approval, which usually takes a few minutes up to 24 hours.
- Click ADD AS STEP
- You can add further steps where necessary, such as:
- Time Delay: Specify the number of hours or days to wait before the next step starts, and receive an alert when the time comes. This is useful for spacing out communications or giving clients time to respond.
- Automatic WhatsApp Message: Add another automated WhatsApp message that you’d like to send to the lead
- Once the steps have been created, you can tap on the “⋮” icon at each step to reorder the steps, edit them, or delete them.
- Click on Activate Sequence
- Review how many automation credits will be used for each client added to the Automated WhatsApp Sequence, then click Activate Sequence
- Credits will only be used for WhatsApp messages that are successfully sent.
- Set the Automated WhatsApp Sequence as the default sequence to automatically send the automated WhatsApp messages to new leads by clicking on Options, and then Set as default sequence
- That’s it! The “Default for New Leads” label will then be shown on the selected Automated WhatsApp Sequence on both the Sequences page and WhatsApp Auto-Responder page.
This Automated WhatsApp Sequence will be used to automatically send WhatsApp messages to all new leads received via your integrations once the message template gets approved by Meta. You can submit a test lead on your connected lead source(s) to ensure it is working as intended.
Note that each successful autoresponder message uses 1 automation credit, which is charged based on your subscription plan. You won’t get charged for messages that you manually send and receive on the WhatsApp Business app.


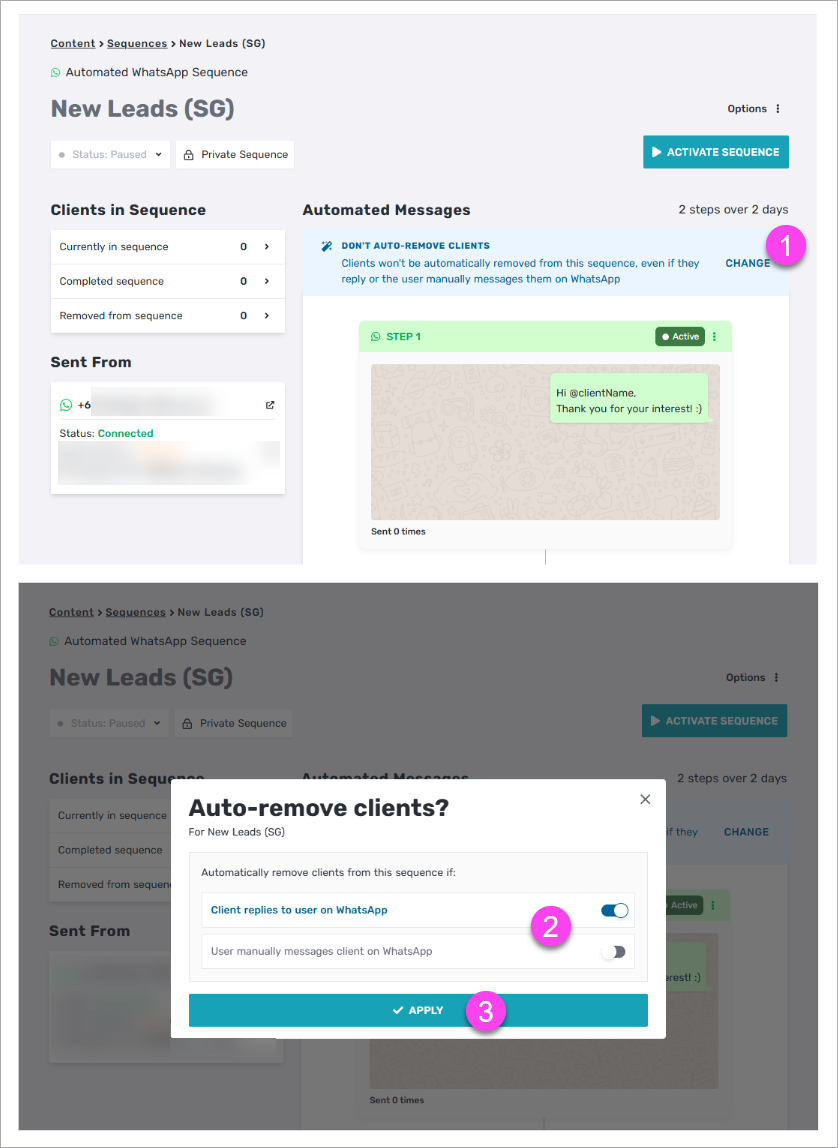
Auto-Remove Clients from the Automated WhatsApp Sequence
You can configure your Automated WhatsApp Sequence to automatically remove clients once a conversation has started, ensuring they don’t continue receiving automated messages unnecessarily. This helps prevent duplicate communication and keeps your interactions more personal and relevant.
In Privyr, clients can be automatically removed from an Automated WhatsApp Sequence if they meet either or both of the following conditions:
- Client replies to user on WhatsApp – If a client responds to any of your messages on WhatsApp, they will also be removed from the sequence. This ensures that once a real conversation begins, automation stops, and you can continue the interaction manually.
- User manually messages clients on WhatsApp – If you send a message to the client manually via WhatsApp, they will also be removed from the sequence. This prevents the client from receiving automated follow-ups while you are already communicating with them directly.
You can enable one or both of these conditions depending on your workflow preferences. For example:
- Enable both options if you want automation to stop as soon as any two-way interaction happens.
- Enable only the client-reply option if you still want automated follow-ups unless the client responds.
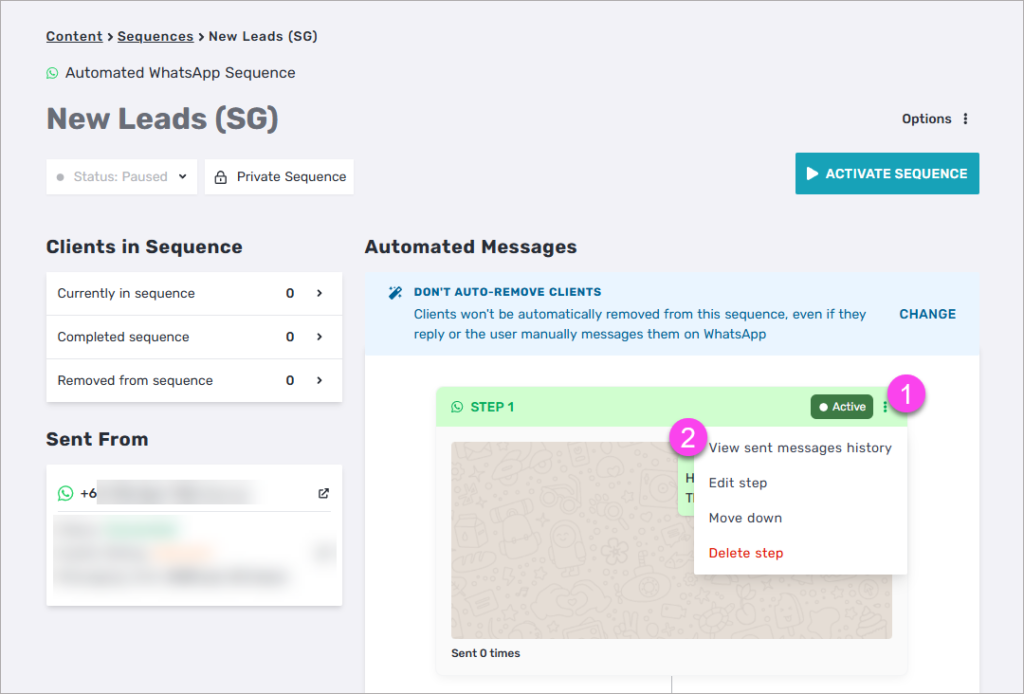
Viewing your Automated WhatsApp Sequence History
When viewing the Automated WhatsApp Sequence, click on the three-dotted (⋮) icon next to the Automatic WhatsApp Message step. Then, click on ‘View Sent Message History’.
You’ll see each lead you’ve messaged, along with the following details:
- WhatsApp Sent Date
- Recipient number
- Privyr Status
- WhatsApp Status
- Sending: Message is still being delivered on WhatsApp’s end
- Sent / Delivered / Read: Message was successfully sent on WhatsApp, with delivery and read status shown if available
- Failed: WhatsApp could not deliver the message (e.g. no valid WhatsApp account found)
- Client Details
Only leads that were successfully auto-responded to will be shown. Leads that weren’t messaged will not appear in this list. Click on a lead to view the full details of the lead.

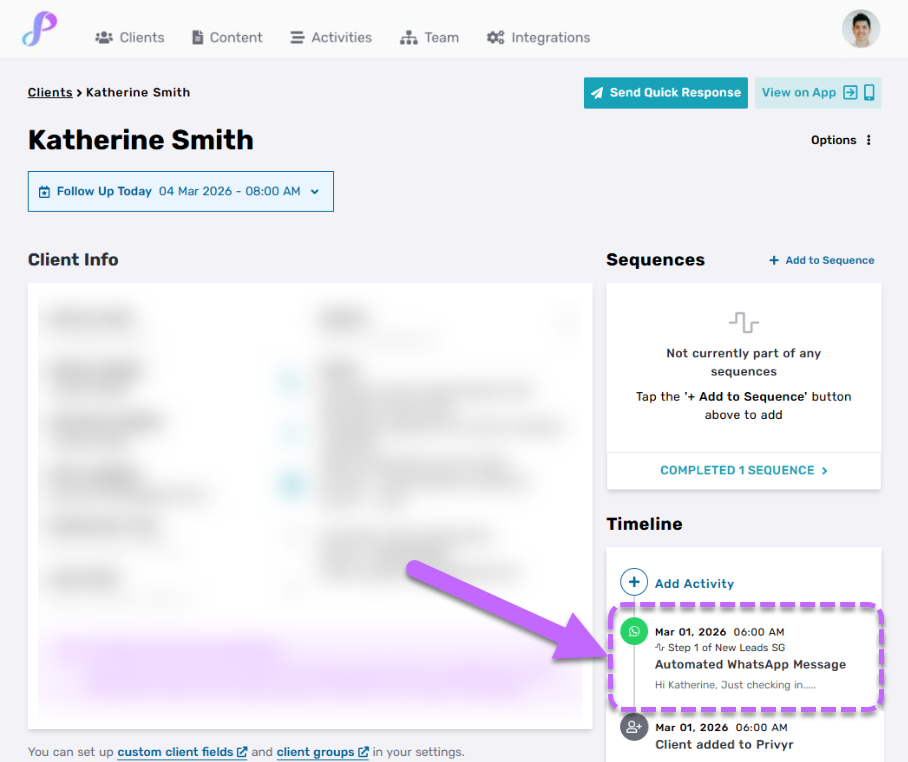
When viewing a client in Privyr, you’ll also see the Automated WhatsApp Message logged to the client’s timeline.
Managing your WhatsApp Connection
Refer to the relevant sections in our Using WhatsApp Business Automations with Privyr guide for detailed steps on disconnecting and troubleshooting your WhatsApp Business number.